C语言中access/_access函数的使用实例详解
在Linux下,access函数的声明在<unistd.h>文件中,声明如下:
int access(const char *pathname, int mode);
access函数用来判断指定的文件或目录是否存在(F_OK),已存在的文件或目录是否有可读(R_OK)、可写(W_OK)、可执行(X_OK)权限。F_OK、R_OK、W_OK、X_OK这四种方式通过access函数中的第二个参数mode指定。如果指定的方式有效,则此函数返回0,否则返回-1。
在Windows下没有access函数,但在<io.h>文件中有_access函数,声明如下:
int _access(const char* _Filename, int _AccessMode);
windows下的函数_access与linux下的access函数功能类似,用来判断指定的文件或目录是否仅存在(00),已存在的文件或目录是否有仅读(04)、仅写(02)、既可读又可写(06)权限。这四种方式通过_access函数中的第二个参数mode指定,如果mode传入的值不是0或2或4或6,调用此函数则会crash。如果指定的方式有效,则此函数返回0,否则返回-1。
以下是测试代码(access.cpp):
#include "access.hpp"
#include <iostream>
#include <vector>
#include <string>
#ifdef _MSC_VER
#include <io.h>
#else
#include <unistd.h>
#endif
namespace access_ {
int test_access_1()
{
#ifdef _MSC_VER
const std::string path{ "E:/GitCode/Messy_Test/" };
const std::vector<const std::string> names {"testdata", ".gitignore", "src", "invalid"};
for (auto& name : names) {
const std::string tmp = path + name;
fprintf(stdout, "file or directory name: \"%s\": ", name.c_str());
if (_access(tmp.c_str(), 0) == 0) fprintf(stdout, "exist, ");
else fprintf(stdout, "not exist, ");
if (_access(tmp.c_str(), 4) == 0) fprintf(stdout, "only has read premission, ");
else fprintf(stdout, "does not have read premission, ");
if (_access(tmp.c_str(), 2) == 0) fprintf(stdout, "only has write premission, ");
else fprintf(stdout, "does not have write premission, ");
if (_access(tmp.c_str(), 6) == 0) fprintf(stdout, "has both read and write premission\n");
else fprintf(stdout, "has neither read nor write premission\n");
}
#else
const std::vector<const char*> names {"testdata", "CMakeLists.txt", "build.sh", "invalid"};
for (auto name : names) {
fprintf(stdout, "file or directory name: \"%s\": ", name);
if (access(name, F_OK) == 0) fprintf(stdout, "exist, ");
else fprintf(stdout, "not exist, ", name);
if (access(name, R_OK) == 0) fprintf(stdout, "has read premission, ");
else fprintf(stdout, "does not have read premission, ");
if (access(name, W_OK) == 0) fprintf(stdout, "has write premission, ");
else fprintf(stdout, "does not have write premission, ");
if (access(name, X_OK) == 0) fprintf(stdout, "has execute premission\n");
else fprintf(stdout, "does not have execute premission\n");
}
#endif
return 0;
}
} // namespace access_
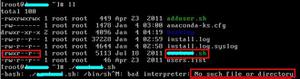
在Linux下的执行结果如下:

GitHub:https://github.com//fengbingchun/Messy_Test
总结
以上所述是小编给大家介绍的C语言中access/_access函数的使用实例详解,希望对大家有所帮助,如果大家有任何疑问请给我留言,小编会及时回复大家的。在此也非常感谢大家对网站的支持!
如果你觉得本文对你有帮助,欢迎转载,烦请注明出处,谢谢!
以上是 C语言中access/_access函数的使用实例详解 的全部内容, 来源链接: utcz.com/p/244540.html