Android启动页用户相关政策弹框的实现代码
现在Android上架各大平台都要求App首页添加一个弹框,显示用户协议以及一些隐私政策,不然上架各大平台,现在就来简单的实现一下这个对话框
既然是一个对话框,那我们就先来简单的封装一个对话框,这样方便后续的一些修改:
widget_user_dialog.xml
<?xml version="1.0" encoding="utf-8"?>
<androidx.appcompat.widget.LinearLayoutCompat
xmlns:android="http://schemas.android.com/apk/res/android"
android:orientation="vertical"
android:background="@drawable/bg_sprint_border"
android:layout_width="wrap_content"
android:layout_height="wrap_content">
<androidx.appcompat.widget.LinearLayoutCompat
android:background="@drawable/bg_sprint_border"
android:orientation="vertical"
android:layout_marginLeft="25dp"
android:layout_marginRight="25dp"
android:layout_width="wrap_content"
android:layout_height="wrap_content">
<androidx.appcompat.widget.AppCompatTextView
android:id="@+id/tv_sprint_title"
android:text="Sprint"
android:padding="12dp"
android:layout_gravity="center_horizontal"
android:textSize="18sp"
android:textColor="@color/colorBlack"
android:textStyle="bold"
android:layout_width="wrap_content"
android:layout_height="wrap_content"/>
<androidx.appcompat.widget.AppCompatTextView
android:id="@+id/tv_sprint_content"
android:text="我是内容我是内容我是内容我是内容我是内容我是内容我是内容我是内容我是内容我是内容我是内容我是内容我是内容我是内容我是内容我是内容"
android:layout_gravity="center_horizontal"
android:padding="8dp"
android:textSize="14sp"
android:textColor="@color/colorBlack"
android:layout_width="wrap_content"
android:layout_height="wrap_content"/>
<View
android:layout_width="match_parent"
android:layout_height="0.5dp"
android:background="@color/colorLightGrey_1" />
<LinearLayout
android:layout_width="match_parent"
android:layout_height="40dp"
android:layout_marginBottom="0.1dp"
android:layout_marginLeft="0.1dp"
android:layout_marginRight="0.1dp"
android:orientation="horizontal">
<TextView
android:id="@+id/tv_dialog_no"
android:layout_width="0dp"
android:layout_height="fill_parent"
android:layout_weight="1"
android:background="@drawable/bg_sprint_cancle"
android:gravity="center_horizontal|center_vertical"
android:text="取消"
android:textSize="15sp"
android:textColor="@color/colorBlack"/>
<View
android:layout_width="0.5dp"
android:layout_height="match_parent"
android:background="@color/colorLightGrey_1" />
<!--android:background="@drawable/message_dialog_bottom_right"-->
<TextView
android:id="@+id/tv_dialog_ok"
android:layout_width="0dp"
android:layout_height="fill_parent"
android:layout_weight="1"
android:gravity="center_horizontal|center_vertical"
android:text="确定"
android:textSize="15sp"
android:background="@drawable/bg_sprint_agreen_commit"
android:textColor="@color/colorFont_0098FA" />
</LinearLayout>
</androidx.appcompat.widget.LinearLayoutCompat>
</androidx.appcompat.widget.LinearLayoutCompat>
drawable文件这里就不放出来了,不懂得可以问问度娘,主要就是设置个圆角,然后还有颜色
AgreementDialog.java
这里就是封装的对话框,包括标题、确定、取消等一些控件的封装,主要我们用SpannableString 这个来实现内容的编辑,可以设置指定内容的演示颜色、大小以及样式等等,需求有需要的话大家可以自己扩展一下
import android.app.Dialog;
import android.content.Context;
import android.os.Bundle;
import android.text.SpannableString;
import android.text.TextUtils;
import android.text.method.LinkMovementMethod;
import android.view.View;
import android.view.Window;
import android.widget.TextView;
import androidx.annotation.NonNull;
import com.huantek.module.sprint.R;
public class AgreementDialog extends Dialog {
private Context context;
private TextView tv_tittle;
private TextView tv_content;
private TextView tv_dialog_ok;
private TextView tv_dialog_no;
private String title;
private SpannableString str;
private View.OnClickListener mClickListener;
private String btnName;
private String no;
private String strContent;
public AgreementDialog(@NonNull Context context) {
super(context);
}
//构造方法
public AgreementDialog(Context context, SpannableString content, String strContent, String title) {
super(context, R.style.MyDialog);
this.context = context;
this.str = content;
this.strContent = strContent;
this.title = title;
}
public AgreementDialog setOnClickListener(View.OnClickListener onClick) {
this.mClickListener = onClick;
return this;
}
public AgreementDialog setBtName(String yes, String no) {
this.btnName = yes;
this.no = no;
return this;
}
@Override
protected void onCreate(Bundle savedInstanceState) {
super.onCreate(savedInstanceState);
requestWindowFeature(Window.FEATURE_NO_TITLE);
setContentView(R.layout.widget_sprint_user_dialog);
initView();
}
private void initView() {
tv_dialog_ok = (TextView) findViewById(R.id.tv_dialog_ok);
tv_tittle = (TextView) findViewById(R.id.tv_sprint_title);
tv_content = (TextView) findViewById(R.id.tv_sprint_content);
tv_dialog_no = (TextView) findViewById(R.id.tv_dialog_no);
tv_content.setMovementMethod(LinkMovementMethod.getInstance());
if (!TextUtils.isEmpty(btnName)) {
tv_dialog_ok.setText(btnName);
}
if (!TextUtils.isEmpty(no)) {
tv_dialog_no.setText(no);
}
//设置点击对话框外部不可取消
this.setCanceledOnTouchOutside(false);
this.setCancelable(true);
tv_dialog_ok.setOnClickListener(new View.OnClickListener() {
@Override
public void onClick(View arg0) {
AgreementDialog.this.dismiss();
if (mClickListener != null) {
mClickListener.onClick(tv_dialog_ok);
}
}
});
tv_dialog_no.setOnClickListener(new View.OnClickListener() {
@Override
public void onClick(View arg0) {
AgreementDialog.this.dismiss();
if (mClickListener != null) {
mClickListener.onClick(tv_dialog_no);
}
}
});
if (TextUtils.isEmpty(strContent)) {
tv_content.setText(str);
} else {
tv_content.setText(strContent);
}
tv_tittle.setText(title);
}
}
对于这种对话框,并不是每次都需要弹出来,只有用户在第一次安装的时候才会弹出,后面启动的话就无需在弹出来了,所以我们要进行一个判断,判断用户是不是第一次使用
先定义一个boolean的值,用于判断用户是不是第一次使用
//是否是第一次使用
private boolean isFirstUse;
这里可以用SharedPreferences来进行保存这个值是false还是true
SharedPreferences preferences = getSharedPreferences("isFirstUse", MODE_PRIVATE);
//默认设置为true
isFirstUse = preferences.getBoolean("isFirstUse", true);
如果是第一次使用,那我们就设置对应的标题、内容等相关值,如果不是就不做操作
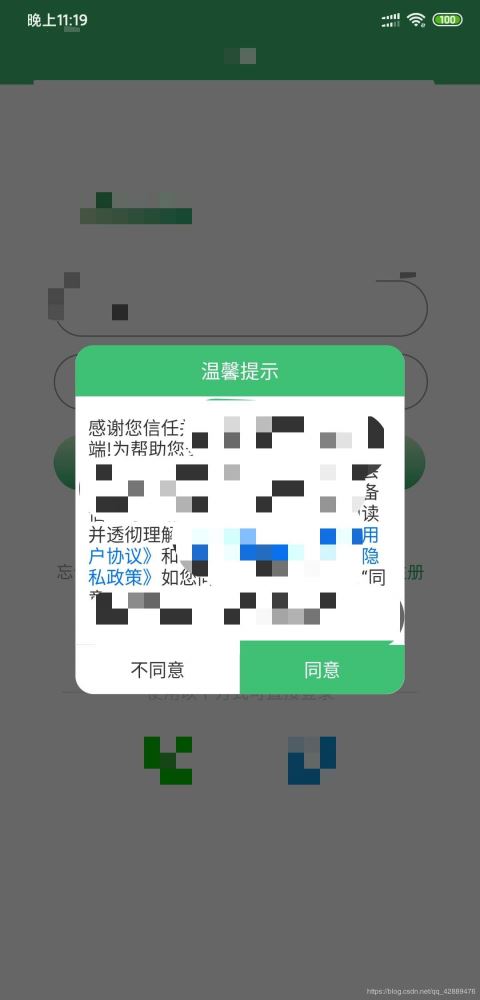
new AgreementDialog(context, generateSp("感谢您信任并使用" + AppUtils.getAppName(this)+"XXXXXX《"+ AppUtils.getAppName(this) + "用户协议》" +
"和《"+ AppUtils.getAppName(this) + "隐私政策》" +
"XXXXX"),null,"温馨提示").setBtName("同意", "不同意")
.setOnClickListener(new View.OnClickListener() {
@Override
public void onClick(View v) {
switch (v.getId()){
case R.id.tv_dialog_ok:
//实例化Editor对象
SharedPreferences.Editor editor = preferences.edit();
//存入数据
editor.putBoolean("isFirstUse", false);
//提交修改
editor.commit();
//这里是一开始的申请权限,不懂可以看我之前的博客
requirePermission();
break;
case R.id.tv_dialog_no:
finish();
break;
}
}
}).show();
} else {
}
记得一定要.show(),不然对话框不会弹出来,这里面的重点部分在于generateSp()这个方法,这里就是为了设置“用户协议”这几个字体的颜色
private SpannableString generateSp(String text) {
//定义需要操作的内容
String high_light_1 = "《用户协议》";
String high_light_2 = "《隐私政策》";
SpannableString spannableString = new SpannableString(text);
//初始位置
int start = 0;
//结束位置
int end;
int index;
//indexOf(String str, int fromIndex): 返回从 fromIndex 位置开始查找指定字符在字符串中第一次出现处的索引,如果此字符串中没有这样的字符,则返回 -1。
//简单来说,(index = text.indexOf(high_light_1, start)) > -1这部分代码就是为了查找你的内容里面有没有high_light_1这个值的内容,并确定它的起始位置
while ((index = text.indexOf(high_light_1, start)) > -1) {
//结束的位置
end = index + high_light_1.length();
spannableString.setSpan(new QMUITouchableSpan(this.getResources().getColor(R.color.colorFont_0098FA), this.getResources().getColor(R.color.colorFont_0098FA),
this.getResources().getColor(R.color.colorWhite), this.getResources().getColor(R.color.colorWhite)) {
@Override
public void onSpanClick(View widget) {
// 点击用户协议的相关操作,可以使用WebView来加载一个网页
}
}, index, end, Spanned.SPAN_INCLUSIVE_EXCLUSIVE);
start = end;
}
start = 0;
while ((index = text.indexOf(high_light_2, start)) > -1) {
end = index + high_light_2.length();
spannableString.setSpan(new QMUITouchableSpan(this.getResources().getColor(R.color.colorFont_0098FA), this.getResources().getColor(R.color.colorFont_0098FA),
this.getResources().getColor(R.color.colorWhite), this.getResources().getColor(R.color.colorWhite)) {
@Override
public void onSpanClick(View widget) {
// 点击隐私政策的相关操作,可以使用WebView来加载一个网页
}
}, index, end, Spanned.SPAN_INCLUSIVE_EXCLUSIVE);
start = end;
}
//最后返回SpannableString
return spannableString;
}
最后就是QMUITouchableSpan.java
用来触发用户点击时的相关操作
/**
* Created by Sammi on 2020/2/27.
* /**
* 可 Touch 的 Span,在 {@link #setPressed(boolean)} 后根据是否 pressed 来触发不同的UI状态
* <p>
* 提供设置 span 的文字颜色和背景颜色的功能, 在构造时传入
* </p>
*/
public abstract class QMUITouchableSpan extends ClickableSpan {
private boolean mIsPressed;
@ColorInt private int mNormalBackgroundColor;
@ColorInt private int mPressedBackgroundColor;
@ColorInt private int mNormalTextColor;
@ColorInt private int mPressedTextColor;
private boolean mIsNeedUnderline = false;
public abstract void onSpanClick(View widget);
@Override
public final void onClick(View widget) {
if (ViewCompat.isAttachedToWindow(widget)) {
onSpanClick(widget);
}
}
public QMUITouchableSpan(@ColorInt int normalTextColor,
@ColorInt int pressedTextColor,
@ColorInt int normalBackgroundColor,
@ColorInt int pressedBackgroundColor) {
mNormalTextColor = normalTextColor;
mPressedTextColor = pressedTextColor;
mNormalBackgroundColor = normalBackgroundColor;
mPressedBackgroundColor = pressedBackgroundColor;
}
public int getNormalBackgroundColor() {
return mNormalBackgroundColor;
}
public void setNormalTextColor(int normalTextColor) {
mNormalTextColor = normalTextColor;
}
public void setPressedTextColor(int pressedTextColor) {
mPressedTextColor = pressedTextColor;
}
public int getNormalTextColor() {
return mNormalTextColor;
}
public int getPressedBackgroundColor() {
return mPressedBackgroundColor;
}
public int getPressedTextColor() {
return mPressedTextColor;
}
public void setPressed(boolean isSelected) {
mIsPressed = isSelected;
}
public boolean isPressed() {
return mIsPressed;
}
public void setIsNeedUnderline(boolean isNeedUnderline) {
mIsNeedUnderline = isNeedUnderline;
}
@Override
public void updateDrawState(TextPaint ds) {
ds.setColor(mIsPressed ? mPressedTextColor : mNormalTextColor);
ds.bgColor = mIsPressed ? mPressedBackgroundColor
: mNormalBackgroundColor;
ds.setUnderlineText(mIsNeedUnderline);
}
}
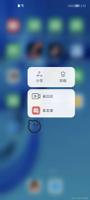
附上效果图
总结
到此这篇关于Android启动页用户相关政策弹框的实现的文章就介绍到这了,更多相关Android启动页用户相关政策弹框的实现内容请搜索以前的文章或继续浏览下面的相关文章希望大家以后多多支持!
以上是 Android启动页用户相关政策弹框的实现代码 的全部内容, 来源链接: utcz.com/p/242760.html