Android studio开发小型对话机器人app(实例代码)
前言
偶然在网上看到一个免费机器人接口,所以生此想法,接口地址:http://api.qingyunke.com/,Android开发比爬虫要繁琐得多,所以本文我将细说接口的调用方法,读者可根据思路去网上找一些免费接口拿来玩,其他代码一带而过,详细源码见文末。
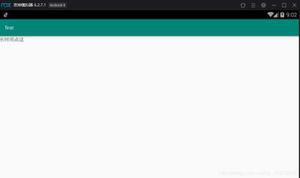
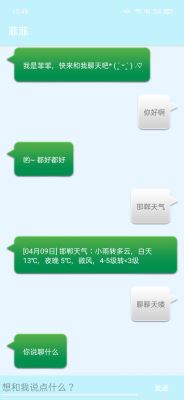
成品展示:
开发步骤
1)新建项目empty,必要可github托管。
2)先写页面在res->layout目录下新建两个layout xml file
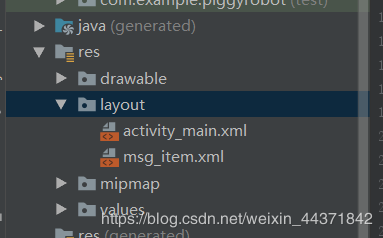
activity_main作为主页面,msg_item为附在其上的消息页面。(具体代码见文末)
这里再acitvity_main采用的不是ListView而是RecyclerView。
(3)写接口调用首先封装一个RobotManager类,用于接收用户输入之后对Url进行封装。
public class RobotManager {
private static String url = "http://api.qingyunke.com/api.php?key=free&appid=0&msg=!!";
public static String getUrl(String question){
String real_url = url.replace("!!",question);//将url中的!!替换为用户输入的内容
return real_url;
}
}
其次在java->第一个包下创建一个接口GetConnection,用来接收接口返回的返回。
public interface GetConnection {
void onFinish(String response); //返回正常
void onError(Exception e); //返回错误
}
然后开始写MyConnection类,调用接口,给参,并通过GetConnection接口将网上接口返回的数据传递出去。
public class MyConnection {
public static void getResponse(final String url,final GetConnection getConnection){
new Thread(new Runnable() {
@Override
public void run() {
HttpURLConnection connection;
try{
URL Url = new URL(url);
connection = (HttpURLConnection) Url.openConnection();
connection.setRequestMethod("GET");//Get方法
connection.setConnectTimeout(2000);//延时时间
connection.setReadTimeout(3000);
connection.setDoInput(true);
InputStream in = connection.getInputStream();
BufferedReader reader = new BufferedReader(new InputStreamReader(in));
StringBuilder response = new StringBuilder();
String line;
while ((line = reader.readLine()) != null) {
response.append(line);
}
Log.e("result",response.toString());
if (getConnection != null) {
getConnection.onFinish(response.toString());
}else {
Log.e("WeiNull","WeiNull");//测试时用的,无须关心。
}
}catch(IOException io) {
if (getConnection != null) {
getConnection.onError(io);
}
}
}
}).start();
}
}
(4)写页面逻辑页面逻辑主要是将从接口得到的内容渲染到页面上。首先进行一系列初始化,绑定布局,然后监听按钮点击接收用户输入,调用MyConnection类传入url,输入内容接收接口返回内容,同时用handler动态更新页面。
public class MainActivity extends AppCompatActivity {
private List<Msg> msgList = new ArrayList<Msg>();
private EditText inputText;
private Button send;
private RecyclerView msgRecyclerView;
private MsgAdapter adapter;
private Handler handler = new Handler(){
@Override
public void handleMessage(@NonNull Message msg) {
switch (msg.what){
case 1:{
Bundle data = msg.getData();
String result = data.getString("result");
Msg robotMsg = new Msg(result,Msg.TYPE_RECEIVED);
msgList.add(robotMsg);
adapter.notifyItemInserted(msgList.size() - 1); // 当有新消息时,刷新ListView中的显示
msgRecyclerView.scrollToPosition(msgList.size() - 1); // 将ListView定位到最后一行
}break;
case 2:{}break;
default:break;
}
}
};
private void getInter(String content){
MyConnection.getResponse(RobotManager.getUrl(content), new GetConnection() {
@Override
public void onFinish(String response) {
ContentBean contentBean = new ContentBean();
Log.e("getResult",response);
Message msg = new Message();
Bundle data = new Bundle();
Gson gson = new Gson();
contentBean = gson.fromJson(response,ContentBean.class); //用Gson将返回内容序列化为ContentBean对象。
if(contentBean.getResult()==0){
data.putString("result",contentBean.getContent());
}else{
data.putString("result","我听不懂你在说什么呀!");
}
msg.setData(data);
msg.what = 1;
handler.sendMessage(msg);
}
@Override
public void onError(Exception e) {
e.printStackTrace();
}
});
}
@Override
protected void onCreate(Bundle savedInstanceState) {
super.onCreate(savedInstanceState);
setContentView(R.layout.activity_main);
initMsgs(); // 初始化消息数据
inputText = findViewById(R.id.input_text);
send = findViewById(R.id.send);
msgRecyclerView = findViewById(R.id.msg_recycler_view);
LinearLayoutManager layoutManager = new LinearLayoutManager(this);
msgRecyclerView.setLayoutManager(layoutManager);
adapter = new MsgAdapter(msgList);
msgRecyclerView.setAdapter(adapter);
send.setOnClickListener(new View.OnClickListener() {
@Override
public void onClick(View v) {
String content = inputText.getText().toString();
if (!"".equals(content)) {
Msg msg = new Msg(content, Msg.TYPE_SENT);
msgList.add(msg);
getInter(content);
Log.e("url",RobotManager.getUrl(content));
adapter.notifyItemInserted(msgList.size() - 1); // 当有新消息时,刷新ListView中的显示
msgRecyclerView.scrollToPosition(msgList.size() - 1); // 将ListView定位到最后一行
inputText.setText(""); // 清空输入框中的内容
}
}
});
}
private void initMsgs() {
Msg msg1 = new Msg("我是菲菲,快来和我聊天吧* ( ´͈ ᵕ `͈ )◞♡", Msg.TYPE_RECEIVED);
msgList.add(msg1);
}
}
由于接口返回的数据是Json格式,所以我们需要对Json进行解析,本文采用google的Gson库对其进行解析,将接口内容序列化为一个类ContentBean。解析过程见上面代码。
public class ContentBean {
/**
* result : 0
* content : [04月08日] 邯郸天气:小雨,白天 17℃,夜晚 9℃,微风,<3级转3-4级
*/
private int result;
private String content;
public int getResult() {
return result;
}
public void setResult(int result) {
this.result = result;
}
public String getContent() {
return content;
}
public void setContent(String content) {
this.content = content;
}
}
(5)其余代码Msg和MsgAdapter用于解析消息是发送方还是接收方
并展示在消息列表上Msg
public class Msg {
public static final int TYPE_RECEIVED = 0;
public static final int TYPE_SENT = 1;
private String content;
private int type;
public Msg(String content, int type) {
this.content = content;
this.type = type;
}
public String getContent() {
return content;
}
public int getType() {
return type;
}
}
MsgAdapter
public class MsgAdapter extends RecyclerView.Adapter<MsgAdapter.ViewHolder> {
private List<Msg> mMsgList;
static class ViewHolder extends RecyclerView.ViewHolder {
LinearLayout leftLayout;
LinearLayout rightLayout;
TextView leftMsg;
TextView rightMsg;
public ViewHolder(View view) {
super(view);
leftLayout = (LinearLayout) view.findViewById(R.id.left_layout);
rightLayout = (LinearLayout) view.findViewById(R.id.right_layout);
leftMsg = (TextView) view.findViewById(R.id.left_msg);
rightMsg = (TextView) view.findViewById(R.id.right_msg);
}
}
public MsgAdapter(List<Msg> msgList) {
mMsgList = msgList;
}
@Override
public ViewHolder onCreateViewHolder(ViewGroup parent, int viewType) {
View view = LayoutInflater.from(parent.getContext()).inflate(R.layout.msg_item, parent, false);
return new ViewHolder(view);
}
@Override
public void onBindViewHolder(ViewHolder holder, int position) {
Msg msg = mMsgList.get(position);
if (msg.getType() == Msg.TYPE_RECEIVED) {
// 如果是收到的消息,则显示左边的消息布局,将右边的消息布局隐藏
holder.leftLayout.setVisibility(View.VISIBLE);
holder.rightLayout.setVisibility(View.GONE);
holder.leftMsg.setText(msg.getContent());
} else if(msg.getType() == Msg.TYPE_SENT) {
// 如果是发出的消息,则显示右边的消息布局,将左边的消息布局隐藏
holder.rightLayout.setVisibility(View.VISIBLE);
holder.leftLayout.setVisibility(View.GONE);
holder.rightMsg.setText(msg.getContent());
}
}
@Override
public int getItemCount() {
return mMsgList.size();
}
}
尾声
以上代码可复制使用,但其中有一些图片,类库什么的需要自行导入,完整代码见geithub:点击此处直达
该项目是我早期项目,只是为了记录当初的开发流程,所以并不存在什么设计模式,代码结构也比较乱,注释也比较少,如果有任何问题,欢迎添加我的QQ询问!
总结
到此这篇关于Android studio开发一个小型对话机器人app的文章就介绍到这了,更多相关android studio 对话机器人内容请搜索以前的文章或继续浏览下面的相关文章希望大家以后多多支持!
以上是 Android studio开发小型对话机器人app(实例代码) 的全部内容, 来源链接: utcz.com/p/242634.html