Android自定义钟表特效
最近该忙的都忙完了,自己自定义一直是个弱项,也一直想整个钟表玩玩,网上看了一圈,学习了不少,下面自己做做自定义
首先,制作钟表第一步,肯定是画个圆吧,这是最直接的思维了!
先创建自己的自定义类,继承View ,重写构造方法,在第一个和第二个构造中初始化画笔,设置颜色等
第一个构造器类似于咱们直接New对象,第二个就是在xml文件引用时用到的
public class Watch extends View {
private Paint mPaint;
private Context context;
public Watch(Context context) {
super(context);
this.context = context;
init();
}
public Watch(Context context, @Nullable AttributeSet attrs) {
super(context, attrs);
this.context = context;
init();
}
public Watch(Context context, @Nullable AttributeSet attrs, int defStyleAttr) {
super(context, attrs, defStyleAttr);
}
private void init() {
mPaint = new Paint();
//抗锯齿
mPaint.setAntiAlias(true);
mPaint.setColor(Color.BLACK);
//分三种,STROKE之绘制轮廓,不绘制内容;FILL,只绘制内容;FILL_AND_STROKE,内容和轮廓都绘制
mPaint.setStyle(Paint.Style.STROKE);
}
开始画圆
//设置线宽,线宽默认是1
mPaint.setStrokeWidth(2);
//在屏幕中心画圆,半径为屏幕的1/3
canvas.drawCircle(getWidth() / 2, getHeight() / 2, getWidth() / 3, mPaint);
画圆心
//整个屏幕中心为圆心点
mPaint.setStrokeWidth(5);
canvas.drawPoint(getWidth() / 2, getHeight() / 2, mPaint);
接下来开始画表里面的竖线
//安卓坐标系默认实在左上角的,现在我们需要将坐标轴移动到圆心位置,这样利于我们绘制线
mPaint.setStrokeWidth(1);
//坐标原点平移到圆心的位置
canvas.translate(getWidth() / 2, getHeight() / 2);
for (int i = 0; i < 360; i++) {
//刻度线长度为20,一圈是360度,并且秒针转一圈为60秒,所以一秒就对应360度/60秒=6度,那么五秒也就是5*6 = 30度
if (i % 30 == 0) { //长的
canvas.drawLine(getWidth() / 3 - 25, 0, getWidth() / 3, 0, mPaint);
} else if (i % 6 == 0) { //中的
canvas.drawLine(getWidth() / 3 - 14, 0, getWidth() / 3, 0, mPaint);
}
//每绘制一次就旋转1度,总共绘制了360条线
canvas.rotate(1);
}
效果
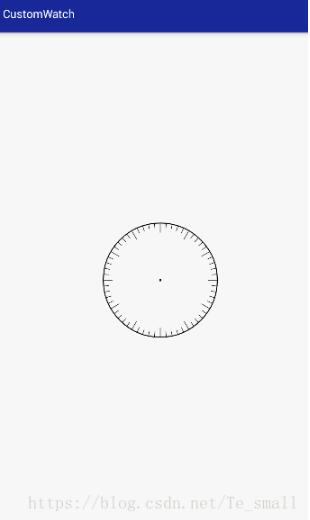
接着再绘制数字 save和restore是成对出现的,为了这一块操作不影响下面的元素,一个保存,一个取出的意思
canvas.save();
for (int i = 0; i < 12; i++) {
if (i == 0) {
trans(canvas, 12 + "", i * 30, mPaint);
} else {
trans(canvas, i + "", i * 30, mPaint);
}
}
canvas.restore();
//如果直接绘制数字的画,文字也跟着旋转了,数字有的就会倒着,所以执行下面这一系列操作,再去绘制数字就正常了
public void trans(Canvas canvas, String text, int degree, Paint paint) {
Rect rect = new Rect();
paint.getTextBounds(text, 0, text.length(), rect);
//先将原来的坐标轴旋转30度
canvas.rotate(degree);
//将旋转完成的坐标轴平移到上方 它只是在y轴进行的平移,所以x轴为0,y轴也就是圆心的位置减去35,35是自己固定的位置,可适当自己修改;但是为负值,因为在y轴的上方,Android坐标系往下为正数
canvas.translate(0, -(getWidth() / 3 - 35));
//这时在将原来旋转的30都转回去,此时的坐标轴与开始的坐标轴都是直立的,只不过现在的位置处于原来坐标轴的 右上方
canvas.rotate(-degree);
//开始写文字 1,2,3,。。。。。12 因为文字写
canvas.drawText(text, -rect.width() / 2, rect.height() / 2, paint);
//写完文字后开始将坐标轴复原 先是顺时针旋转30都,
canvas.rotate(degree);
//再平移到圆心的位置
canvas.translate(0, getWidth() / 3 - 35);
//在逆时针平移30都
canvas.rotate(-degree);
}
最后绘制分针、秒针、时针
//秒针
canvas.save(); //save方法作用是将画布先保存下来,为了不影响其他的元素,例如绘制两张图片,绘制完第一张接着绘制第二张,第二张可能就会受到第一张的影响,变形啊或者压缩了
mPaint.setColor(Color.RED);
mPaint.setStyle(Paint.Style.STROKE);//绘制边框
mPaint.setStrokeWidth(2);//边框宽度
canvas.rotate(secondDegree);//这三个变量在下面代码中
canvas.drawLine(0, 0, 0, -100, mPaint);//竖直的,只在Y轴上,所以X轴都为0,100其实是指针的长度,因为在上方,所以为负数
canvas.restore();
//分针
canvas.save();
mPaint.setColor(Color.BLACK);
mPaint.setStyle(Paint.Style.STROKE);//绘制边框
mPaint.setStrokeWidth(4);//边框宽度 比指针粗点
canvas.rotate(minuteDegree);
canvas.drawLine(0, 0, 0, -80, mPaint);
canvas.restore();
//时针
canvas.save();
//mPaint.setColor(Color.GREEN);
mPaint.setStyle(Paint.Style.STROKE);//绘制边框
mPaint.setStrokeWidth(6);//边框宽度 比指分针粗点
canvas.rotate(hourDegree);
canvas.drawLine(0, 0, 0, -60, mPaint);
canvas.restore();
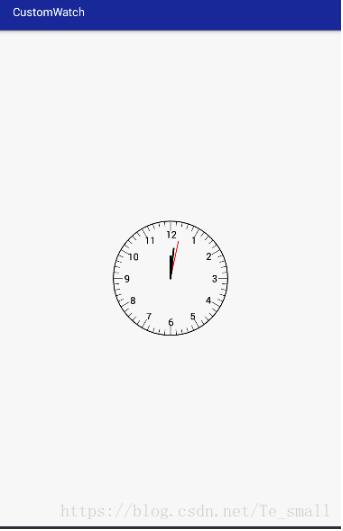
效果

最后让三个针跑起来
private float secondDegree;
private float minuteDegree;
private float hourDegree;
private Timer timer = new Timer();
private TimerTask timerTask = new TimerTask() {
@Override
public void run() {
if (secondDegree == 360) {
secondDegree = 0;
}
if (minuteDegree == 360) {
minuteDegree = 0;
}
if (hourDegree == 360) {
hourDegree = 0;
}
//这三个变量的换算方式,变量名起分针和秒针起反了,也无所谓了
//第一个360/60=6,也就是一秒钟走六度
//第二个6/60 分针一秒针走0.1度
//时针,一秒钟走1/120度
secondDegree = secondDegree + 6;
minuteDegree = minuteDegree + 0.1f;
hourDegree = hourDegree + 1 / 120f;
/**
* 自定义View 刷新界面有三种
* 1:Invalidate() 如果只是内容变动,可使用此方法
* 2:postInvalidate() 涉及到线程切换的
* 3:requestLayout() view位置变动,需要调用此方法 涉及到RadioGroup
*/
postInvalidate();//涉及到线程,界面刷新需要使用此方法
}
};
public void start() {
timer.schedule(timerTask, 0, 1000);
}
在下面的旋转角度里调用三个变量,重复的上面的代码 星星部分
//秒针
canvas.save();
mPaint.setColor(Color.RED);
mPaint.setStyle(Paint.Style.STROKE);
mPaint.setStrokeWidth(2);
**canvas.rotate(secondDegree);**
canvas.drawLine(0, 0, 0, -100, mPaint);
canvas.restore();
//分针
canvas.save();
mPaint.setColor(Color.BLACK);
mPaint.setStyle(Paint.Style.STROKE);
mPaint.setStrokeWidth(4);
**canvas.rotate(minuteDegree);**
canvas.drawLine(0, 0, 0, -80, mPaint);
canvas.restore();
//时针
canvas.save();
//mPaint.setColor(Color.GREEN);
mPaint.setStyle(Paint.Style.STROKE);
mPaint.setStrokeWidth(6);
**canvas.rotate(hourDegree);**
canvas.drawLine(0, 0, 0, -60, mPaint);
canvas.restore();
最后在activity界面调用
<?xml version="1.0" encoding="utf-8"?>
<RelativeLayout xmlns:android="http://schemas.android.com/apk/res/android"
xmlns:tools="http://schemas.android.com/tools"
android:layout_width="match_parent"
android:layout_height="match_parent"
tools:context="com.liuguijie.customwatch.MainActivity">
<com.liuguijie.customwatch.Watch
android:id="@+id/watch"
android:layout_centerInParent="true"
android:layout_width="300dp"
android:layout_height="300dp" />
</RelativeLayout>
//调用start方法
Watch watchView = findViewById(R.id.watch);
watchView.start();
基本就是这么多,跑起来就可以了!
以上就是本文的全部内容,希望对大家的学习有所帮助,也希望大家多多支持。
以上是 Android自定义钟表特效 的全部内容, 来源链接: utcz.com/p/242277.html