Android打开系统相机并拍照的2种显示方法
本文实例为大家分享了Android打开系统相机并拍照的具体实现代码,供大家参考,具体内容如下
目标效果:
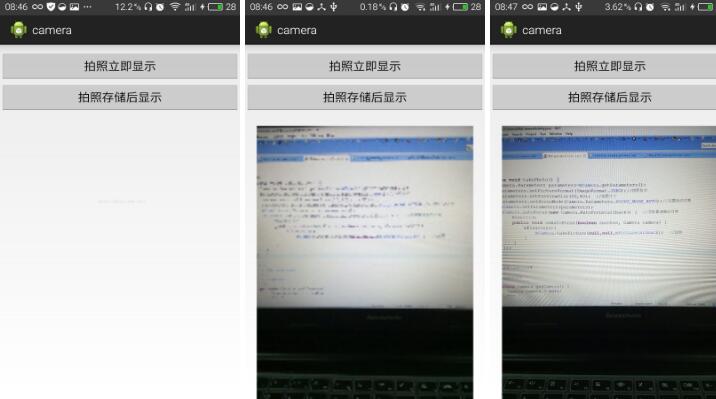
第二张为点击第一个按钮拍照后显示的,比较模糊,第三章为点击第二个按钮拍照后显示的,比较清楚。
1.activity_main.xml页面设置布局。
activity_main.xml页面:
<RelativeLayout xmlns:android="http://schemas.android.com/apk/res/android"
xmlns:tools="http://schemas.android.com/tools"
android:layout_width="match_parent"
android:layout_height="match_parent"
tools:context=".MainActivity" >
<Button
android:id="@+id/btnOpenCamera"
android:layout_width="match_parent"
android:layout_height="wrap_content"
android:layout_marginTop="10dp"
android:text="拍照立即显示" />
<Button
android:id="@+id/btnSavePhoto"
android:layout_width="match_parent"
android:layout_height="wrap_content"
android:layout_marginTop="60dp"
android:text="拍照存储后显示" />
<ImageView
android:id="@+id/ivShowPicture"
android:layout_width="match_parent"
android:layout_height="match_parent"
android:layout_centerHorizontal="true"
android:layout_marginTop="130dp" />
</RelativeLayout>
2.MainActivity.java页面打开相机并获取传递回来的数据,两种方式第一个比较模糊,适合小图,第二个清楚些。
MainActivity.java页面:
package com.example.camera;
import java.io.File;
import java.io.FileInputStream;
import java.io.FileNotFoundException;
import java.io.IOException;
import java.net.URI;
import android.net.Uri;
import android.os.Bundle;
import android.os.Environment;
import android.provider.MediaStore;
import android.app.Activity;
import android.content.Intent;
import android.graphics.Bitmap;
import android.graphics.BitmapFactory;
import android.view.View;
import android.view.View.OnClickListener;
import android.widget.Button;
import android.widget.ImageView;
public class MainActivity extends Activity implements OnClickListener {
private Button btnOpenCamera, btnSavePhoto;
private ImageView ivShowPicture;
private static int REQUEST_CAMERA_1 = 1;
private static int REQUEST_CAMERA_2 = 2;
private String mFilePath;
@Override
protected void onCreate(Bundle savedInstanceState) {
super.onCreate(savedInstanceState);
setContentView(R.layout.activity_main);
// 初始化控件
init();
// 控件绑定点击事件
bindClick();
}
// 初始化控件和变量
private void init() {
btnOpenCamera = (Button) findViewById(R.id.btnOpenCamera);
btnSavePhoto = (Button) findViewById(R.id.btnSavePhoto);
ivShowPicture = (ImageView) findViewById(R.id.ivShowPicture);
mFilePath = Environment.getExternalStorageDirectory().getPath();// 获取SD卡路径
mFilePath = mFilePath + "/" + "temp.png";// 指定路径
}
// 控件绑定点击事件
private void bindClick() {
btnOpenCamera.setOnClickListener(this);
btnSavePhoto.setOnClickListener(this);
}
@Override
public void onClick(View view) {
switch (view.getId()) {
case R.id.btnOpenCamera:
// 拍照并显示图片
openCamera_1();
break;
case R.id.btnSavePhoto:
// 拍照后存储并显示图片
openCamera_2();
break;
default:
break;
}
}
// 拍照并显示图片
private void openCamera_1() {
Intent intent = new Intent(MediaStore.ACTION_IMAGE_CAPTURE);// 启动系统相机
startActivityForResult(intent, REQUEST_CAMERA_1);
}
// 拍照后存储并显示图片
private void openCamera_2() {
Intent intent = new Intent(MediaStore.ACTION_IMAGE_CAPTURE);// 启动系统相机
Uri photoUri = Uri.fromFile(new File(mFilePath)); // 传递路径
intent.putExtra(MediaStore.EXTRA_OUTPUT, photoUri);// 更改系统默认存储路径
startActivityForResult(intent, REQUEST_CAMERA_2);
}
@Override
protected void onActivityResult(int requestCode, int resultCode, Intent data) {
super.onActivityResult(requestCode, resultCode, data);
if (resultCode == RESULT_OK) { // 如果返回数据
if (requestCode == REQUEST_CAMERA_1) { // 判断请求码是否为REQUEST_CAMERA,如果是代表是这个页面传过去的,需要进行获取
Bundle bundle = data.getExtras(); // 从data中取出传递回来缩略图的信息,图片质量差,适合传递小图片
Bitmap bitmap = (Bitmap) bundle.get("data"); // 将data中的信息流解析为Bitmap类型
ivShowPicture.setImageBitmap(bitmap);// 显示图片
} else if (requestCode == REQUEST_CAMERA_2) {
FileInputStream fis = null;
try {
fis = new FileInputStream(mFilePath); // 根据路径获取数据
Bitmap bitmap = BitmapFactory.decodeStream(fis);
ivShowPicture.setImageBitmap(bitmap);// 显示图片
} catch (FileNotFoundException e) {
e.printStackTrace();
} finally {
try {
fis.close();// 关闭流
} catch (IOException e) {
e.printStackTrace();
}
}
}
}
}
}
3.因为打开的是系统相机,所以不需要添加打开相机的权限,如果想要在别的应用里选择打开系统相机时也出现你的应用,需要在AndroidManifest.xml页面进行设置。
AndroidManifest.xml页面:
<?xml version="1.0" encoding="utf-8"?>
<manifest xmlns:android="http://schemas.android.com/apk/res/android"
package="com.example.camera"
android:versionCode="1"
android:versionName="1.0" >
<uses-sdk
android:minSdkVersion="17"
android:targetSdkVersion="19" />
<uses-permission android:name="android.permission.WRITE_EXTERNAL_STORAGE" />
<application
android:allowBackup="true"
android:icon="@drawable/ic_launcher"
android:label="@string/app_name"
android:theme="@style/AppTheme" >
<activity
android:name="com.example.camera.MainActivity"
android:label="@string/app_name" >
<intent-filter>
<action android:name="android.intent.action.MAIN" />
<category android:name="android.intent.category.LAUNCHER" />
</intent-filter>
<!-- 注册相机功能,在别的程序Intent intent = new Intent(MediaStore.ACTION_IMAGE_CAPTURE);进行启动相机时也会选择是否启动该应用 -->
<intent-filter>
<action android:name="android.media.action.IMAGE_CAPTURE" />
<category android:name="android.intent.category.DEFAULT" />
</intent-filter>
</activity>
</application>
</manifest>
4.运行就可以显示目标效果了。
以上就是本文的全部内容,希望对大家的学习有所帮助,也希望大家多多支持。
以上是 Android打开系统相机并拍照的2种显示方法 的全部内容, 来源链接: utcz.com/p/241881.html