Android实现简单下拉筛选框
最近接到一个新的项目,项目时间比较紧张,有一个功能类似于58同城,京东的一个下拉筛选框,为了节省时间,从网上面拷贝了一份封装好的代码,进行的自己的一些修改,感觉灵活性还挺高的,分享出来给大家看一看
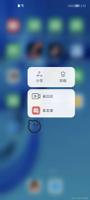
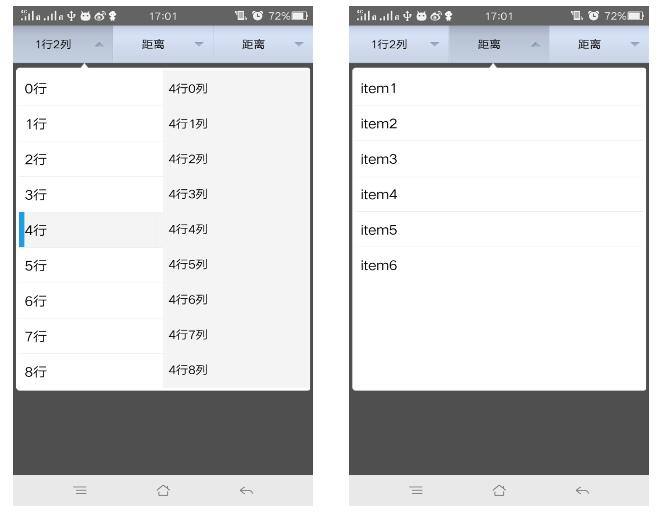
大致效果如下,可以自己加入自己的布局
先看一下这个ExpandTabView这个类 代码比较简单 我就不做具体介绍了 有不懂的可以私信我
public class ExpandTabView extends LinearLayout implements OnDismissListener {
private ToggleButton selectedButton;
private ArrayList<String> mTextArray = new ArrayList<String>();
private ArrayList<RelativeLayout> mViewArray = new ArrayList<RelativeLayout>();
private ArrayList<ToggleButton> mToggleButton = new ArrayList<ToggleButton>();
private Context mContext;
private final int SMALL = 0;
private int displayWidth;
private int displayHeight;
private PopupWindow popupWindow;
private int selectPosition;
public ExpandTabView(Context context) {
super(context);
init(context);
}
public ExpandTabView(Context context, AttributeSet attrs) {
super(context, attrs);
init(context);
}
/**
* 根据选择的位置设置tabitem显示的值
*/
public void setTitle(String valueText, int position) {
if (position < mToggleButton.size()) {
mToggleButton.get(position).setText(valueText);
}
}
public void setTitle(String title){
}
/**
* 根据选择的位置获取tabitem显示的值
*/
public String getTitle(int position) {
if (position < mToggleButton.size() && mToggleButton.get(position).getText() != null) {
return mToggleButton.get(position).getText().toString();
}
return "";
}
/**
* 设置tabitem的个数和初始值
*/
public void setValue(ArrayList<String> textArray, ArrayList<View> viewArray) {
if (mContext == null) {
return;
}
LayoutInflater inflater = (LayoutInflater) mContext.getSystemService(Context.LAYOUT_INFLATER_SERVICE);
mTextArray = textArray;
for (int i = 0; i < viewArray.size(); i++) {
final RelativeLayout r = new RelativeLayout(mContext);
int maxHeight = (int) (displayHeight * 0.7);
RelativeLayout.LayoutParams rl = new RelativeLayout.LayoutParams(RelativeLayout.LayoutParams.FILL_PARENT, maxHeight);
rl.leftMargin = 10;
rl.rightMargin = 10;
r.addView(viewArray.get(i), rl);
mViewArray.add(r);
r.setTag(SMALL);
ToggleButton tButton = (ToggleButton) inflater.inflate(R.layout.toggle_button, this, false);
addView(tButton);
View line = new TextView(mContext);
line.setBackgroundResource(R.drawable.choosebar_line);
if (i < viewArray.size() - 1) {
LayoutParams lp = new LayoutParams(2, LayoutParams.FILL_PARENT);
addView(line, lp);
}
mToggleButton.add(tButton);
tButton.setTag(i);
tButton.setText(mTextArray.get(i));
r.setOnClickListener(new OnClickListener() {
@Override
public void onClick(View v) {
onPressBack();
}
});
r.setBackgroundColor(mContext.getResources().getColor(R.color.popup_main_background));
tButton.setOnClickListener(new OnClickListener() {
@Override
public void onClick(View view) {
// initPopupWindow();
ToggleButton tButton = (ToggleButton) view;
if (selectedButton != null && selectedButton != tButton) {
selectedButton.setChecked(false);
}
selectedButton = tButton;
selectPosition = (Integer) selectedButton.getTag();
startAnimation();
if (mOnButtonClickListener != null && tButton.isChecked()) {
mOnButtonClickListener.onClick(selectPosition);
}
}
});
}
}
private void startAnimation() {
if (popupWindow == null) {
popupWindow = new PopupWindow(mViewArray.get(selectPosition), displayWidth, displayHeight);
popupWindow.setAnimationStyle(R.style.PopupWindowAnimation);
popupWindow.setFocusable(false);
popupWindow.setOutsideTouchable(true);
}
if (selectedButton.isChecked()) {
if (!popupWindow.isShowing()) {
showPopup(selectPosition);
} else {
popupWindow.setOnDismissListener(this);
popupWindow.dismiss();
hideView();
}
} else {
if (popupWindow.isShowing()) {
popupWindow.dismiss();
hideView();
}
}
}
private void showPopup(int position) {
View tView = mViewArray.get(selectPosition).getChildAt(0);
if (tView instanceof ViewBaseAction) {
ViewBaseAction f = (ViewBaseAction) tView;
f.show();
}
if (popupWindow.getContentView() != mViewArray.get(position)) {
popupWindow.setContentView(mViewArray.get(position));
}
popupWindow.showAsDropDown(this, 0, 0);
}
/**
* 如果菜单成展开状态,则让菜单收回去
*/
public boolean onPressBack() {
if (popupWindow != null && popupWindow.isShowing()) {
popupWindow.dismiss();
hideView();
if (selectedButton != null) {
selectedButton.setChecked(false);
}
return true;
} else {
return false;
}
}
private void hideView() {
View tView = mViewArray.get(selectPosition).getChildAt(0);
if (tView instanceof ViewBaseAction) {
ViewBaseAction f = (ViewBaseAction) tView;
f.hide();
}
}
private void init(Context context) {
mContext = context;
displayWidth = ((Activity) mContext).getWindowManager().getDefaultDisplay().getWidth();
displayHeight = ((Activity) mContext).getWindowManager().getDefaultDisplay().getHeight();
setOrientation(LinearLayout.HORIZONTAL);
}
@Override
public void onDismiss() {
showPopup(selectPosition);
popupWindow.setOnDismissListener(null);
}
private OnButtonClickListener mOnButtonClickListener;
/**
* 设置tabitem的点击监听事件
*/
public void setOnButtonClickListener(OnButtonClickListener l) {
mOnButtonClickListener = l;
}
/**
* 自定义tabitem点击回调接口
*/
public interface OnButtonClickListener {
public void onClick(int selectPosition);
}
}
这个代码基本就是对popupwindow进行了封装,通过对ToggleButton按钮的监听来实现popupwindow的弹出和收回。
外部设置的话,也特别简单,只需要将自己定义好的布局传入到list集合中就可以。
下面是MainActivity中的代码
public class MainActivity extends AppCompatActivity {
private ExpandTabView expandTabView;
private ArrayList<View> mViewArray = new ArrayList<View>();
private ViewLeft viewLeft;
private ViewMiddle viewMiddle;
private ViewRight viewRight;
@Override
protected void onCreate(Bundle savedInstanceState) {
super.onCreate(savedInstanceState);
setContentView(R.layout.activity_main);
initView();
initVaule();
initListener();
}
private void initView() {
expandTabView = (ExpandTabView) findViewById(R.id.expandtab_view);
viewLeft = new ViewLeft(this);
viewMiddle = new ViewMiddle(this);
viewRight = new ViewRight(this);
}
private void initVaule() {
mViewArray.add(viewMiddle);
mViewArray.add(viewLeft);
mViewArray.add(viewRight);
ArrayList<String> mTextArray = new ArrayList<String>();
mTextArray.add("区域");
mTextArray.add("距离");
mTextArray.add("距离");
expandTabView.setValue(mTextArray, mViewArray);
// expandTabView.setTitle(viewLeft.getShowText(), 0);
// expandTabView.setTitle(viewMiddle.getShowText(), 1);
// expandTabView.setTitle(viewRight.getShowText(), 2);
}
private void initListener() {
viewLeft.setOnSelectListener(new ViewLeft.OnSelectListener() {
@Override
public void getValue(String distance, String showText) {
onRefresh(viewLeft, showText);
}
});
viewMiddle.setOnSelectListener(new ViewMiddle.OnSelectListener() {
@Override
public void getValue(String showText) {
onRefresh(viewMiddle,showText);
}
});
viewRight.setOnSelectListener(new ViewRight.OnSelectListener() {
@Override
public void getValue(String distance, String showText) {
onRefresh(viewRight, showText);
}
});
}
private void onRefresh(View view, String showText) {
expandTabView.onPressBack();
int position = getPositon(view);
if (position >= 0 && !expandTabView.getTitle(position).equals(showText)) {
expandTabView.setTitle(showText, position);
}
// Toast.makeText(MainActivity.this, showText, Toast.LENGTH_SHORT).show();
}
private int getPositon(View tView) {
for (int i = 0; i < mViewArray.size(); i++) {
if (mViewArray.get(i) == tView) {
return i;
}
}
return -1;
}
@Override
public void onBackPressed() {
if (!expandTabView.onPressBack()) {
finish();
}
}
}
以上就是这个筛选菜单栏的大致用法,个人感觉还是比较简单的,也比较灵活,修改起来也比较方便。
但是在项目中使用的时候碰到了一个问题,就是popupwindow在7.0的手机上弹出位置异常的问题,,查了一下,是因为手机状态栏高度的问题
于是重写了一下popupwindow的showAsDropDown方法就解决了,下面是具体代码
@Override
public void showAsDropDown(View anchor, int xoff, int yoff) {
if(Build.VERSION.SDK_INT >= 24) {
Rect rect = new Rect();
anchor.getGlobalVisibleRect(rect);
int h = anchor.getResources().getDisplayMetrics().heightPixels - rect.bottom;
setHeight(h);
}
super.showAsDropDown(anchor, xoff, yoff);
}
通过对SDK版本来进行判断,大于24的话就执行这个方法,解决了popupwindow在7.0手机上异常弹出的问题。
最后附上Demo地址
以上就是本文的全部内容,希望对大家的学习有所帮助,也希望大家多多支持。
以上是 Android实现简单下拉筛选框 的全部内容, 来源链接: utcz.com/p/241278.html