Android实现添加商品到购物车动画效果
本文实例为大家分享了Android添加商品到购物车的具体代码,供大家参考,具体内容如下
实现需求
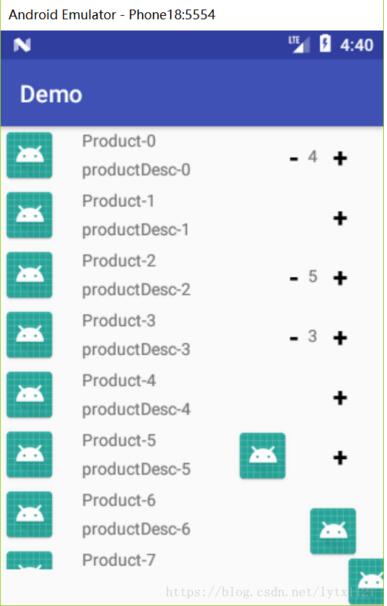
在商品列表页面中,从列表item添加商品时,实现一个动画,给人感觉像是在添加商品到购物车。
思路
1、获取各个动画执行对象的起点和终点的坐标,利用PathMeasure绘制绘制贝塞尔曲线;
2、为商品图片设置属性动画;
3、为动画设置addUpdateListene监听器,更新view的坐标。
效果图:
MainActivity.java
package com.zlw.yzm.demo;
import android.animation.Animator;
import android.animation.ValueAnimator;
import android.graphics.Path;
import android.graphics.PathMeasure;
import android.os.Bundle;
import android.support.v7.app.AppCompatActivity;
import android.support.v7.widget.LinearLayoutManager;
import android.support.v7.widget.RecyclerView;
import android.util.Log;
import android.view.View;
import android.view.ViewGroup;
import android.view.animation.LinearInterpolator;
import android.widget.ImageView;
import android.widget.RelativeLayout;
import android.widget.TextView;
import com.zlw.yzm.demo.view.AmountView;
import java.util.ArrayList;
import java.util.HashMap;
import java.util.List;
import java.util.Map;
public class MainActivity extends AppCompatActivity {
private RecyclerView rvGoodsList;
private ImageView ivGotoGouWuChe;
private RelativeLayout llContainer;
private List<Product> productList;
private PathMeasure mPathMeasure;
/**
* 存储商品列表中对应position的商品数量
*/
private Map<Integer, Integer> amountMap = new HashMap<>();
/**
* 贝塞尔曲线中间过程的点的坐标
*/
private float[] mCurrentPosition = new float[2];
@Override
protected void onCreate(Bundle savedInstanceState) {
super.onCreate(savedInstanceState);
setContentView(R.layout.activity_main);
initView();
initData();
bindData();
}
private void initView() {
rvGoodsList = findViewById(R.id.main_rv_goods_list);
ivGotoGouWuChe = findViewById(R.id.main_iv_goto_gwche);
llContainer = findViewById(R.id.rlContainer);
}
private void initData() {
productList = new ArrayList<>();
Product product = null;
for (int i = 0; i < 30; i++) {
product = new Product();
product.productId = 10000L + i;
product.productName = "Product-" + i;
product.productDesc = "productDesc-" + i;
productList.add(product);
}
}
private void bindData() {
rvGoodsList.setLayoutManager(new LinearLayoutManager(this));
MyAdapter myAdapter = new MyAdapter();
rvGoodsList.setAdapter(myAdapter);
}
class MyAdapter extends RecyclerView.Adapter {
@Override
public RecyclerView.ViewHolder onCreateViewHolder(ViewGroup parent, int viewType) {
View itemView = View.inflate(MainActivity.this, R.layout.rv_item, null);
return new ViewHolder(itemView);
}
@Override
public void onBindViewHolder(RecyclerView.ViewHolder holder, int position) {
final ViewHolder viewHolder = (ViewHolder) holder;
Product product = productList.get(position);
viewHolder.tvProductName.setText(product.productName);
viewHolder.tvProductDesc.setText(product.productDesc);
viewHolder.amountView.setGoods_storage(5);
viewHolder.amountView.setPosition(position);
final Integer amount = amountMap.get(position);
if (amount == null) {
viewHolder.amountView.setAmount(0);
viewHolder.amountView.playCloseAnim(0);
} else {
viewHolder.amountView.setAmount(amount.intValue());
if (amount.intValue() == 0) {
viewHolder.amountView.playCloseAnim(0);
} else if (amount.intValue() >= 1) {
viewHolder.amountView.playOpenAnim(0);
}
}
Log.e("tag1", "amount===" + amount);
viewHolder.amountView.setOnAmountChangedListener(new AmountView.OnAmountChangedListener() {
@Override
public void onAmountChanged(View view, int amount, int position, boolean increase) {
amountMap.put(position, amount);
if (increase) {
add2Cart(viewHolder.ivProductIcon);
}
}
});
}
@Override
public int getItemCount() {
return productList != null ? productList.size() : 0;
}
class ViewHolder extends RecyclerView.ViewHolder {
ImageView ivProductIcon;
TextView tvProductName;
TextView tvProductDesc;
AmountView amountView;
public ViewHolder(View itemView) {
super(itemView);
ivProductIcon = itemView.findViewById(R.id.rv_item_iv_product_Icon);
tvProductName = itemView.findViewById(R.id.rv_item_tv_product_name);
tvProductDesc = itemView.findViewById(R.id.rv_item_tv_product_desc);
amountView = itemView.findViewById(R.id.rv_item_amountview);
}
}
}
/**
* 添加到购物车
*
* @param ivProductIcon
*/
private void add2Cart(ImageView ivProductIcon) {
// 一、创建执行动画的主题---ImageView(该图片就是执行动画的图片,从开始位置出发,经过一个抛物线(贝塞尔曲线)。)
final ImageView imageView = new ImageView(MainActivity.this);
imageView.setImageDrawable(ivProductIcon.getDrawable());
// 将执行动画的图片添加到开始位置。
RelativeLayout.LayoutParams params = new RelativeLayout.LayoutParams(RelativeLayout.LayoutParams.WRAP_CONTENT, RelativeLayout.LayoutParams.WRAP_CONTENT);
llContainer.addView(imageView, params);
// 二、计算动画开始/结束点的坐标的准备工作
// 得到父布局的起始点坐标(用于辅助计算动画开始/结束时的点的坐标)
int[] parentLocation = new int[2];
llContainer.getLocationInWindow(parentLocation);
// 得到商品图片的坐标(用于计算动画开始的坐标)
int[] startLoc = new int[2];
ivProductIcon.getLocationInWindow(startLoc);
// 得到购物车图片的坐标(用于计算动画结束后的坐标)
int[] endLoc = new int[2];
ivGotoGouWuChe.getLocationInWindow(endLoc);
// 三、计算动画开始结束的坐标
// 开始掉落的商品的起始点:商品起始点-父布局起始点+该商品图片的一半
float startX = startLoc[0] - parentLocation[0] + ivProductIcon.getWidth() / 2;
float startY = startLoc[1] - parentLocation[1] + ivProductIcon.getHeight() / 2;
//商品掉落后的终点坐标:购物车起始点-父布局起始点+购物车图片的1/5
float toX = endLoc[0] - parentLocation[0] + ivGotoGouWuChe.getWidth() / 5;
float toY = endLoc[1] - parentLocation[1];
// 四、计算中间动画的插值坐标(贝塞尔曲线)(其实就是用贝塞尔曲线来完成起终点的过程)
//开始绘制贝塞尔曲线
Path path = new Path();
//移动到起始点(贝塞尔曲线的起点)
path.moveTo(startX, startY);
//使用二次萨贝尔曲线:注意第一个起始坐标越大,贝塞尔曲线的横向距离就会越大,一般按照下面的式子取即可
path.quadTo((startX + toX) / 2, startY, toX, toY);
//mPathMeasure用来计算贝塞尔曲线的曲线长度和贝塞尔曲线中间插值的坐标,
// 如果是true,path会形成一个闭环
mPathMeasure = new PathMeasure(path, false);
//★★★属性动画实现(从0到贝塞尔曲线的长度之间进行插值计算,获取中间过程的距离值)
ValueAnimator valueAnimator = ValueAnimator.ofFloat(0, mPathMeasure.getLength());
valueAnimator.setDuration(1000);
// 匀速线性插值器
valueAnimator.setInterpolator(new LinearInterpolator());
valueAnimator.addUpdateListener(new ValueAnimator.AnimatorUpdateListener() {
@Override
public void onAnimationUpdate(ValueAnimator animation) {
// 当插值计算进行时,获取中间的每个值,
// 这里这个值是中间过程中的曲线长度(下面根据这个值来得出中间点的坐标值)
float value = (Float) animation.getAnimatedValue();
// ★★★★★获取当前点坐标封装到mCurrentPosition
// boolean getPosTan(float distance, float[] pos, float[] tan) :
// 传入一个距离distance(0<=distance<=getLength()),然后会计算当前距
// 离的坐标点和切线,pos会自动填充上坐标,这个方法很重要。
mPathMeasure.getPosTan(value, mCurrentPosition, null);//mCurrentPosition此时就是中间距离点的坐标值
// 移动的商品图片(动画图片)的坐标设置为该中间点的坐标
imageView.setTranslationX(mCurrentPosition[0]);
imageView.setTranslationY(mCurrentPosition[1]);
}
});
// 五、 开始执行动画
valueAnimator.start();
// 六、动画结束后的处理
valueAnimator.addListener(new Animator.AnimatorListener() {
@Override
public void onAnimationStart(Animator animation) {
}
//当动画结束后:
@Override
public void onAnimationEnd(Animator animation) {
// 购物车的数量加1
// 把移动的图片imageview从父布局里移除
llContainer.removeView(imageView);
}
@Override
public void onAnimationCancel(Animator animation) {
}
@Override
public void onAnimationRepeat(Animator animation) {
}
});
}
}
activity_main.xml
<?xml version="1.0" encoding="utf-8"?>
<RelativeLayout xmlns:android="http://schemas.android.com/apk/res/android"
xmlns:tools="http://schemas.android.com/tools"
android:id="@+id/rlContainer"
android:layout_width="match_parent"
android:layout_height="match_parent"
tools:context="com.zlw.yzm.demo.MainActivity">
<ImageView
android:id="@+id/main_iv_goto_gwche"
android:layout_width="30dp"
android:layout_height="30dp"
android:layout_alignParentBottom="true"
android:layout_alignParentRight="true"
android:src="@drawable/gouwuche" />
<android.support.v7.widget.RecyclerView
android:id="@+id/main_rv_goods_list"
android:layout_width="match_parent"
android:layout_height="match_parent"
android:layout_above="@id/main_iv_goto_gwche"></android.support.v7.widget.RecyclerView>
</RelativeLayout>
// 商品列表中item的布局
rl_item.xml
<?xml version="1.0" encoding="utf-8"?>
<RelativeLayout xmlns:android="http://schemas.android.com/apk/res/android"
android:layout_width="match_parent"
android:layout_height="wrap_content">
<ImageView
android:id="@+id/rv_item_iv_product_Icon"
android:layout_width="wrap_content"
android:layout_height="wrap_content"
android:src="@mipmap/ic_launcher" />
<LinearLayout
android:layout_width="match_parent"
android:layout_height="wrap_content"
android:layout_alignBottom="@id/rv_item_iv_product_Icon"
android:layout_alignTop="@id/rv_item_iv_product_Icon"
android:layout_marginLeft="20dp"
android:layout_toRightOf="@id/rv_item_iv_product_Icon"
android:gravity="center_vertical"
android:orientation="vertical">
<TextView
android:id="@+id/rv_item_tv_product_name"
android:layout_width="wrap_content"
android:layout_height="wrap_content"
android:text="@string/product_name" />
<TextView
android:id="@+id/rv_item_tv_product_desc"
android:layout_width="wrap_content"
android:layout_height="wrap_content"
android:layout_marginTop="5dp"
android:text="@string/product_desc" />
</LinearLayout>
<com.zlw.yzm.demo.view.AmountView
android:id="@+id/rv_item_amountview"
android:layout_alignParentRight="true"
android:layout_centerVertical="true"
android:layout_marginRight="20dp"
android:layout_width="wrap_content"
android:layout_height="wrap_content">
</com.zlw.yzm.demo.view.AmountView>
</RelativeLayout>
// 自定义更新商品数量view
AmountView.java
package com.zlw.yzm.demo.view;
import android.animation.ValueAnimator;
import android.content.Context;
import android.util.AttributeSet;
import android.util.Log;
import android.view.LayoutInflater;
import android.view.View;
import android.view.animation.LinearInterpolator;
import android.widget.RelativeLayout;
import android.widget.TextView;
import com.zlw.yzm.demo.R;
/**
* Created by 13198 on 2018/6/28.
* 对商品的添加和删除进行封装
*/
public class AmountView extends RelativeLayout implements View.OnClickListener {
private Context context;
private TextView tvDecrease;
private TextView tvAmount;
private TextView tvIncrease;
private RelativeLayout rlContainer;
private float leftStartX;
private float centerStartX;
private float finalX;
// 商品位置
private int position = -1;
// 商品库存
private int goods_storage = 10;
// 购买数量
private int amount = 0;
private int rlContainerMeasuredWidth;
public AmountView(Context context) {
this(context, null);
}
public AmountView(Context context, AttributeSet attrs) {
this(context, attrs, 0);
}
public AmountView(Context context, AttributeSet attrs, int defStyleAttr) {
super(context, attrs, defStyleAttr);
this.context = context;
initView();
initListener();
}
private void initView() {
LayoutInflater.from(context).inflate(R.layout.rl_add2cart, this, true);
tvDecrease = findViewById(R.id.tv_decrease);
tvAmount = findViewById(R.id.tv_amount);
tvIncrease = findViewById(R.id.tv_increase);
rlContainer = findViewById(R.id.rlContainer);
}
private void initListener() {
tvDecrease.setOnClickListener(this);
tvIncrease.setOnClickListener(this);
}
public void setVisiable(boolean b) {
tvDecrease.setVisibility(!b ? View.GONE : View.VISIBLE);
tvAmount.setVisibility(!b ? View.GONE : View.VISIBLE);
}
@Override
public void onClick(View v) {
int id = v.getId();
if (id == R.id.tv_increase) {
// 添加商品
if (amount < goods_storage) {
amount++;
setAmount(amount);
if (getAmount() == 1) {
playOpenAnim(500);
}
if (onAmountChangedListener != null) {
onAmountChangedListener.onAmountChanged(this, amount, position, true);
}
}
} else {
//删除商品
if (amount > 0) {
amount--;
setAmount(amount);
playCloseAnim(500);
if (onAmountChangedListener != null) {
onAmountChangedListener.onAmountChanged(this, amount, position, false);
}
}
}
}
public void setPosition(int position) {
this.position = position;
}
public void setAmount(int amount) {
this.amount = amount;
tvAmount.setText(String.valueOf(amount));
}
public int getAmount() {
return amount;
}
public void setGoods_storage(int goods_storage) {
this.goods_storage = goods_storage;
}
public void playOpenAnim(int duration) {
rlContainer.measure(0, 0);
rlContainerMeasuredWidth = tvDecrease.getMeasuredWidth();
startAnim(tvDecrease, 0, -rlContainerMeasuredWidth / 3, duration);
startAnim(tvAmount, 0, -rlContainerMeasuredWidth / 3, duration);
}
public void playCloseAnim(int duration) {
rlContainer.measure(0, 0);
rlContainerMeasuredWidth = rlContainer.getMeasuredWidth();
if (getAmount() == 0) {
startAnim(tvDecrease, 0, rlContainerMeasuredWidth / 3, duration);
startAnim(tvAmount, 0, rlContainerMeasuredWidth / 3, duration);
}
}
/**
* 添加、移除购物车中商品的动画
*
* @param view
* @param startX
* @param endX
* @param duration
*/
private void startAnim(final View view, final float startX, final float endX, int duration) {
ValueAnimator animator = ValueAnimator.ofFloat(0, endX - startX);
animator.setDuration(duration);
animator.setInterpolator(new LinearInterpolator());
animator.addUpdateListener(new ValueAnimator.AnimatorUpdateListener() {
@Override
public void onAnimationUpdate(ValueAnimator animation) {
float currentX = (float) animation.getAnimatedValue();
view.setTranslationX(currentX);
float alpha = 0;
float hudu = 0;
float lenth = Math.abs(endX - startX);
if (endX - startX > 0) {
// 向右滑动=====>1--0
alpha = (lenth - currentX) / lenth;
hudu = currentX * 360 / lenth;
} else {
// 向左滑动====>0-1
alpha = Math.abs(currentX) / lenth;
hudu = 360 - (lenth - Math.abs(currentX)) * 360 / lenth;
}
view.setAlpha(alpha);
view.setRotation(hudu);
Log.e("tag", "view=====" + view.getId() + "=======currentX==========" + currentX);
}
});
animator.start();
}
/**
* 定义一个接口,监听数量变化
*/
public interface OnAmountChangedListener {
void onAmountChanged(View view, int amount, int position, boolean increase);
}
private OnAmountChangedListener onAmountChangedListener;
public void setOnAmountChangedListener(OnAmountChangedListener onAmountChangedListener) {
this.onAmountChangedListener = onAmountChangedListener;
}
}
// 自定义更新商品数量view的布局
rl_amountview.xml
<?xml version="1.0" encoding="utf-8"?>
<RelativeLayout xmlns:android="http://schemas.android.com/apk/res/android"
android:id="@+id/rlContainer"
android:layout_width="60dp"
android:layout_height="wrap_content">
<TextView
android:id="@+id/tv_decrease"
android:layout_width="wrap_content"
android:layout_height="wrap_content"
android:layout_centerVertical="true"
android:padding="10dp"
android:text="-"
android:textColor="@android:color/black"
android:textSize="22sp"
android:textStyle="bold" />
<TextView
android:id="@+id/tv_amount"
android:layout_width="wrap_content"
android:layout_height="wrap_content"
android:layout_centerInParent="true"
android:gravity="center"
android:text="0" />
<TextView
android:id="@+id/tv_increase"
android:layout_width="wrap_content"
android:layout_height="wrap_content"
android:layout_alignParentRight="true"
android:layout_centerVertical="true"
android:padding="10dp"
android:text="+"
android:textColor="@android:color/black"
android:textSize="22sp"
android:textStyle="bold" />
</RelativeLayout>
以上就是本文的全部内容,希望对大家的学习有所帮助,也希望大家多多支持。
以上是 Android实现添加商品到购物车动画效果 的全部内容, 来源链接: utcz.com/p/240739.html


