Android悬浮按钮的使用方法
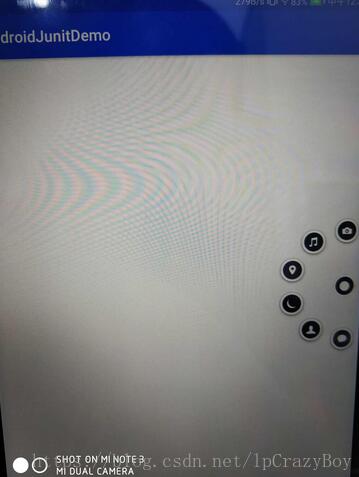
悬浮按钮效果如下图所示:
步骤1:引用
compile 'com.laocaixw.suspendbuttonlayout:suspendbuttonlayout:1.0.3'
步骤2:xml布局
<?xml version="1.0" encoding="utf-8"?>
<LinearLayout android:layout_height="match_parent"
android:layout_width="match_parent"
android:orientation="vertical"
xmlns:suspend="http://schemas.android.com/apk/res-auto"
xmlns:android="http://schemas.android.com/apk/res/android">
<com.laocaixw.layout.SuspendButtonLayout
android:id="@+id/layout"
android:layout_width="match_parent"
android:layout_height="match_parent"
suspend:distance="80dp"
suspend:imageSize="50dp"
suspend:marginY="100dp"
suspend:number="6"
suspend:imageMainOpen="@mipmap/suspend_main_open"
suspend:imageMainClose="@mipmap/suspend_main_close"
suspend:image1="@mipmap/suspend_1"
suspend:image2="@mipmap/suspend_2"
suspend:image3="@mipmap/suspend_3"
suspend:image4="@mipmap/suspend_4"
suspend:image5="@mipmap/suspend_5"
suspend:image6="@mipmap/suspend_6">
</com.laocaixw.layout.SuspendButtonLayout>
</LinearLayout>
以上各属性:
- distance="80dp" // 按钮打开后,主按钮和子按钮的距离
- imageSize="50dp" // 按钮大小,所占区域的边长
- marginY="100dp" // 与上下边缘距离,下图中黄色部分的高度
- number="6" // 展开的子按钮的数量,可以是3-6个
- imageMainOpen="@mipmap/suspendMainOpen" // 中间按钮展开时的图片资源
- imageMainClose="@mipmap/suspendMainClose" // 中间按钮关闭时的图片资源
- image1="@mipmap/suspend_1" // 子按钮的图片资源,image1~image6
步骤3:Activity使用
public class MainActivity extends AppCompatActivity {
public String[] suspendChildButtonInfo = {"相机", "音乐", "地图", "亮度", "联系人", "短信"};
@Override
protected void onCreate(Bundle savedInstanceState) {
super.onCreate(savedInstanceState);
setContentView(R.layout.activity_suspendbutton);
final SuspendButtonLayout suspendButtonLayout = (SuspendButtonLayout) findViewById(R.id.layout);
suspendButtonLayout.setOnSuspendListener(new SuspendButtonLayout.OnSuspendListener() {
@Override
public void onButtonStatusChanged(int status) {
}
@Override
public void onChildButtonClick(int index) {
Toast.makeText(MainActivity.this, "您点击了【"
+ suspendChildButtonInfo[index - 1] + "】按钮!", Toast.LENGTH_SHORT).show();
}
});
/**
* suspendButtonLayout.hideSuspendButton(); // 隐藏按钮
suspendButtonLayout.showSuspendButton(); // 显示按钮
suspendButtonLayout.openSuspendButton(); // 展开按钮
suspendButtonLayout.closeSuspendButton(); // 关闭按钮
suspendButtonLayout.setMainCloseImageResource(R.mipmap.suspend_main_close); // 设置关闭时,主按钮的图片
suspendButtonLayout.setMainOpenImageResource(R.mipmap.suspend_main_open); // 设置展开时,主按钮的图片
// 设置按钮位置。isRight:true在右边,false在左边;stayPosY:在'按钮停留区域'从上往下,值为从0到100。
suspendButtonLayout.setPosition(isRight, stayPosY); */
}
}
以上就是本文的全部内容,希望对大家的学习有所帮助,也希望大家多多支持。
以上是 Android悬浮按钮的使用方法 的全部内容, 来源链接: utcz.com/p/240628.html