Vue实现图片预览效果实例(放大、缩小、拖拽)
前言
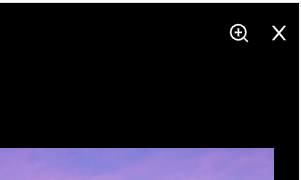
这张图是显示的图片放大的一个预览情况,这里是参考预览操作实现的一个背景为黑色的部分,上层的图片可实现滚轮放大或者点击上部的放大镜图标进行放大,代码是基于Ant Design Vue框架的基础上

这里先分解部分,后面有全部代码
1.需要有黑色背景用于预览背景:
这里的背景要占满整个屏幕(这里的一般是参考其他插件预览的样式进行模拟设计的),样式在后方代码内
2.展示图片并且把图片展示到背景板最中间。
3.最重要的下方的两部分:
滚轮放大缩小图片:
bbimg() {
let e = e || window.event
this.params.zoomVal += e.wheelDelta / 1200
if (this.params.zoomVal >= 0.2) {
this.test = `transform:scale(${this.params.zoomVal});`
} else {
this.params.zoomVal = 0.2
this.test = `transform:scale(${this.params.zoomVal});`
return false
}
},
图片拖拽:
imgMove(e) {
console.log('e', e)
let oImg = e.target
let disX = e.clientX - oImg.offsetLeft
let disY = e.clientY - oImg.offsetTop
console.log('disX', disX)
document.onmousemove = (e) => {
e.preventDefault()
let left = e.clientX - disX
let top = e.clientY - disY
this.test = this.test + `left: ${left}px;top: ${top}px;`
}
document.onmouseup = (e) => {
document.onmousemove = null
document.onmouseup = null
}
},
这里的test和classStyle是作为图片的动态样式,虽然名字起得着急,但是不影响使用
整体实现的功能:
- 点击图片,可以进行滚轮放大及缩小,
- 点击后按压左键可进行拖拽查看图片
- 点击上方的放大及缩小图标也可以进行放大等操作,
- 点击 x 可关于预览
- 点击关闭后,恢复大小,避免点击其他照片影响大小
下面是全部实现代码:
<template>
<a-card style="width: 100%">
<div>
<img
:src="file"
alt=""
@click="handlePhotoShow(file)"
/>
<!-- preview="0"
preview-text="图片" -->
</div>
<div class="showImg" v-if="pictShow" @mousewheel="bbimg(this)">
<div class="setting_box">
<a-icon
class="setting_zoom"
v-if="zoomInShow == false"
type="zoom-in"
@click="handleZoomIn"
/>
<a-icon
color="#fff"
class="setting_zoom"
v-if="zoomInShow == true"
type="zoom-out"
@click="handleZoomOut"
/>
<a-icon color="#fff" class="setting_close" type="close" @click="handleClose" />
</div>
<img :src="file" alt="" :class="classStyle" :style="test" @mousedown="imgMove" />
</div>
</a-card>
</template>
<script>
export default {
data() {
return {
test: '',
pictShow: false,
zoomInShow: false,
params: {
zoomVal: 1,
left: 0,
top: 0,
currentX: 0,
currentY: 0,
flag: false,
},
file: '',
}
},
computed: {
classStyle() {
return this.zoomInShow ? 'a1' : 'a2'
},
},
methods: {
// 实现图片放大缩小
bbimg() {
let e = e || window.event
this.params.zoomVal += e.wheelDelta / 1200
if (this.params.zoomVal >= 0.2) {
this.test = `transform:scale(${this.params.zoomVal});`
} else {
this.params.zoomVal = 0.2
this.test = `transform:scale(${this.params.zoomVal});`
return false
}
},
// 实现图片拖拽
imgMove(e) {
console.log('e', e)
let oImg = e.target
let disX = e.clientX - oImg.offsetLeft
let disY = e.clientY - oImg.offsetTop
console.log('disX', disX)
document.onmousemove = (e) => {
e.preventDefault()
let left = e.clientX - disX
let top = e.clientY - disY
this.test = this.test + `left: ${left}px;top: ${top}px;`
}
document.onmouseup = (e) => {
document.onmousemove = null
document.onmouseup = null
}
},
handleZoomIn() {
this.zoomInShow = true
},
handleZoomOut() {
this.zoomInShow = false
},
handlePhotoShow(file) {
console.log('file', file)
this.file = file
this.pictShow = true
},
handleClose() {
this.pictShow = false
this.test = `transform:scale(1)`
},
},
}
</script>
<style scoped lang="less">
.showImg {
width: 100%;
height: 100vh;
background-color: rgba(0, 0, 0, 1);
position: fixed;
*position: absolute;
z-index: 20;
margin: 0 auto;
top: 0;
left: 0;
display: flex;
justify-content: center;
align-items: center;
.setting_box {
width: 100%;
height: 50px;
line-height: 50px;
font-size: 20px;
background-color: rgba(0, 0, 0, 0.3);
position: absolute;
top: 0;
z-index: 999;
.setting_zoom,
.setting_close {
position: absolute;
z-index: 1000;
top: 20px;
color: #fff;
opacity: 1;
}
.setting_zoom {
right: 50px;
}
.setting_close {
right: 10px;
}
}
}
.a1 {
max-width: 200vw;
max-height: 180vh;
position: absolute;
z-index: 22;
margin-top: 40px;
cursor: move;
}
.a2 {
max-width: 95vw;
max-height: 90vh;
position: absolute;
z-index: 22;
margin-top: 40px;
cursor: move;
}
.zoom-box {
cursor: zoom-in;
}
.photo_box {
margin: 0 5px 5px 0;
}
</style>
因为具体也是查看了很多博客等资源最后完成的。
其实在代码内有一部分代码:
<img
:src="file"
preview="0"
preview-text="图片"
alt=""
@click="handlePhotoShow(file)"
/>
其实有 preview="0" preview-text="图片" 这两行实现图片的预览,但是找了资料没找到具体实现的部分,但是这个属性确实实现了
这里手写预览的原因是这个插件在数量大的情况下是没有反应的。
总结
到此这篇关于Vue实现图片预览效果实例(放大、缩小、拖拽)的文章就介绍到这了,更多相关Vue图片放大缩小拖拽内容请搜索以前的文章或继续浏览下面的相关文章希望大家以后多多支持!
以上是 Vue实现图片预览效果实例(放大、缩小、拖拽) 的全部内容, 来源链接: utcz.com/p/239173.html