MySQL数据库实现MMM高可用群集架构
概念
MMM(Master-Master replication managerfor Mysql,Mysql主主复制管理器)是一套灵活的脚本程序,基于perl实现,用来对mysql replication进行监控和故障迁移,并能管理mysql Master-Master复制的配置(同一时间只有一个节点是可写的)。
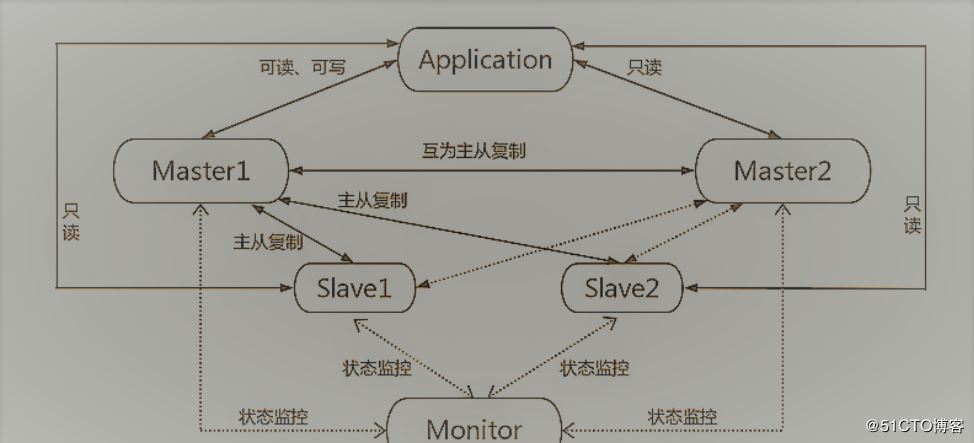
MMM高可用架构说明
- mmm_mond:监控进程,负责所有的监控工作,决定和处理所有节点角色活动。此脚本需要在监管机上运行。
- mmm_agentd:运行在每个mysql服务器上的代理进程,完成监控的探针工作和执行简单的远端服务设置。此脚本需要在被监管机上运行。
- mmm_control:一个简单的脚本,提供管理mmm_mond进程的命令。
- mysql-mmm的监管端会提供多个虚拟IP(VIP),包括一个可写VIP,多个可读VIP,通过监管的管理,这些IP会绑定在可用mysql之上,当某一台mysql宕机时,监管会将VIP迁移至其他mysql。在整个监管过程中,需要在mysql中添加相关授权用户,以便让mysql可以支持监理机的维护。授权的用户包括一个mmm_monitor用户和一个mmm_agent用户。
MMM的优缺点
优点: 高可用性,扩展性好,出现故障自动切换,对于主主同步,在同一时间只提供一台数据库写操作,保证的数据的一致性。
缺点: Monitor节点是单点,可以结合Keepalived实现高可用,对主机的数量有要求,需要实现读写分离,对程序来说是个挑战。
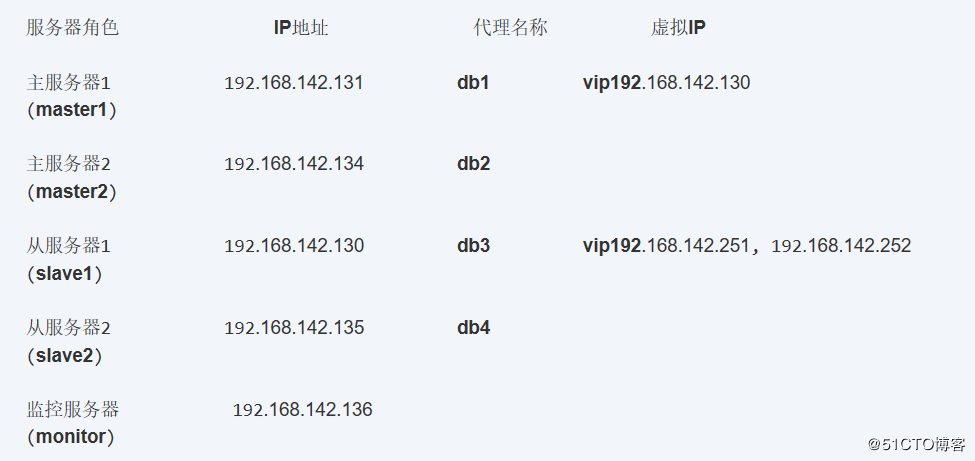
实验环境部署
第一步:在四台服务器上都需要安装MySQL数据库
1.配置ALI云源,然后安装epel-release源
[root@localhost ~]# wget -O /etc/yum.repos.d/CentOS-Base.repo http://mirrors.aliyun.com/repo/Centos-7.repo
[root@localhost ~]# yum -y install epel-release
[root@localhost ~]# yum clean all && yum makecache
2.搭建本地yum源
#安装数据库
[root@localhost ~]# yum -y install mariadb-server mariadb
#关闭防火墙和安全功能
[root@localhost ~]# systemctl stop firewalld.service
[root@localhost ~]# setenforce 0
#开启数据库
[root@localhost ~]# systemctl start mariadb.service
3.修改ml主配置文件
[root@localhost ~]# vim /etc/my.cnf
#删除前9行,添加以下内容
[mysqld]
log_error=/var/lib/mysql/mysql.err #错误日志的文件位置
log=/var/lib/mysql/mysql_log.log #访问日志的文件位置
log_slow_queries=/var/lib/mysql_slow_queris.log #man日志的文件位置
binlog-ignore-db=mysql,information_schema #mysql,information_schema不生成二进制日志文件
character_set_server=utf8 #字符集
log_bin=mysql_bin #二进制日志文件功能开启
server_id=1 #不同主机id不同
log_slave_updates=true #授权同步
sync_binlog=1 #二进制日志文件功能开启
auto_increment_increment=2 #自增量
auto_increment_offset=1 #起始值
[root@localhost ~]# systemctl restart mariadb.service
[root@localhost ~]# netstat -natp | grep 3306
4.复制配置文件到其他三台数据库服务器,注意修改server_id
[root@localhost ~]# scp /etc/my.cnf root@192.168.142.134:etc/
5.进入数据库,并查看日志文件信息
[root@localhost ~]# mysql
#查看记录日志文件名称和位置值
MariaDB [(none)]> show master status;
+------------------+----------+--------------+--------------------------+
| File | Position | Binlog_Do_DB | Binlog_Ignore_DB |
+------------------+----------+--------------+--------------------------+
| mysql_bin.000001 | 245| | mysql,information_schema |
+------------------+----------+--------------+--------------------------+
1 row in set (0.00 sec)
6.在m1和m2上互相授予访问的权限,并授权同步日志
#在m1和m2上互相授予访问的权限
MariaDB [(none)]> grant replication slave on *.* to 'replication'@'192.168.142.%' identified by '123456';
#在m1上指定m2的日志文件名和位置参数
MariaDB [(none)]> change master to master_host='192.168.142.134',master_user='replication',master_password='123456',master_log_file='mysql_bin.000001',master_log_pos=245;
#在m2上指定m1的日志文件名和位置参数
MariaDB [(none)]> change master to master_host='192.168.142.131',master_user='replication',master_password='123456',master_log_file='mysql_bin.000001',master_log_pos=245;
7.在m1上开启同步功能
MariaDB [(none)]> start slave;
8.查看同步状态,两台主服务器都要看到Yes
MariaDB [(none)]> show slave status\G;
Slave_IO_Running: Yes
Slave_SQL_Running: Yes
9.在m1上创建数据库
MariaDB [(none)]> create database school;
10.在m2上查看同步数据库
MariaDB [(none)]> show databases;
+--------------------+
| Database |
+--------------------+
| information_schema |
| mysql |
| performance_schema |
| school |
| test |
+--------------------+
5 rows in set (0.00 sec)
11.在两台从上做-注意日志文件和位置参数的改变(都指向m1)
MariaDB [(none)]> change master to master_host='192.168.142.131',master_user='replication',master_password='123456',master_log_file='mysql_bin.000001',master_log_pos=245;
12.开启同步功能
MariaDB [(none)]> start slave;
#在从服务器上查看同步数据信息
MariaDB [(none)]> show databases;
+--------------------+
| Database |
+--------------------+
| information_schema |
| mysql |
| performance_schema |
| school |
| test |
+--------------------+
5 rows in set (0.00 sec)
13.在四台服务器上安装MMM相关软件
[root@localhost ~]# yum -y install mysql-mmm*
14.配置mmm_common.conf配置文件
[root@localhost ~]# vim /etc/mysql-mmm/mmm_common.conf
<host default>
#修改网卡为ens33
cluster_interface ens33
pid_path /run/mysql-mmm-agent.pid
bin_path /usr/libexec/mysql-mmm/
replication_user replicantion
#修改授权密码
replication_password 123456
agent_user mmm_agent
#修改代理授权密码
agent_password 123456
</host>
#指定四台服务器的角色与IP地址
<host db1>
ip 192.168.142.131
mode master
peer db2
</host>
<host db2>
ip 192.168.142.134
mode master
peer db1
</host>
<host db3>
ip 192.168.142.130
mode slave
</host>
<host db4>
ip 192.168.142.135
mode slave
</host>
#设定主服务器虚拟IP
<role writer>
hosts db1, db2
ips 192.168.142.250
mode exclusive
</role>
#设定从服务器虚拟IP
<role reader>
hosts db3, db4
ips 192.168.142.251, 192.168.142.252
mode balanced
</role>
15.从m1上面复制配置文件到其他三台服务器
[root@localhost ~]# scp mmm_common.conf/mmm_common.conf root@192.168.142.134:/etc/mysql-mmm/mmm_common.conf
[root@localhost ~]# scp mmm_common.conf/mmm_common.conf root@192.168.142.130:/etc/mysql-mmm/mmm_common.conf
[root@localhost ~]# scp mmm_common.conf/mmm_common.conf root@192.168.142.135:/etc/mysql-mmm/mmm_common.conf
第二步:配置monitor监控服务器
1.安装epel-release源以及MMM相关软件
[root@localhost ~]# systemctl stop firewalld.service
[root@localhost ~]# setenforce 0
[root@localhost ~]# wget -O /etc/yum.repos.d/CentOS-Base.repo http://mirrors.aliyun.com/repo/Centos-7.repo
[root@localhost ~]# yum -y install epel-release
[root@localhost ~]# yum clean all && yum makecache
[root@localhost ~]# yum -y install mysql-mmm*
2.从m1上面复制配置文件到监控服务器
[root@localhost ~]# scp mmm_common.conf root@192.168.142.134:/etc/mysql-mmm/
3.配置mmm_common.conf配置文件
[root@localhost ~]# vim /etc/mysql-mmm/mmm_mon.conf
<monitor>
ip 127.0.0.1
pid_path /run/mysql-mmm-monitor.pid
bin_path /usr/libexec/mysql-mmm
status_path /var/lib/mysql-mmm/mmm_mond.status
#指向四台服务器的IP地址
ping_ips 192.168.142.131,192.168.142.134,192.168.142.130,192.168.142.135
auto_set_online 10
4.在所有数据库服务器上为mmm_agent授权
MariaDB [(none)]> grant super, replication client, process on *.* to 'mmm_agent'@'192.168.142.%' identified by '123456';
Query OK, 0 rows affected (0.02 sec)
5.在所有数据库服务器上为mmm_moniter授权
MariaDB [(none)]> grant replication client on *.* to 'mmm_monitor'@'192.168.18.%' identified by '123456';
Query OK, 0 rows affected (0.02 sec)
6.刷新数据库、在所有数据库服务器上设定代理名称
[root@localhost ~]# vim /etc/mysql-mmm/mmm_agent.conf #修改代理配置文件
#m1中默认名称
this db1
#m2中名称
this db2
#s1中名称
this db3
#s2中名称
this db4
7.所有数据库服务器上启动代理功能并设定开机自启动
#启动代理功能
[root@localhost ~]# systemctl start mysql-mmm-agent.service
#设置开机自启动
[root@localhost ~]# systemctl enable mysql-mmm-agent.service
8.在monitor服务器开启监控服务、查看各节点的情况
[root@localhost mysql-mmm]# systemctl start mysql-mmm-monitor.service
[root@localhost ~]# mmm_control show
db1(192.168.142.131) master/ONLINE. Roles: writer(192.168.142.250)
db2(192.168.142.134) master/ONLINE. Roles:
db3(192.168.142.130) slave/ONLINE. Roles: reader(192.168.142.252)
db4(192.168.142.135) slave/ONLINE. Roles: reader(192.168.142.251)
9、检测所有服务器状态
[root@localhost ~]# mmm_control checks all
db4 ping [last change: 2019/11/25 18:23:03] OK
db4 mysql [last change: 2019/11/25 18:23:03] OK
db4 rep_threads [last change: 2019/11/25 18:23:03] OK
db4 rep_backlog [last change: 2019/11/25 18:23:03] OK: Backlog is null
db2 ping [last change: 2019/11/25 18:23:03] OK
db2 mysql [last change: 2019/11/25 18:59:01] OK
db2 rep_threads [last change: 2019/11/25 18:59:01] OK
db2 rep_backlog [last change: 2019/11/25 18:59:01] OK: Backlog is null
db3 ping [last change: 2019/11/25 18:23:03] OK
db3 mysql [last change: 2019/11/25 18:59:01] OK
db3 rep_threads [last change: 2019/11/25 18:59:01] OK
db3 rep_backlog [last change: 2019/11/25 18:59:01] OK: Backlog is null
db1 ping [last change: 2019/11/25 18:23:03] OK
db1 mysql [last change: 2019/11/25 18:59:01] OK
db1 rep_threads [last change: 2019/11/25 18:59:01] OK
db1 rep_backlog [last change: 2019/11/25 18:59:01] OK: Backlog is null
第三、故障测试
1、模拟m1服务器宕机,停止服务
[root@localhost ~]# systemctl stop mariadb.service
2.当m1服务器宕机后,m2接收虚拟IP继续提供服务
[root@localhost ~]# mmm_control show
db1(192.168.142.131) master/ONLINE. Roles:
db2(192.168.142.134) master/ONLINE. Roles: writer(192.168.142.250)
db3(192.168.142.130) slave/ONLINE. Roles: reader(192.168.142.252)
db4(192.168.142.135) slave/ONLINE. Roles: reader(192.168.142.251)
3.当s1服务器宕机后,s2接收虚拟IP继续提供服务
[root@localhost ~]# mmm_control show db1(192.168.142.131) master/ONLINE. Roles: writer(192.168.142.250)
db2(192.168.142.134) master/ONLINE. Roles:
db3(192.168.142.130) slave/HARD_OFFLINE. Roles:
db4(192.168.142.135) slave/ONLINE. Roles: reader(192.168.142.251), reader(192.168.142.252
4.在m1服务器上为监控服务器地址授权登录
MariaDB [(none)]> grant all on *.* to 'root'@'192.168.142.136' identified by '123456';
Query OK, 0 rows affected (0.00 sec)
5.在监控服务器上安装数据库客户端
[root@localhost ~]# yum -y install mariadb
6.在监控服务器上使用指定用户登录数据库,并创建数据信息
[root@localhost ~]# mysql -u root -p -h 192.168.142.250
Enter password:
#输入密码即可
#创建一个数据库
MariaDB [(none)]> create database BDQN;
Query OK, 1 row affected (0.01 sec)
7.在所有数据库上都能查看及时同步到的数据信息
MariaDB [(none)]> show databases; #查看数据库
+--------------------+
| Database |
+--------------------+
| information_schema |
| BDQN | #同步到的BDQN数据库
| mysql |
| performance_schema |
| school |
| test |
+--------------------+
6 rows in set (0.00 sec)
到此MMM群集架构已完成,谢谢阅读!!!
以上就是本文的全部内容,希望对大家的学习有所帮助,也希望大家多多支持。
以上是 MySQL数据库实现MMM高可用群集架构 的全部内容, 来源链接: utcz.com/p/229981.html