JS+JQuery实现无缝连接轮播图
我之前写过一个简易版的自动+手动轮播图:简易轮播图
但是这个轮播图在切换的时候是没有实现无缝滚动的,每张图片都是单张切换的,而不是滑动。现在用JQuery实现无缝连接的轮播图。
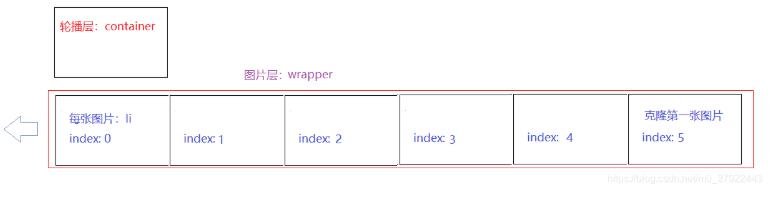
无缝连接的轮播图的原理如下:
代码:
<!DOCTYPE html>
<html>
<head>
<meta charset="utf-8">
<title>无缝轮播图</title>
</head>
<style type="text/css">
* {
margin: 0;
padding: 0;
list-style: none;
text-decoration: none;
}
#container {
position: relative;
/*轮播图容器的宽高*/
width: 500px;
height: 260px;
margin: 20px auto;
overflow: hidden;
/*溢出隐藏:只显示一张图片*/
}
#container .wrapper {
position: absolute;
top: 0;
left: 0;
/*每张图片的宽度和轮播图容器的宽度相等,
整个图片层长度:500*5=2500,由于克隆了一张,多加一张宽度*/
width: 3000px;
height: 100%;
}
#container .wrapper li {
width: 500px;
height: 100%;
float: left;
}
#container .wrapper li img {
width: 100%;
height: 100%;
vertical-align: middle;
/*去掉未浮动时图片间的上下空隙*/
}
#container .btnLeft,
#container .btnRight {
display: none;
z-index: 999;
width: 30px;
height: 30px;
position: absolute;
top: 50%;
margin-top: -15px;
background-color: #9E9E9E;
border-radius: 20%;
opacity: 60%;
font-size: 20px;
color: #673ab7;
text-align: center;
line-height: 30px;
}
#container .btnLeft {
left: 0;
}
#container .btnRight {
right: 0;
}
#container .btnLeft:hover,
#container .btnRight:hover {
opacity: 70%;
cursor: pointer;
}
/* 鼠标滑过图片的时候显示按钮 */
#container:hover .btnLeft,
#container:hover .btnRight {
display: block;
}
/*圆点层*/
#container .dots {
background: rgba(0, 0, 0, .3);
position: absolute;
left: 50%;
bottom: 10px;
transform: translateX(-50%);
z-index: 999;
padding: 4px;
border-radius: 24px;
}
#container .dots li {
width: 15px;
height: 15px;
border-radius: 50%;
background-color: #9e9e9e;
float: left;
/*可以使用行块盒*/
/*display: inline-block;*/
margin: 0 5px;
cursor: pointer;
}
#container .dots li.active {
background-color: #c74b42;
}
.clearfix::after {
content: "";
display: block;
clear: both;
}
</style>
<body>
<!-- 实现轮播图的容器 -->
<div id="container">
<!-- 存放全部图片的容器 -->
<div class="wrapper">
<!-- LI: 每张图片 -->
<li><img src="0.jpg"></li>
<li><img src="1.jpg"></li>
<li><img src="2.jpg"></li>
<li><img src="3.jpg"></li>
<li><img src="4.jpg"></li>
<!-- 克隆到末尾 -->
<li><img src="0.jpg"></li>
</div>
<div class="btnLeft"><</div>
<div class="btnRight">></div>
<!-- 分页器:圆点 -->
<div class="dots">
<ul class="clearfix">
<li class="active"></li>
<li></li>
<li></li>
<li></li>
<li></li>
</ul>
</div>
</div>
<script src="jquery-1.11.3.min.js"></script>
<!-- <script src="index.js"></script> -->
<script type="text/javascript">
let $container = $('#container'),
$wrapper = $container.children('.wrapper'),
$btnLeft = $container.find('.btnLeft'),
$btnRight = $container.find('.btnRight'),
$dots = $container.find('.dots'),
$dotList = $dots.find('li');
let autoTimer = null,
interval = 2000,
imgIndex = 0; //当前轮播的图片索引,默认第一张
// 自动轮播
function autoPlay() {
// 让wrapper向左移动
imgIndex++;
/* if(imgIndex === 4) imgIndex = 0; 这样写会导致图片会一下变到第一张,不是无缝滚动
无缝滚动:
1. 把第一张克隆一份放到末尾,wrapper中会比真实的图片层多一张
2. 依然一张张往后滚动,滚动到第5张的时候,继续向后走(imgIndex=6),看到了克隆的第一张,再要向后走的时候,
让其“立即”跳转到真实的第一张(肉眼看不出跳转),然后运动到第二张......
*/
if (imgIndex > 5) {
// 上次显示的是克隆的那张,忽略真实的第一张,让其立即跳转到第二张
$wrapper.css('left', 0);
imgIndex = 1;
}
// 匀速向左移动
// 无动画版:$wrapper.css('transform', 'translate(' + (-imgIndex * 500) + 'px)');
// 动画版:
$wrapper.stop().animate({
left: -imgIndex * 500 //JQ自动补'px'
}, 300);
showDots();
}
autoTimer = setInterval(autoPlay, interval);
// 圆点对焦
function showDots() {
// 由于不能修改imgIndex的值,所以定义一个临时变量
let temp = imgIndex;
temp === 5 ? temp = 0 : null;
$dotList.each((index, item) => {
let $item = $(item);
if (index === temp) {
$item.addClass('active');
return;
}
$item.removeClass('active');
});
}
// 鼠标进入/离开轮播区域时停止/开启自动轮播
$container.on('mouseenter', () => {
clearInterval(autoTimer);
});
$container.on('mouseleave', () => {
autoTimer = setInterval(autoPlay, interval);
});
// 点击圆点
$dotList.click(function () {
let index = $(this).index();
imgIndex = index;
$wrapper.stop().animate({
left: -imgIndex * 500 //JQ自动补'px'
}, 300);
showDots();
});
// 左键点击
$btnLeft.click(function () {
imgIndex--;
if (imgIndex < 0) {
// 上次显示的是真实的第一张,忽略克隆的倒数第一张,让其立即跳转倒数第二张
$wrapper.css('left', -2500);
imgIndex = 4;
}
$wrapper.stop().animate({
left: -imgIndex * 500 //JQ自动补'px'
}, 300);
showDots();
});
// 右键点击:相当于自动轮播
$btnRight.click(function() {
autoPlay();
});
</script>
</body>
</html>
这段代码用单例模式优化一下:
html部分:test.html
<!DOCTYPE html>
<html>
<head>
<meta charset="utf-8">
<title>无缝轮播图</title>
</head>
<style type="text/css">
* {
margin: 0;
padding: 0;
list-style: none;
text-decoration: none;
}
#container {
position: relative;
/*轮播图容器的宽高*/
width: 500px;
height: 260px;
margin: 20px auto;
overflow: hidden;
/*溢出隐藏:只显示一张图片*/
}
#container .wrapper {
position: absolute;
top: 0;
left: 0;
/*每张图片的宽度和轮播图容器的宽度相等,
整个图片层长度:500*5=2500,由于克隆了一张,多加一张宽度*/
width: 3000px;
height: 100%;
}
#container .wrapper li {
width: 500px;
height: 100%;
float: left;
}
#container .wrapper li img {
width: 100%;
height: 100%;
vertical-align: middle;
/*去掉未浮动时图片间的上下空隙*/
}
#container .btnLeft,
#container .btnRight {
display: none;
z-index: 999;
width: 30px;
height: 30px;
position: absolute;
top: 50%;
margin-top: -15px;
background-color: #9E9E9E;
border-radius: 20%;
opacity: 60%;
font-size: 20px;
color: #673ab7;
text-align: center;
line-height: 30px;
}
#container .btnLeft {
left: 0;
}
#container .btnRight {
right: 0;
}
#container .btnLeft:hover,
#container .btnRight:hover {
opacity: 70%;
cursor: pointer;
}
/* 鼠标滑过图片的时候显示按钮 */
#container:hover .btnLeft,
#container:hover .btnRight {
display: block;
}
/*圆点层*/
#container .dots {
background: rgba(0, 0, 0, .3);
position: absolute;
left: 50%;
bottom: 10px;
transform: translateX(-50%);
z-index: 999;
padding: 4px;
border-radius: 24px;
}
#container .dots li {
width: 15px;
height: 15px;
border-radius: 50%;
background-color: #9e9e9e;
float: left;
/*可以使用行块盒*/
/*display: inline-block;*/
margin: 0 5px;
cursor: pointer;
}
#container .dots li.active {
background-color: #c74b42;
}
.clearfix::after {
content: "";
display: block;
clear: both;
}
</style>
<body>
<!-- 实现轮播图的容器 -->
<div id="container">
<!-- 存放全部图片的容器 -->
<div class="wrapper">
<!-- LI: 每张图片 -->
<li><img src="0.jpg"></li>
<li><img src="1.jpg"></li>
<li><img src="2.jpg"></li>
<li><img src="3.jpg"></li>
<li><img src="4.jpg"></li>
<!-- 克隆到末尾 -->
<li><img src="0.jpg"></li>
</div>
<div class="btnLeft"><</div>
<div class="btnRight">></div>
<!-- 分页器:圆点 -->
<div class="dots">
<ul class="clearfix">
<li class="active"></li>
<li></li>
<li></li>
<li></li>
<li></li>
</ul>
</div>
</div>
<script src="jquery-1.11.3.min.js"></script>
<script src="index.js"></script>
</body>
</html>
JS部分:index.js
function debounce(func, wait, immediate) {
let timer = null,
result = null;
return function anonymous(...args) {
let context = this,
now = immediate && !timer;
clearTimeout(timer);
timer = setTimeout(() => {
timer = null;
!immediate ? (result = func.call(context, ...args)) : null;
}, wait);
now ? (result = func.call(context, ...args)) : null;
return result;
};
}
let bannerModule = (function () {
let $container = $("#container"),
$wrapper = $container.children(".wrapper"),
$btnLeft = $container.find(".btnLeft"),
$btnRight = $container.find(".btnRight"),
$dots = $container.find(".dots"),
$dotList = $dots.find("li");
let autoTimer = null,
interval = 2000,
imgIndex = 0; //当前轮播的图片索引,默认第一张
// 自动轮播
function autoPlay() {
// 让wrapper向左移动
imgIndex++;
/* if(imgIndex === 4) imgIndex = 0; 这样写会导致图片会一下变到第一张,不是无缝滚动
无缝滚动:
1. 把第一张克隆一份放到末尾,wrapper中会比真实的图片层多一张
2. 依然一张张往后滚动,滚动到第5张的时候,继续向后走(imgIndex=6),看到了克隆的第一张,再要向后走的时候,
让其“立即”跳转到真实的第一张(肉眼看不出跳转),然后运动到第二张......
*/
if (imgIndex > 5) {
// 上次显示的是克隆的那张,忽略真实的第一张,让其立即跳转到第二张
$wrapper.css("left", 0);
imgIndex = 1;
}
// 匀速向左移动
// 无动画版:$wrapper.css('transform', 'translate(' + (-imgIndex * 500) + 'px)');
// 动画版:
$wrapper.stop().animate({
left: -imgIndex * 500 //JQ自动补'px'
}, 300);
showDots();
}
// 圆点对焦
function showDots() {
// 由于不能修改imgIndex的值,所以定义一个临时变量
let temp = imgIndex;
temp === 5 ? (temp = 0) : null;
$dotList.each((index, item) => {
let $item = $(item);
if (index === temp) {
$item.addClass("active");
return;
}
$item.removeClass("active");
});
}
//点击圆点
function clickDots() {
$dotList.click(debounce(function () {
let index = $(this).index();
imgIndex = index;
$wrapper.stop().animate({
left: -imgIndex * 500 //JQ自动补'px'
}, 300);
showDots();
},300,true));
}
// 左右按键
function btnClick() {
$btnLeft.click(function () {
imgIndex--;
if (imgIndex < 0) {
// 上次显示的是真实的第一张,忽略克隆的倒数第一张,让其立即跳转倒数第二张
$wrapper.css('left', -2500);
imgIndex = 4;
}
$wrapper.stop().animate({
left: -imgIndex * 500 //JQ自动补'px'
}, 300);
showDots();
});
// 右键点击:相当于自动轮播
$btnRight.click(debounce(autoPlay, 300, true));
}
return {
init: function () {
autoTimer = setInterval(autoPlay, interval);
// 鼠标进入/离开轮播区域时停止/开启自动轮播
$container.on("mouseenter", () => {
clearInterval(autoTimer);
});
$container.on("mouseleave", () => {
autoTimer = setInterval(autoPlay, interval);
});
clickDots();
btnClick();
},
};
})();
bannerModule.init();
以上就是本文的全部内容,希望对大家的学习有所帮助,也希望大家多多支持。
以上是 JS+JQuery实现无缝连接轮播图 的全部内容, 来源链接: utcz.com/p/219258.html