小程序实现tab标签页
本文实例为大家分享了小程序实现tab标签页的具体代码,供大家参考,具体内容如下
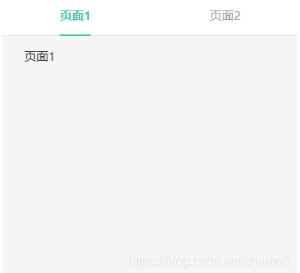
页面效果:

HTML:
<view wx:if="{{userType==0}}" style="height:100%">
<view class="tab_box" style="width: 100%">
<view class="tabs_v">
<block wx:for="{{tabs}}" wx:for-item="item" wx:key="index">
<view class="tab_v {{index<1?'tab_nature':'tab_course'}}" bindtap='changeCurrentTab_' data-index='{{index}}'
data-current='{{index}}'>
<text class="tab_txt {{currentTab==index? 'tab_v_active' : ''}}">{{item.label}}</text>
</view>
</block>
</view>
</view>
<!-- tab 容器 -->
<view class="tabWrap">
<swiper class="" current="{{currentTab}}" duration="300" bindchange="swiperTab" style="width:100%;height:100%;">
<!-- 页面1 -->
<block>
<swiper-item style="width:100%;height:100%;">
<view class="" style="width:100%;height:100%;">
<scroll-view style="width:100%;height:100%;" scroll-y="true" bindscrolltolower='scrollToLower'
bindscrolltoupper='scrollToUpper' lower-threshold='30' upper-threshold='30'>
<view style="width:100%;height:auto;">
页面1
</view>
</scroll-view>
</view>
</swiper-item>
</block>
<!-- 页面2 -->
<block>
<swiper-item style="width:100%;height:100%;">
<view class="" style="width:100%;height:100%;">
<scroll-view style="width:100%;height:100%;" scroll-y="true" bindscrolltolower='scrollToLower'
bindscrolltoupper='scrollToUpper' lower-threshold='30' upper-threshold='30'>
<view style="width:100%;height:auto;">
页面2
</view>
</scroll-view>
</view>
</swiper-item>
</block>
</swiper>
</view>
</view>
CSS:
/* tab */
.tab_box{
height: 50px;
display: flex;
flex-direction: row;
background-color: #fff;
border-bottom: 1px solid #E5E5E5;
margin-bottom: 15px;
}
.tabs_v{
width: 100%;
display: flex;
flex-direction: row;
justify-content: space-between;
align-items: center;
}
.tab_v{
width: 50%;
text-align: center;
}
.tab_txt{
border-bottom: 2px solid transparent;
padding-bottom: 14px;
color: #999999;
}
.tab_v_active{
border-bottom: 2px solid #00C6AC;
color: #00C6AC;
font-weight: bold;
}
/* 容器 */
.tabWrap{
width: 100%;
height: calc(100% - 67px);
position: relative;
border-bottom: 1px solid #e6e6e6;
}
JS:
Page({
/**
* 页面的初始数据
*/
data: {
tabs: [
{label:'访客', index: 0},
{label:'工作人员', index: 1}
],
currentTab:0
},
/**
* 生命周期函数--监听页面加载
*/
onLoad: function (options) {
},
/**
* 生命周期函数--监听页面初次渲染完成
*/
onReady: function () {
},
/**
* 生命周期函数--监听页面显示
*/
onShow: function () {
},
// tab切换
changeCurrentTab_(e){
let that = this
if (that.data.currentTab === e.currentTarget.dataset.current){
return false
}else{
that.setData({
currentTab: e.currentTarget.dataset.current
})
}
},
//滑动切换
swiperTab: function (e) {
var that = this;
that.setData({
currentTab: e.detail.current
});
}
})
为大家推荐现在关注度比较高的微信小程序教程一篇:《微信小程序开发教程》小编为大家精心整理的,希望喜欢。
以上就是本文的全部内容,希望对大家的学习有所帮助,也希望大家多多支持。
以上是 小程序实现tab标签页 的全部内容, 来源链接: utcz.com/p/218751.html


