javascript实现移动端上传图片功能
本文实例为大家分享了javascript实现移动端上传图片的具体代码,供大家参考,具体内容如下
核心部分(.html)
window.onload = function() {
let fileTag = document.getElementById('file');
// console.log(fileTag)
// console.log(this.pic)
let that = this
fileTag.onchange = function() {
let file = fileTag.files[0];
let fileReader = new FileReader();
// console.log(file)
console.log(fileReader)
// console.log(that.pic)
fileReader.onloadend = function() {
console.log(1212)
if (fileReader.readyState == fileReader.DONE) {
// console.log(that.pic)
console.log(fileReader)
if(that.pic=="") {
console.log(1111)
that.pic = fileReader.result
that.input1 = false
that.upLoad(fileReader.result)
return
}else{
if(that.pic2=='') {
console.log(2222)
that.pic2 = fileReader.result
that.input2 = false
return
}else {
if(that.pic3=='') {
console.log(3333)
that.pic3 = fileReader.result
that.input3 = false
return
}else {
if(that.pic4=='') {
console.log(4444)
that.pic4 = fileReader.result
that.input4 = false
return
}else {
console.log(5555)
if(that.pic5=='') {
that.pic5 = fileReader.result
that.input5 = false
return
}
}
}
}
}
// console.log(that.pic)
}
};
fileReader.readAsDataURL(file);
}
}
vue项目代码
主要是HTML页面设计
<div class="imgBox" @click="upImg">
<div style="display:flex;flex-flow:wrap;">
<div class="Img" >
<label>
<img v-if="pic==''" src="./img/addPhotos.jpg">
<img v-else width='100%' height='100%' style="border-radius:5px" id="img" :src="pic">
<input v-if="input1" class="myInput" type="file" id="file" accept="image/*" multiple required>
</label>
<div v-if="pic!=''" class="myDel" @click="delImg(1)">X</div>
</div>
<div class="Img" v-if="pic!='' || !input2">
<label>
<img v-if="pic2==''" src="./img/addPhotos.jpg">
<img v-else width='100%' height='100%' style="border-radius:5px" :src="pic2">
<input v-if="input2" class="myInput" type="file" id="file" accept="image/*" multiple required>
</label>
<div v-if="pic2!=''" class="myDel" @click="delImg(2)">X</div>
</div>
<div class="Img" v-if="(pic!='' && pic2!='' ) || !input3">
<label>
<img v-if="pic3==''" src="./img/addPhotos.jpg">
<img v-else width='100%' height='100%' style="border-radius:5px" :src="pic3">
<input v-if="input3" class="myInput" type="file" id="file" accept="image/*" multiple required>
</label>
<div v-if="pic3!=''" class="myDel" @click="delImg(3)">X</div>
</div>
<div class="Img" v-if="(pic!='' && pic2!='' && pic3!='') || !input4">
<label>
<img v-if="pic4==''" src="./img/addPhotos.jpg">
<img v-else width='100%' height='100%' style="border-radius:5px" :src="pic4">
<input v-if="input4" class="myInput" type="file" id="file" accept="image/*" multiple required>
</label>
<div v-if="pic4!=''" class="myDel" @click="delImg(4)">X</div>
</div>
<div class="Img" v-if="(pic!='' && pic2!='' && pic3!='' && pic4!='') || !input5">
<label>
<img v-if="pic5==''" src="./img/addPhotos.jpg">
<img v-else width='100%' height='100%' style="border-radius:5px" :src="pic5">
<input v-if="input5" class="myInput" type="file" id="file" accept="image/*" multiple required>
</label>
<div v-if="pic5!=''" class="myDel" @click="delImg(5)">X</div>
</div>
</div>
</div>
data()部分
pic:'',
pic2:'',
pic3:'',
pic4:'',
pic5:'',
input1:true,
input2:true,
input3:true,
input4:true,
input5:true
methods:{}部分
upImg() {
// window.onload = function() {
let fileTag = document.getElementById('file');
// console.log(fileTag)
// console.log(this.pic)
let that = this
fileTag.onchange = function() {
let file = fileTag.files[0];
let fileReader = new FileReader();
// console.log(file)
console.log(fileReader)
// console.log(that.pic)
fileReader.onloadend = function() {
console.log(1212)
if (fileReader.readyState == fileReader.DONE) {
// console.log(that.pic)
console.log(fileReader)
if(that.pic=="") {
console.log(1111)
that.pic = fileReader.result
that.input1 = false
that.upLoad(fileReader.result)
return
}else{
if(that.pic2=='') {
console.log(2222)
that.pic2 = fileReader.result
that.input2 = false
return
}else {
if(that.pic3=='') {
console.log(3333)
that.pic3 = fileReader.result
that.input3 = false
return
}else {
if(that.pic4=='') {
console.log(4444)
that.pic4 = fileReader.result
that.input4 = false
return
}else {
console.log(5555)
if(that.pic5=='') {
that.pic5 = fileReader.result
that.input5 = false
return
}
}
}
}
}
// console.log(that.pic)
}
};
fileReader.readAsDataURL(file);
}
// }
},
delImg(num) {
if(num==1) {
this.pic = ''
this.input1 = true
}
if(num==2) {
this.pic2 = ''
this.input2 = true
}
if(num==3) {
this.pic3 = ''
this.input3 = true
}
if(num==4) {
this.pic4 = ''
this.input4 = true
}
if(num==5) {
this.pic5 = ''
this.input5 = true
}
}
css部分(style)
#order .imgBox {
margin-bottom: 100px;
padding: 20px;
box-sizing: border-box;
background: #fff;
height: 250px;
}
#order .Img {
width: 90px;
height: 90px;
background: #fff;
text-align: center;
line-height: 132px;
box-sizing: border-box;
border-radius: 5px;
border: 1px solid rgba(0,0,0,.2);
position: relative;
margin: 0 20px 20px 0;
}
#order .myInput {
opacity:0;
position:absolute;
top:0;
top:0;
width:90px;
height:90px;
left:0;
}
#order .myDel {
color: #fff;
position: absolute;
right: -10px;
top: -7px;
width: 25px;
height: 25px;
border-radius: 25px;
line-height: 25px;
background: rgba(0,0,0,.5);
}
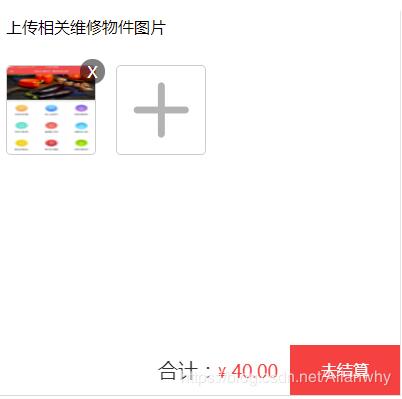
效果图


更多精彩内容请参考专题《ajax上传技术汇总》,《javascript文件上传操作汇总》和《jQuery上传操作汇总》进行学习。
以上就是本文的全部内容,希望对大家的学习有所帮助,也希望大家多多支持。
以上是 javascript实现移动端上传图片功能 的全部内容, 来源链接: utcz.com/p/217547.html