Spring boot多线程配置方法
本文实例为大家分享了Spring boot多线程配置的具体代码,供大家参考,具体内容如下
1、配置线程配置类
package test;
import java.util.concurrent.Executor;
import org.springframework.aop.interceptor.AsyncUncaughtExceptionHandler;
import org.springframework.context.annotation.ComponentScan;
import org.springframework.context.annotation.Configuration;
import org.springframework.scheduling.annotation.AsyncConfigurer;
import org.springframework.scheduling.annotation.EnableAsync;
import org.springframework.scheduling.concurrent.ThreadPoolTaskExecutor;
@Configuration
@ComponentScan("test")
@EnableAsync
// 线程配置类
public class AsyncTaskConfig implements AsyncConfigurer {
// ThredPoolTaskExcutor的处理流程
// 当池子大小小于corePoolSize,就新建线程,并处理请求
// 当池子大小等于corePoolSize,把请求放入workQueue中,池子里的空闲线程就去workQueue中取任务并处理
// 当workQueue放不下任务时,就新建线程入池,并处理请求,如果池子大小撑到了maximumPoolSize,就用RejectedExecutionHandler来做拒绝处理
// 当池子的线程数大于corePoolSize时,多余的线程会等待keepAliveTime长时间,如果无请求可处理就自行销毁
@Override
public Executor getAsyncExecutor() {
ThreadPoolTaskExecutor taskExecutor = new ThreadPoolTaskExecutor();
taskExecutor.setCorePoolSize(5);// 最小线程数
taskExecutor.setMaxPoolSize(10);// 最大线程数
taskExecutor.setQueueCapacity(25);// 等待队列
taskExecutor.initialize();
return taskExecutor;
}
@Override
public AsyncUncaughtExceptionHandler getAsyncUncaughtExceptionHandler() {
return null;
}
}
2、定义线程执行任务类
package test;
import java.util.Random;
import java.util.concurrent.Future;
import org.springframework.scheduling.annotation.Async;
import org.springframework.scheduling.annotation.AsyncResult;
import org.springframework.stereotype.Service;
@Service
// 线程执行任务类
public class AsyncTaskService {
Random random = new Random();// 默认构造方法
@Async
// 表明是异步方法
// 无返回值
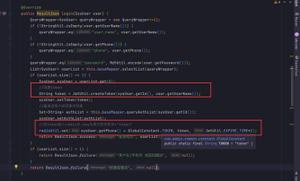
public void executeAsyncTask(Integer i) {
System.out.println("执行异步任务:" + i);
}
/**
* 异常调用返回Future
*
* @param i
* @return
* @throws InterruptedException
*/
@Async
public Future<String> asyncInvokeReturnFuture(int i) throws InterruptedException {
System.out.println("input is " + i);
Thread.sleep(1000 * random.nextInt(i));
Future<String> future = new AsyncResult<String>("success:" + i);// Future接收返回值,这里是String类型,可以指明其他类型
return future;
}
}
3、调用
package test;
import java.util.ArrayList;
import java.util.List;
import java.util.concurrent.ExecutionException;
import java.util.concurrent.Future;
import org.springframework.context.annotation.AnnotationConfigApplicationContext;
import org.springframework.core.task.TaskRejectedException;
public class Application {
public static void main(String[] args) throws InterruptedException, ExecutionException {
// testVoid();
testReturn();
}
// 测试无返回结果
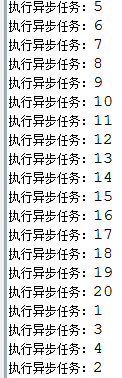
private static void testVoid() {
AnnotationConfigApplicationContext context = new AnnotationConfigApplicationContext(AsyncTaskConfig.class);
AsyncTaskService asyncTaskService = context.getBean(AsyncTaskService.class);
// 创建了20个线程
for (int i = 1; i <= 20; i++) {
asyncTaskService.executeAsyncTask(i);
}
context.close();
}
// 测试有返回结果
private static void testReturn() throws InterruptedException, ExecutionException {
AnnotationConfigApplicationContext context = new AnnotationConfigApplicationContext(AsyncTaskConfig.class);
AsyncTaskService asyncTaskService = context.getBean(AsyncTaskService.class);
List<Future<String>> lstFuture = new ArrayList<Future<String>>();// 存放所有的线程,用于获取结果
// 创建100个线程
for (int i = 1; i <= 100; i++) {
while (true) {
try {
// 线程池超过最大线程数时,会抛出TaskRejectedException,则等待1s,直到不抛出异常为止
Future<String> future = asyncTaskService.asyncInvokeReturnFuture(i);
lstFuture.add(future);
break;
} catch (TaskRejectedException e) {
System.out.println("线程池满,等待1S。");
Thread.sleep(1000);
}
}
}
// 获取值。get是阻塞式,等待当前线程完成才返回值
for (Future<String> future : lstFuture) {
System.out.println(future.get());
}
context.close();
}
}
maven配置
<project xmlns="http://maven.apache.org/POM/4.0.0" xmlns:xsi="http://www.w3.org/2001/XMLSchema-instance" xsi:schemaLocation="http://maven.apache.org/POM/4.0.0 http://maven.apache.org/xsd/maven-4.0.0.xsd">
<modelVersion>4.0.0</modelVersion>
<groupId>TestAysc</groupId>
<artifactId>TestAysc</artifactId>
<version>0.0.1-SNAPSHOT</version>
<dependencies>
<dependency>
<groupId>org.springframework.boot</groupId>
<artifactId>spring-boot</artifactId>
<version>1.5.6.RELEASE</version>
</dependency>
<dependency>
<groupId>org.springframework</groupId>
<artifactId>spring-aop</artifactId>
<version>4.3.10.RELEASE</version>
</dependency>
</dependencies>
</project>
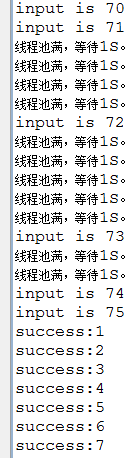
结果展示:
1、无返回结果
2、有返回结果
以上是 Spring boot多线程配置方法 的全部内容, 来源链接: utcz.com/p/215372.html