在springboot中对kafka进行读写的示例代码
springboot对kafka的client很好的实现了集成,使用非常方便,本文也实现了一个在springboot中实现操作kafka的demo。
1.POM配置
只需要在dependencies中增加 spring-kafka的配置即可。完整效果如下:
<parent>
<groupId>org.springframework.boot</groupId>
<artifactId>spring-boot-starter-parent</artifactId>
<version>1.5.4.RELEASE</version>
</parent>
<properties>
<java.version>1.8</java.version>
<spring-kafka.version>1.2.2.RELEASE</spring-kafka.version>
<project.build.sourceEncoding>UTF-8</project.build.sourceEncoding>
</properties>
<dependencies>
<groupId>org.springframework.boot</groupId>
<artifactId>spring-boot-starter-web</artifactId>
</dependency>
<dependency>
<groupId>org.springframework.boot</groupId>
<artifactId>spring-boot-starter</artifactId>
</dependency>
<dependency>
<groupId>org.springframework.boot</groupId>
<artifactId>spring-boot-starter-test</artifactId>
<scope>test</scope>
</dependency>
<dependency>
<groupId>org.springframework.boot</groupId>
<artifactId>spring-boot-starter-aop</artifactId>
</dependency>
<!-- spring-kafka -->
<dependency>
<groupId>org.springframework.kafka</groupId>
<artifactId>spring-kafka</artifactId>
<version>${spring-kafka.version}</version>
</dependency>
<dependency>
<groupId>org.springframework.kafka</groupId>
<artifactId>spring-kafka-test</artifactId>
<version>${spring-kafka.version}</version>
<scope>test</scope>
</dependency>
</dependencies>
2.生产者
参数配置类,其参数卸载yml文件中,通过@Value注入
package com.dhb.kafka.producer;
import org.apache.kafka.clients.producer.ProducerConfig;
import org.apache.kafka.common.serialization.StringSerializer;
import org.springframework.beans.factory.annotation.Value;
import org.springframework.context.annotation.Bean;
import org.springframework.context.annotation.Configuration;
import org.springframework.kafka.core.DefaultKafkaProducerFactory;
import org.springframework.kafka.core.KafkaTemplate;
import org.springframework.kafka.core.ProducerFactory;
import java.util.HashMap;
import java.util.Map;
@Configuration
public class SenderConfig {
@Value("${kafka.bootstrap-servers}")
private String bootstrapServers;
@Bean
public Map<String,Object> producerConfigs() {
Map<String,Object> props = new HashMap<>();
props.put(ProducerConfig.BOOTSTRAP_SERVERS_CONFIG,this.bootstrapServers);
props.put(ProducerConfig.KEY_SERIALIZER_CLASS_CONFIG, StringSerializer.class);
props.put(ProducerConfig.VALUE_SERIALIZER_CLASS_CONFIG,StringSerializer.class);
props.put(ProducerConfig.ACKS_CONFIG,"0");
return props;
}
@Bean
public ProducerFactory<String,String> producerFactory() {
return new DefaultKafkaProducerFactory<>(producerConfigs());
}
@Bean
public KafkaTemplate<String,String> kafkaTemplate() {
return new KafkaTemplate<String, String>(producerFactory());
}
@Bean
public Sender sender() {
return new Sender();
}
}
消息发送类
package com.dhb.kafka.producer;
import lombok.extern.slf4j.Slf4j;
import org.springframework.beans.factory.annotation.Autowired;
import org.springframework.kafka.core.KafkaTemplate;
@Slf4j
public class Sender {
@Autowired
private KafkaTemplate<String,String> kafkaTemplate;
public void send(String topic,String payload) {
log.info("sending payload='{}' to topic='{}'",payload,topic);
this.kafkaTemplate.send(topic,payload);
}
}
3.消费者
参数配置类
package com.dhb.kafka.consumer;
import org.apache.kafka.clients.consumer.ConsumerConfig;
import org.apache.kafka.common.serialization.StringDeserializer;
import org.springframework.beans.factory.annotation.Value;
import org.springframework.context.annotation.Bean;
import org.springframework.context.annotation.Configuration;
import org.springframework.kafka.annotation.EnableKafka;
import org.springframework.kafka.config.ConcurrentKafkaListenerContainerFactory;
import org.springframework.kafka.core.ConsumerFactory;
import org.springframework.kafka.core.DefaultKafkaConsumerFactory;
import java.util.HashMap;
import java.util.Map;
@Configuration
@EnableKafka
public class ReceiverConfig {
@Value("${kafka.bootstrap-servers}")
private String bootstrapServers;
public Map<String,Object> consumerConfigs() {
Map<String,Object> props = new HashMap<>();
props.put(ConsumerConfig.BOOTSTRAP_SERVERS_CONFIG,bootstrapServers);
props.put(ConsumerConfig.KEY_DESERIALIZER_CLASS_CONFIG, StringDeserializer.class);
props.put(ConsumerConfig.VALUE_DESERIALIZER_CLASS_CONFIG,StringDeserializer.class);
props.put(ConsumerConfig.GROUP_ID_CONFIG,"helloword");
return props;
}
@Bean
public ConsumerFactory<String,String> consumerFactory() {
return new DefaultKafkaConsumerFactory<>(consumerConfigs());
}
@Bean
public ConcurrentKafkaListenerContainerFactory<String,String> kafkaListenerContainerFactory() {
ConcurrentKafkaListenerContainerFactory<String,String> factory =
new ConcurrentKafkaListenerContainerFactory<>();
factory.setConsumerFactory(consumerFactory());
return factory;
}
@Bean
public Receiver receiver() {
return new Receiver();
}
}
消息接受类
package com.dhb.kafka.consumer;
import lombok.extern.slf4j.Slf4j;
import org.springframework.kafka.annotation.KafkaListener;
import java.util.concurrent.CountDownLatch;
@Slf4j
public class Receiver {
private CountDownLatch latch = new CountDownLatch(1);
public CountDownLatch getLatch() {
return latch;
}
@KafkaListener(topics = "${kafka.topic.helloworld}")
public void receive(String payload) {
log.info("received payload='{}'",payload);
latch.countDown();
}
}
3.web测试类
定义了一个基于http的web测试接口
package com.dhb.kafka.web;
import com.dhb.kafka.producer.Sender;
import lombok.extern.slf4j.Slf4j;
import org.springframework.beans.factory.annotation.Autowired;
import org.springframework.web.bind.annotation.RequestMapping;
import org.springframework.web.bind.annotation.RequestMethod;
import org.springframework.web.bind.annotation.RestController;
import javax.servlet.http.HttpServletRequest;
import javax.servlet.http.HttpServletResponse;
import java.io.IOException;
@RestController
@Slf4j
public class KafkaProducer {
@Autowired
Sender sender;
@RequestMapping(value = "/sender.action", method = RequestMethod.POST)
public void exec(HttpServletRequest request, HttpServletResponse response,String data) throws IOException{
this.sender.send("testtopic",data);
response.setCharacterEncoding("UTF-8");
response.setContentType("text/json");
response.getWriter().write("success");
response.getWriter().flush();
response.getWriter().close();
}
}
4.启动类及配置
package com.dhb.kafka;
import org.springframework.boot.SpringApplication;
import org.springframework.boot.autoconfigure.SpringBootApplication;
@SpringBootApplication
public class KafkaApplication {
public static void main(String[] args) {
SpringApplication.run(KafkaApplication.class,args);
}
}
application.yml
kafka:
bootstrap-servers: 192.168.162.239:9092
topic:
helloworld: testtopic
程序结构:
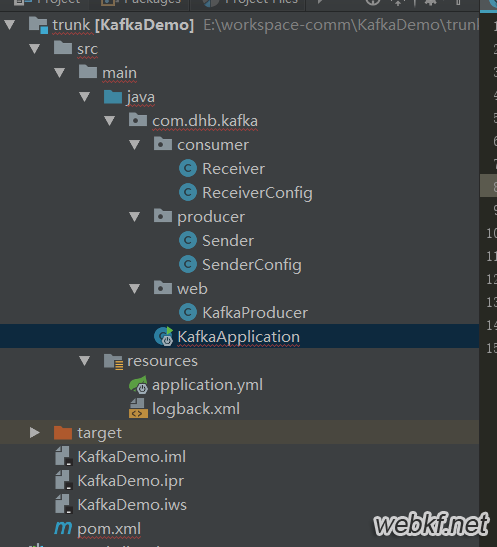
包结构
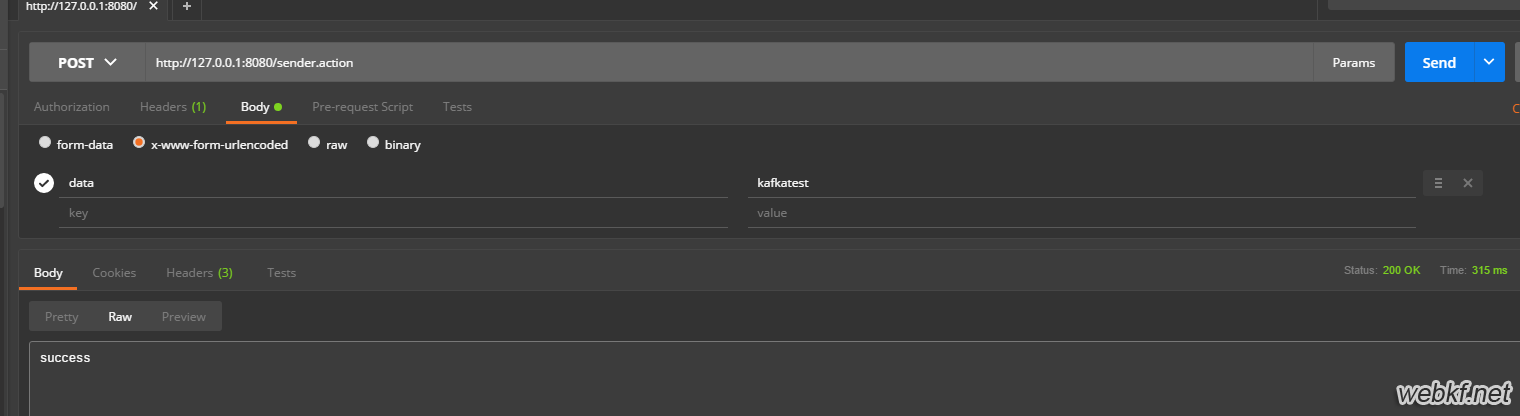
5.读写测试
通过执行KafkaApplication的main方法启动程序。然后打开postman进行测试:

运行后返回success
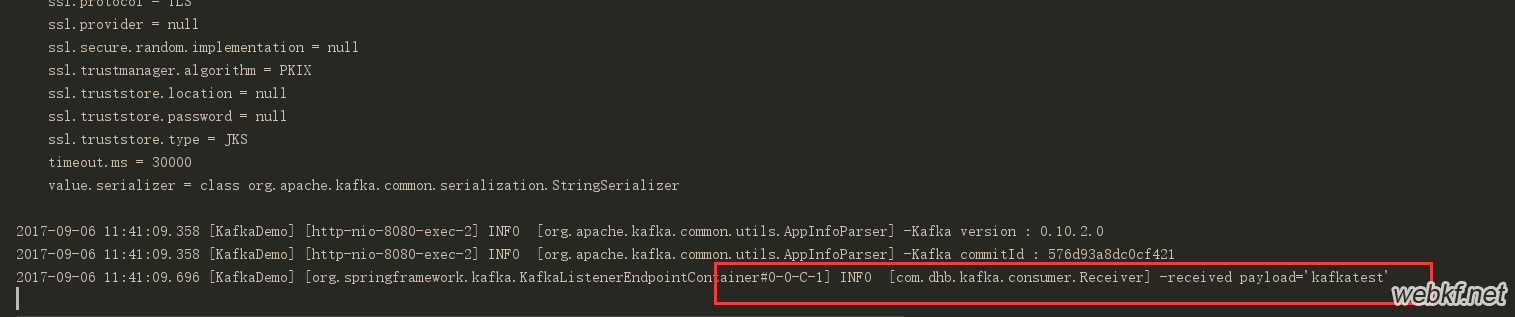
生产者日志:

消费者日志:
以上是 在springboot中对kafka进行读写的示例代码 的全部内容, 来源链接: utcz.com/p/214792.html