spring结合hibernate示例详解
单纯Hibernate程序
1、首先是导入hibernate的jar包。
2、 建立用户和用户操作记录实体,Log.Java和User.java。代码如下所示。
Log.java
import java.util.Date;
public class Log {
private int id;
//日志的类别.日志一般起到一个不可否认性.
//操作日志 安全日志 事件日志.
private String type;
private String detail;
private Date time;
public int getId() {
return id;
}
public void setId(int id) {
this.id = id;
}
public String getType() {
return type;
}
public void setType(String type) {
this.type = type;
}
public String getDetail() {
return detail;
}
public void setDetail(String detail) {
this.detail = detail;
}
public Date getTime() {
return time;
}
public void setTime(Date time) {
this.time = time;
}
}
User.java
public class User {
private int id;
private String name;
public int getId() {
return id;
}
public void setId(int id) {
this.id = id;
}
public String getName() {
return name;
}
public void setName(String name) {
this.name = name;
}
}
3、 并建立与之对应的实体配置文件,Log.hbm.xml和Use.hbm.xml。代码如下所示。
<?xml version="1.0"?>
<!DOCTYPE hibernate-mapping PUBLIC
"-//Hibernate/Hibernate Mapping DTD 3.0//EN"
"http://hibernate.sourceforge.net/hibernate-mapping-3.0.dtd">
<hibernate-mapping>
<class name="com.bjpowernode.usermgr.domain.User" table="t_user">
<id name="id" >
<generator class="native"/>
</id>
<property name="name" />
</class>
</hibernate-mapping>
Log.hbm.xml
<?xml version="1.0"?>
<!DOCTYPE hibernate-mapping PUBLIC
"-//Hibernate/Hibernate Mapping DTD 3.0//EN"
"http://hibernate.sourceforge.net/hibernate-mapping-3.0.dtd">
<hibernate-mapping>
<class name="com.bjpowernode.usermgr.domain.Log" table="t_log">
<id name="id" >
<generator class="native"/>
</id>
<property name="type" />
<property name="detail" />
<property name="time" />
</class>
</hibernate-mapping>
4、Manager层代码如下所示。
LogManager.java接口
public interface LogManager {
//添加日志.方法
public void addLog(Log log);
}
LogManagerImpl实现
public class LogManagerImpl implements LogManager {
@Override
public void addLog(Log log) {
HibernateUtils.getSessionFactory().getCurrentSession().save(log);
}
}
UserManager接口
public interface UserManager {
public void addUser(User user);
}
UserManagerImpl.java实现
public class UserManagerImpl implements UserManager {
@Override
public void addUser(User user) {
Session session = null;
try {
//这个session中是放到threadlocal.
session = HibernateUtils.getSessionFactory().getCurrentSession();
session.beginTransaction();
// 网用户表中添加一条同时网日志中添加一条.
session.save(user);
Log log = new Log();
log.setType("操作日志");
log.setTime(new Date());
log.setDetail("xxx");
LogManager logManager = new LogManagerImpl();
//添加日志.
logManager.addLog(log);
session.getTransaction().commit();
} catch (Exception e) {
e.printStackTrace();
session.getTransaction().rollback();
}finally{
HibernateUtils.closeSession(session);
}
}
}
5、是通过sessionFactory来创建session,通过session来开启提交和关闭回滚事务,我们把session的开启关闭封装到一个工具类中。HibernateUtils.java代码如下所示。
public class HibernateUtils {
private static SessionFactory factory;
static {
try {
//读取hibernate.cfg.xml文件
Configuration cfg = new Configuration().configure();
//建立SessionFactory
factory = cfg.buildSessionFactory();
}catch(Exception e) {
e.printStackTrace();
}
}
public static Session getSession() {
return factory.openSession();
}
public static void closeSession(Session session) {
if (session != null) {
if (session.isOpen()) {
session.close();
}
}
}
public static SessionFactory getSessionFactory() {
return factory;
}
}
6、配置hibernate.cfg.xml文件,包括数据库名称,数据库关联的表,以及用户名密码等。代码如下所示。
<hibernate-configuration>
<session-factory>
<property name="hibernate.connection.driver_class">com.mysql.jdbc.Driver</property>
<property name="hibernate.connection.url">jdbc:mysql://localhost:3306/spring_hibernate_1</property>
<property name="hibernate.connection.username">root</property>
<property name="hibernate.connection.password">root</property>
<property name="hibernate.dialect">org.hibernate.dialect.MySQLDialect</property>
<property name="hibernate.show_sql">true</property>
<property name="hibernate.hbm2ddl.auto">update</property>
<property name="hibernate.current_session_context_class">thread</property>
<!--
<property name="hibernate.current_session_context_class">jta</property>
-->
<mapping resource="com/bjpowernode/usermgr/domain/User.hbm.xml"/>
<mapping resource="com/bjpowernode/usermgr/domain/Log.hbm.xml"/>
</session-factory>
</hibernate-configuration>
7、 使用junit进行单元测试,代码如下所示。
import junit.framework.TestCase;
public class UserManagerImplTest extends TestCase {
public void testAddUser() {
UserManager userManager = new UserManagerImpl();
User user = new User();
user.setName("张三");
userManager.addUser(user);
}
}
在上述操作用,对事物的控制边界在业务逻辑层,因为在UserManagerImpl中我们调用addUser()这一方法的同时要把这一操作写入到日志中,也就是调用了addLog()方法,而对于类的方法,一方法一session,一session一事务,那么如果控制事务的呢?我们要执行开启addUser()事务同时再开启addLog()事务吗?在这里我们没有再用以前的openSession方法,选择用的HibernateUtils.getSessionFactory().getCurrentSession();同时在hibernate.cfg.xml中对getCurrentSession()进行配置如下, <propertyname="hibernate.current_session_context_class">thread</property>表示在当前线程中,与当前线程绑定这样执行addUser()方法和addLog()方法使用的是同一个事务。
那OpenSession和getCurrentSession的区别呢?
1、 openSession必须关闭,currentSession在事务结束后自动关闭。
2、 openSession没有和当前线程绑定,currentSession和当前线程绑定。并且使用currentSession需要在我们的hibernate.cfg.xml文件中进行事务的配置,是使用Jdbc事务还是JTA事务。
hibernate和spring结合使用
我们从上述例子中发现,hibernate的事务是独立于hibernate对数据库的增删改查的,并且事务控制在我们的业务逻辑层,对于独立的东西,像是横切性问题,自然想到了AOP,实际上SpringAOP封装了对事务的管理,使用SpringAOP我们不再负责去开启和关闭事务。
下面用SpringAOP来和hibernate结合。
当然也要导入Spring相关jar。
对于事务管理就是一个横切性问题,把事务管理模块化就是我们的aspect,然后再配置文件中进行配置,我们可以把事务单独放到一个配置文件中。
1、代码如下,applicationContext-common.xml文件。
<beans xmlns="http://www.springframework.org/schema/beans"
xmlns:xsi="http://www.w3.org/2001/XMLSchema-instance"
xmlns:aop="http://www.springframework.org/schema/aop"
xmlns:tx="http://www.springframework.org/schema/tx"
xsi:schemaLocation="http://www.springframework.org/schema/beans http://www.springframework.org/schema/beans/spring-beans-2.0.xsd
http://www.springframework.org/schema/aop http://www.springframework.org/schema/aop/spring-aop-2.0.xsd
http://www.springframework.org/schema/tx http://www.springframework.org/schema/tx/spring-tx-2.0.xsd">
<!-- 配置SessionFactoyr -->
<bean id="sessionFactory" class="org.springframework.orm.hibernate3.LocalSessionFactoryBean">
<property name="configLocation">
<value>classpath:hibernate.cfg.xml</value>
</property>
</bean>
<!-- 配置事务管理器 -->
<bean id="transactionManager" class="org.springframework.orm.hibernate3.HibernateTransactionManager">
<property name="sessionFactory">
<ref bean="sessionFactory"/>
</property>
</bean>
<!-- 哪些类哪些方法使用事务. -->
<aop:config>
<aop:pointcut id="allManagerMethod" expression="execution(* com.bjpowernode.usermgr.manager.*.*(..))"/>
<aop:advisor pointcut-ref="allManagerMethod" advice-ref="txAdvice"/>
</aop:config>
<tx:advice id="txAdvice" transaction-manager="transactionManager">
<tx:attributes>
<tx:method name="add*" propagation="REQUIRED"/>
<tx:method name="del*" propagation="REQUIRED"/>
<tx:method name="modify*" propagation="REQUIRED"/>
<tx:method name="*" propagation="REQUIRED" read-only="true"/>
</tx:attributes>
</tx:advice>
</beans>
首先是配置的是sessionFactory,让spring拿到hibernate的sessionFactory,以便对hibernate事务控制,通过sessionFactory产生session再访问。这样就把把hibernate的sessionFactory注入到Spring中了。通过<property>标签,告诉SpringHibernate的配置文件在哪里,以便spring可以读取hibernate的配置文件。
其次是配置事务管理器,把我们的sessionFactory注入给事务管理器,让事务管理器管理事务。
其次,到底是哪些类哪些方法,开始执行的时候执行事务,<aop:pointcutid="allManagerMethod"
其次,配置AOP,expression="execution(*com.bjpowernode.usermgr.manager.*.*(..))",到底是哪些类交给spring完成事务管理?我们应用在所有的manager包中的所有方法上,manager所有类所有方法全部参与事务的运行。那在什么地方触发开启事务?
再次,定义一个Advice,配置事务的传播特性,例如addUser()中调用addLog()方法,是在同一个事务还是不在同一个事务。以add开头,del开头,modify开头以及其他,我们配置的事务传播特性为propagation="REQUIRED",这样在一个方法中调用另一个方法他们公共一个线程。
2、让UserManagerImpl继承spring提供的对hibernateDao支持类。
HibernateDaoSupport,这样继承之后我们就能拿到session,其实也就是hibernate中的session,只不过spring为我们封装了。我们可以这样拿到sesion:This.getSession().save(user);或者使用spring封装好的对象:
This.getHibernateTemplate().save(user);这样都封装到里面了,我们不管理事务的开启和关闭。
之前在我们的UserManagerImpl中使用了LogManagerImpl实例,这次我们可以使用Spring的IOC容器,把他们之间的依赖关系注入到Spring中,这样就看不到实例,面对接口编程,进行了解耦。
接口不变,UserManagerImpl.java代码如下所示。
public class UserManagerImpl extends HibernateDaoSupport implements UserManager {
private LogManager logManager;
public void setLogManager(LogManager logManager)
{
this.logManager = logManager;
}
@Override
public void addUser(User user)throws Exception {
//this.getSession().save(user);
//或者用.
this.getHibernateTemplate().save(user);
Log log = new Log();
log.setType("操作日志");
log.setTime(new Date());
log.setDetail("xxx");
//LogManager logManager = new LogManagerImpl();
//添加日志.
logManager.addLog(log);
//运行期的异常,会回滚. 并且是他的子类也会回滚.
//throw new RuntimeException();
//throw new Exception();
}
}
LogManagerImpl.java 代码如下所示。
public class LogManagerImpl extends HibernateDaoSupport implements LogManager {
@Override
public void addLog(Log log) {
//getSession().save(log);
this.getHibernateTemplate().save(log);
}
}
删除我们自己建立的HibernateUtils.java类,删除hibernate.cfg.xml文件中对getCurrentSession()的事务配置。
3、在配置文件中配置依赖关系。
applicationContext-beans.xml代码如下所示。
<beans xmlns="http://www.springframework.org/schema/beans"
xmlns:xsi="http://www.w3.org/2001/XMLSchema-instance"
xmlns:aop="http://www.springframework.org/schema/aop"
xmlns:tx="http://www.springframework.org/schema/tx"
xsi:schemaLocation="http://www.springframework.org/schema/beans http://www.springframework.org/schema/beans/spring-beans-2.0.xsd
http://www.springframework.org/schema/aop http://www.springframework.org/schema/aop/spring-aop-2.0.xsd
http://www.springframework.org/schema/tx http://www.springframework.org/schema/tx/spring-tx-2.0.xsd">
<bean id="userManager" class="com.bjpowernode.usermgr.manager.UserManagerImpl">
<property name="sessionFactory" ref="sessionFactory"/>
<property name="logManager" ref="logManager"/>
</bean>
<bean id="logManager" class="com.bjpowernode.usermgr.manager.LogManagerImpl">
<property name="sessionFactory" ref="sessionFactory"/>
</bean>
</beans>
在Junit中测试程序代码如下所示。
public class UserManagerImplTest extends TestCase {
public void testAddUser() {
BeanFactory factory = new ClassPathXmlApplicationContext("applicationContext-*.xml");
UserManager userManager = (UserManager) factory.getBean("userManager");
User user = new User();
user.setName("张三");
try {
userManager.addUser(user);
} catch (Exception e) {
e.printStackTrace();
}
}
}
显示结果如下图所示。
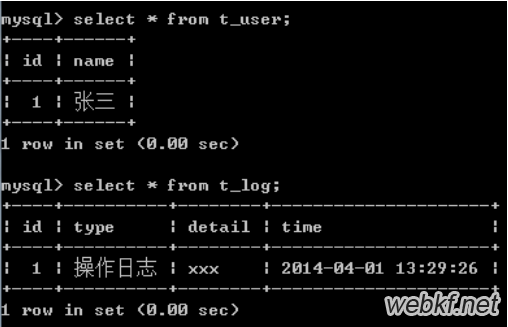
这样就完成了spring和hibernate的结合,主要是利用SpringAOP对hibernate的事务进行控制和在Manager层之间的调用用Spring IOC进行控制。
总结
以上所述是小编给大家介绍的spring结合hibernate示例详解,希望对大家有所帮助,如果大家有任何疑问请给我留言,小编会及时回复大家的。在此也非常感谢大家对网站的支持!
以上是 spring结合hibernate示例详解 的全部内容, 来源链接: utcz.com/p/214657.html

