Spring MVC+mybatis实现注册登录功能
本文实例为大家分享了Spring MVC mybatis实现注册登录功能的具体代码,供大家参考,具体内容如下
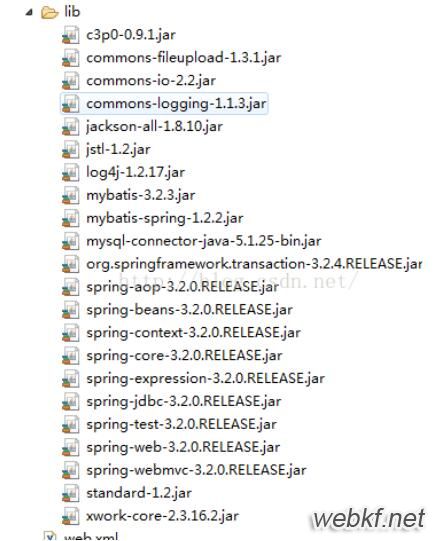
前期准备:
如下图所示,准备好所需要的包
新建工程,导入所需要的包,在web.xml中配置好所需要的,如下
<?xml version="1.0" encoding="UTF-8"?>
<web-app version="2.4" xmlns="http://java.sun.com/xml/ns/j2ee"
xmlns:xsi="http://www.w3.org/2001/XMLSchema-instance
http://www.springmodules.org/schema/cache/springmodules-cache.xsd
http://www.springmodules.org/schema/cache/springmodules-ehcache.xsd"
xsi:schemaLocation="http://java.sun.com/xml/ns/j2ee
http://java.sun.com/xml/ns/j2ee/web-app_2_4.xsd
">
<filter>
<filter-name>encoding</filter-name>
<filter-class>org.springframework.web.filter.CharacterEncodingFilter</filter-class>
<init-param>
<param-name>encoding</param-name>
<param-value>UTF-8</param-value>
</init-param>
</filter>
<filter-mapping>
<filter-name>encoding</filter-name>
<url-pattern>*.action</url-pattern>
</filter-mapping>
<!-- 前端控制器 -->
<servlet>
<servlet-name>spring</servlet-name>
<servlet-class>org.springframework.web.servlet.DispatcherServlet</servlet-class>
<!-- 在tomcat启动时初始化servlet的优先级,这个数字只能整数,正整数才会初始化servlet -->
<load-on-startup>1</load-on-startup>
<init-param>
<param-name>contextConfigLocation</param-name>
<param-value>/WEB-INF/config/spring.xml</param-value>
</init-param>
</servlet>
<servlet-mapping>
<servlet-name>spring</servlet-name>
<url-pattern>*.action</url-pattern>
</servlet-mapping>
<welcome-file-list>
<welcome-file>index.jsp</welcome-file>
</welcome-file-list>
</web-app>
配置好如下文件spring.xml
<?xml version="1.0" encoding="UTF-8"?>
<beans xmlns="http://www.springframework.org/schema/beans"
xmlns:xsi="http://www.w3.org/2001/XMLSchema-instance" xmlns:context="http://www.springframework.org/schema/context"
xmlns:aop="http://www.springframework.org/schema/aop" xmlns:util="http://www.springframework.org/schema/util"
xmlns:cache="http://www.springframework.org/schema/cache" xmlns:tx="http://www.springframework.org/schema/tx"
xmlns:mvc="http://www.springframework.org/schema/mvc"
xsi:schemaLocation="http://www.springframework.org/schema/beans
http://www.springframework.org/schema/beans/spring-beans-3.2.xsd
http://www.springframework.org/schema/context
http://www.springframework.org/schema/context/spring-context-3.2.xsd
http://www.springframework.org/schema/aop
http://www.springframework.org/schema/aop/spring-aop-3.2.xsd
http://www.springframework.org/schema/util
http://www.springframework.org/schema/util/spring-util-3.2.xsd
http://www.springframework.org/schema/cache
http://www.springframework.org/schema/cache/spring-cache-3.2.xsd
http://www.springframework.org/schema/tx
http://www.springframework.org/schema/tx/spring-tx-3.2.xsd
http://www.springframework.org/schema/mvc
http://www.springframework.org/schema/mvc/spring-mvc-3.2.xsd">
<!-- 启用注解 -->
<context:annotation-config></context:annotation-config>
<!-- 加载注解 -->
<context:component-scan base-package="com.register"></context:component-scan>
<!-- 导入数据库配置文件 -->
<util:properties id="myproperties" location="/WEB-INF/config/jdbc.properties">
</util:properties>
<!-- 创建数据库连接池 -->
<bean id="ds" class="com.mchange.v2.c3p0.ComboPooledDataSource">
<!-- 定义数据库连接的参数 -->
<property name="driverClass" value="#{myproperties.driver}"></property>
<property name="jdbcUrl" value="#{myproperties.url}"></property>
<property name="user" value="#{myproperties.username}"></property>
<property name="password" value="#{myproperties.password}"></property>
<!-- 数据库连接池的两个属性 -->
<property name="initialPoolSize" value="3"></property>
<property name="maxPoolSize" value="20"></property>
</bean>
<!-- 替代mybatis的配置文件用来执行mysql语句 -->
<bean id="sqlSessionFactory" class="org.mybatis.spring.SqlSessionFactoryBean">
<property name="dataSource" ref="ds" />
<!-- 定义映射文件路径 -->
<property name="mapperLocations" value="classpath:com/register/dao/*.xml"></property>
</bean>
<!-- sqlSession中的bean -->
<bean id="sqlSession" class="org.mybatis.spring.SqlSessionTemplate">
<constructor-arg index="0" ref="sqlSessionFactory"></constructor-arg>
</bean>
<!-- 开启mvc注解 -->
<mvc:annotation-driven></mvc:annotation-driven>
</beans>
配置好数据库信息
driver=com.mysql.jdbc.Driver
url=jdbc:mysql://localhost:3306/cheshangbao?useUnicode=true&characterEncoding=utf8&autoReconnect=true&useOldAliasMetadataBehavior=true
username=root
password=admin
另外,还有所需要的操作数据库的语句:
<?xml version="1.0" encoding="UTF-8" ?>
<!DOCTYPE mapper
PUBLIC "-//mybatis.org//DTD Mapper 3.0//EN"
"http://mybatis.org/dtd/mybatis-3-mapper.dtd">
<!-- sql 映射文件 -->
<mapper namespace="com.register.dao">
<!-- 用户注册的判断 -->
<insert id="addUser" parameterType="map">
insert into user_login (phone_mobile,login_password,register_time,user_code) values(#{phone_mobile},#{login_password},#{register_time},#{user_code})
</insert>
<!-- 用户名唯一性的判断 -->
<select id="judgeUser" parameterType="String" resultType="com.register.vo.User">
select phone_mobile from user_login where phone_mobile=#{phone_mobile}
</select>
<!-- 用户登录的判断返回一个user给service处理 -->
<select id="userLogin" parameterType="map" resultType="com.register.vo.User">
select phone_mobile,login_password from user_login where phone_mobile=#{phone_mobile} and login_password=#{login_password}
</select>
</mapper>
前端准备工作
我做的一个简单的注册登录的页面,在页面中对表单进行了第一层的判断,然后在后端又写了第二层验证。
登陆页面如下
<!DOCTYPE HTML PUBLIC "-//W3C//DTD HTML 4.01 Transitional//EN">
<html>
<head>
<base href="<%=basePath%>">
<title>用户登录</title>
<meta http-equiv="pragma" content="no-cache">
<meta http-equiv="cache-control" content="no-cache">
<meta http-equiv="expires" content="0">
<meta http-equiv="keywords" content="keyword1,keyword2,keyword3">
<link rel="stylesheet" href="assets/css/style.css">
</head>
<script type="text/javascript" src="<%=basePath%>/js/jquery-1.8.3.js"></script>
<script src="<%=basePath%>/js/My97DatePicker/WdatePicker.js" ></script>
<script type="text/javascript">
// 用户名合法性的判断
$(function(){
$("#phone_number").blur(function(){
var phone = $("#phone_number").val();
var len = $("#phone_number").val().length;
if(len==0||phone==null){
$("#userNameError").html("手机号不能为空!");
$("#loginFrm").attr("onsubmit","return false");
}
});
});
// 密码合法性的判断
$(function(){
$("#pwd").blur(function(){
var len = $("#pwd").val().length;
if(len==0){
$("#pwdError").html("密码不能为空!");
$("#loginFrm").attr("onsubmit","return false");
}
})
})
function check(){
fr=document.form1;
if(fr.phone_mobile.value==""){
fr.phone_mobile.focus();
return false;
}
if((fr.login_password.value!="")){
fr.pwd1.focus();
return false;
}
fr.submit();
}
</script>
<body>
<div class="page-container">
<h1>登录</h1>
<form name="form1" id="loginFrm" action="userLogin.action" method="post" onsubmit="">
手机号:<input type="text" name="phone_mobile" id="phone_number"><span style="color: red;" id="userNameError"></span><br>
密 码:<input type="password" name="login_password" id="pwd" ><span style="color: red;" id="pwdError"></span>
<button type="submit" class="submit_button" onclick="return check()">登录</button>
</form>
<br><br><br>
<h2><a href="pages/register.jsp">注册</a></h2>
</div>
</body>
</html>
以下是注册界面
<!DOCTYPE HTML PUBLIC "-//W3C//DTD HTML 4.01 Transitional//EN">
<html>
<head>
<base href="<%=basePath%>">
<title>用户注册</title>
<meta http-equiv="pragma" content="no-cache">
<meta http-equiv="cache-control" content="no-cache">
<meta http-equiv="expires" content="0">
<meta http-equiv="keywords" content="keyword1,keyword2,keyword3">
<meta http-equiv="description" content="This is my page">
<link rel="stylesheet" href="assets/css/style.css">
<!--
<link rel="stylesheet" type="text/css" href="styles.css">
-->
</head>
<script type="text/javascript" src="<%=basePath%>/js/jquery-1.8.3.js"></script>
<script src="<%=basePath%>/js/My97DatePicker/WdatePicker.js" ></script>
<script type="text/javascript">
// 用户名合法性的判断
$(function(){
$("#phone_number").blur(function(){
var phone = $("#phone_number").val();
var len = $("#phone_number").val().length;
$.getJSON("userJudge.action",{"phone_mobile":phone},function(data){
if(data!=null){
alert("手机号已注册,青重新输入!!");
$("#userNameError").html("手机号已注册!");
$("#regFrm").attr("onsubmit","return false");
}else if(len==0||phone==null){
$("#userNameError").html("手机号不能为空!");
$("#regFrm").attr("onsubmit","return false");
}
else if (!checkContactNumber()) {
$("#userNameError").html("不符合手机号格式!");
$("#regFrm").attr("onsubmit","return false");
}
else{
$("#userNameError").html("恭喜!手机号可用!")
$("#regFrm").attr("onsubmit","return true");
}
});
});
});
// 密码合法性的判断
$(function(){
$("#pwd").blur(function(){
var len = $("#pwd").val().length;
if(len==0){
$("#pwdError").html("密码不能为空!");
$("#regFrm").attr("onsubmit","return false");
}
if(len>0&&len<6){
$("#pwdError").html("密码位数最少为6位!");
$("#regFrm").attr("onsubmit","return false");
}
if(len>=6){
$("#pwdError").html("密码格式正确!");
$("#regFrm").attr("onsubmit","return true");
}
})
})
// 确认两次密码
$(function(){
$("#conpwd").blur(function(){
var oldpwd = $("#pwd").val();
var conpwd = $("#conpwd").val();
var number = $("#conpwd").val().length;
if(number == 0){
$("#pwdError").html("密码不能为空!");
$("#regFrm").attr("onsubmit","return false");
}
else if(oldpwd!=conpwd){
$("#conpwdError").html("两次密码不一致!");
$("#regFrm").attr("onsubmit","return false");
}else{
$("#conpwdError").html("密码符合!");
$("#regFrm").attr("onsubmit","return true");
}
})
})
function check(){
fr=document.reg;
if(fr.phone_mobile.value==""){
fr.phone_mobile.focus();
return false;
}
if((fr.login_password.value=="")){
fr.login_password.focus();
return false;
}
if((fr.login_password2.value=="")){
fr.login_password2.focus();
return false;
}
fr.submit();
}
function checkContactNumber() {
var mobile = $.trim($("#phone_number").val());
var isMobile = /^(((13[0-9]{1})|(15[0-9]{1})|(18[0-9]{1})|(17[0-9]{1})|(14[0-9]{1}))+\d{8})$/;
if (!isMobile.exec(mobile) && mobile.length != 11) {
$("#phone_number").focus();
return false;
}
return true;
}
</script>
<body>
<!-- <form id="regFrm" action="userReg.action" method="post" onsubmit="">
用户名:<input type="text" name="userName" id="uname"><span style="color: red;" id="userNameError"></span><br/>
密码:<input type="password" name="password" id="pwd"><span style="color: red;" id="pwdError"></span><br/>
确认密码:<input type="password" id="conpwd"><span style="color: red;" id="conpwdError"></span><br/>
生日<input type="text" name="birthday" onClick="WdatePicker()" class="Wdate"><br/>
<input type="submit" value="注册">
</form> -->
<div class="page-container">
<h1>用户注册</h1>
<!-- <form id="regFrm" action="userReg.action" method="post" onsubmit="">
用户名:<input type="text" name="userName" class="username" >
密 码:<input type="password" name="password" class="password" >
<button type="submit" class="submit_button">登录</button> -->
<form name="reg" id="regFrm" action="userReg.action" method="post" onsubmit="">
手机号:<input type="text" name="phone_mobile" id="phone_number"><span style="color: red;" id="userNameError"></span><br/>
密码:<input type="password" name="login_password" id="pwd"><span style="color: red;" id="pwdError"></span><br/>
确认密码:<input type="password" name="login_password2" id="conpwd"><span style="color: red;" id="conpwdError"></span><br/>
<button type="submit" class="submit_button" onclick="return check()">注册</button>
</form>
</div>
</body>
</html>
页面中对手机号进行了验证,而且能够与后台进行交互,判断数据库中是否已有此手机号,页面所需的js文件和css配置会在以下给出,
进入正题
数据库中包含用户手机号,用户密码,以及注册信息,和生成的唯一识别码
以下是用户的实体类
package com.register.vo;
import java.util.Date;
public class User {
private int id;
private String phone_mobile;//用户手机号
private String login_password;//用户登录密码
private Date register_time;//用户注册日期
private String user_code;//用户唯一识别ID
public User(int id, String phone_mobile, String login_password, Date register_time,
String user_code) {
super();
this.id = id;
this.phone_mobile = phone_mobile;
this.login_password = login_password;
this.register_time = register_time;
this.user_code = user_code;
}
public User(String phone_mobile, String login_password, Date register_time, String user_code) {
super();
this.phone_mobile = phone_mobile;
this.login_password = login_password;
this.register_time = register_time;
this.user_code = user_code;
}
public User() {
}
public int getId() {
return id;
}
//对用户数据进行封装
public void setId(int id) {
this.id = id;
}
public String getPhone_mobile() {
return phone_mobile;
}
public void setPhone_mobile(String phone_mobile) {
this.phone_mobile = phone_mobile;
}
public String getLogin_password() {
return login_password;
}
public void setLogin_password(String login_password) {
this.login_password = login_password;
}
public Date getRegister_time() {
return register_time;
}
public void setRegister_time(Date register_time) {
this.register_time = register_time;
}
public String getUser_code() {
return user_code;
}
public void setUser_code(String user_code) {
this.user_code = user_code;
}
}
下面这一步是比较重要的一步,Controller类, 如下所示
package com.register.controller;
import java.net.InetAddress;
import java.net.UnknownHostException;
import java.text.DateFormat;
import java.text.SimpleDateFormat;
import java.util.Date;
import java.util.HashMap;
import java.util.Map;
import java.util.UUID;
import java.util.regex.Matcher;
import java.util.regex.Pattern;
import javax.script.ScriptEngine;
import javax.script.ScriptEngineManager;
import javax.script.ScriptException;
import javax.servlet.http.HttpServletRequest;
import javax.servlet.http.HttpSession;
import org.apache.ibatis.session.SqlSession;
import org.springframework.beans.factory.annotation.Autowired;
import org.springframework.stereotype.Controller;
import org.springframework.web.bind.annotation.RequestMapping;
import org.springframework.web.bind.annotation.ResponseBody;
import com.register.service.UserService;
import com.register.vo.User;
//让控制器成为一个bean
@Controller
//这个控制器是接受user_reg页面传过来的参数去操作数据库
public class UserController {
@Autowired
private SqlSession sqlSession;
@Autowired
private UserService us;
@Autowired
private HttpServletRequest req;
@RequestMapping("/userReg.action")
//jsp页面通过userReg.action找到这个方法
public String userReg(User user){
Map<String,Object> map = new HashMap<String, Object>();
map.put("phone_mobile", user.getPhone_mobile());
map.put("login_password", user.getLogin_password());
//判断页面传回的数据要求
Pattern pattern = Pattern.compile("^((13[0-9])|(15[^4,\\D])|(18[01236789]))\\d{8}$");
Matcher matcher = pattern.matcher(user.getPhone_mobile());
if(user.getPhone_mobile()==null || user.getLogin_password()==null || !matcher.matches()){
return "index.jsp";
}
//获取当前注册时间
Date date = new Date();
DateFormat df = new SimpleDateFormat("yyyy-MM-dd HH:mm:ss");
map.put("register_time", df.format(date));
//生成唯一识别码
String s = UUID.randomUUID().toString();
String user_code = s.substring(0,8)+s.substring(9,13)+s.substring(14,18)+s.substring(19,23)+s.substring(24);
map.put("user_code", user_code);
//将数据添加到数据库中
int a = sqlSession.insert("com.register.dao.addUser",map);
req.setAttribute("phone_mobile", user.getPhone_mobile());
req.setAttribute("login_password", user.getLogin_password());
return "pages/register_success.jsp";
}
//处理用户名唯一性的判断
@RequestMapping("/userJudge.action")
@ResponseBody
public User userJudge(String phone_mobile) {
User u = sqlSession.selectOne("com.register.dao.judgeUser",phone_mobile);
System.out.println(u.getPhone_mobile());
return u;
}
//用户登录的判断
@RequestMapping("/userLogin.action")
public String userLogin(String phone_mobile,String login_password){
//对页面传回的值进行二次判断
Pattern pattern = Pattern.compile("^((13[0-9])|(15[^4,\\D])|(18[01236789]))\\d{8}$");
Matcher matcher = pattern.matcher(phone_mobile);
if(phone_mobile==null || login_password==null || !matcher.matches()){
return "pages/user-login-no.jsp";
}
User u = us.userLogin(phone_mobile, login_password);
//查到用户了,执行登录成功的操作
if(u!=null){
req.getSession().setAttribute("u", u);
return "pages/user-login-ok.jsp";
}else{
return "pages/user-login-no.jsp";
}
}
//用户退出销毁session 跳转到登录页
@RequestMapping("/userExit.action")
public String userExit(HttpSession session){
session.invalidate();
return "index.jsp";
}
}
UserService类:
package com.register.service;
import java.util.HashMap;
import java.util.Map;
import org.apache.ibatis.session.SqlSession;
import org.springframework.beans.factory.annotation.Autowired;
import org.springframework.stereotype.Service;
import com.register.vo.User;
@Service
public class UserService {
@Autowired
private SqlSession sqlSession;
public User userLogin(String phone_mobile,String login_password){
Map<String,Object> map = new HashMap<String, Object>();
map.put("phone_mobile",phone_mobile);
map.put("login_password", login_password);
User u = sqlSession.selectOne("com.register.dao.userLogin",map);
return u;
}
}
注入测试类:
package com.register.util;
import org.springframework.stereotype.Controller;
@Controller
public class TestUtil {
public void a(){
System.out.println("注入成功!");
}
}
OK,到这里已经基本差不多了,但是这里边所给的代码并不完整,为了方便大家相互交流学习,这是源码以及数据库文件,
链接:注册登录功能,想要参考源码的可以自己下载。
以上是 Spring MVC+mybatis实现注册登录功能 的全部内容, 来源链接: utcz.com/p/213940.html