Spring搭配Ehcache实例解析
1 Ehcache简介
EhCache 是一个纯Java的进程内缓存框架,具有快速、精干等特点,是Hibernate中默认的CacheProvider。
Ehcache是一种广泛使用的开源Java分布式缓存。主要面向通用缓存,Java EE和轻量级容器。它具有内存和磁盘存储,缓存加载器,缓存扩展,缓存异常处理程序,一个gzip缓存servlet过滤器,支持REST和SOAP api等特点。
Ehcache最初是由Greg Luck于2003年开始开发。2009年,该项目被Terracotta购买。软件仍然是开源,但一些新的主要功能(例如,快速可重启性之间的一致性的)只能在商业产品中使用,例如Enterprise EHCache and BigMemory。维基媒体Foundationannounced目前使用的就是Ehcache技术。
总之Ehcache还是一个不错的缓存技术,我们来看看Spring搭配Ehcache是如何实现的。
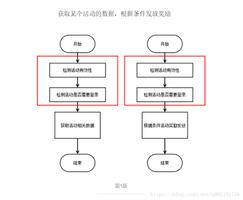
2 Spring搭配Ehcache
系统结果如下:
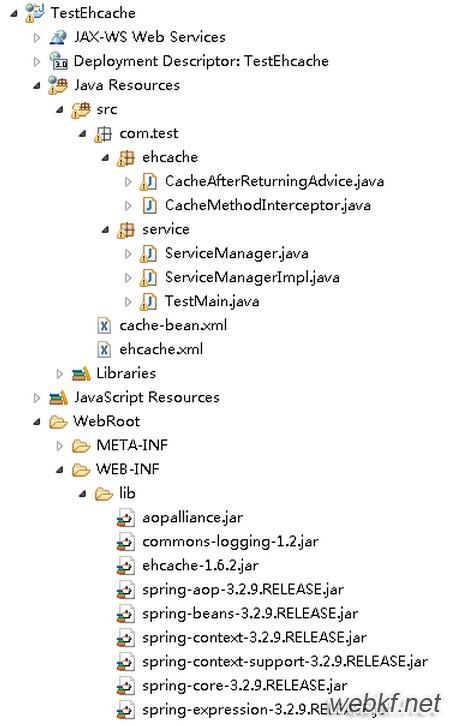
3 具体配置介绍
有这几部分的结合:
src:java代码,包含拦截器,调用接口,测试类
src/cache-bean.xml:配置Ehcache,拦截器,以及测试类等信息对应的bean
src/ehcache.xml:Ehcache缓存配置信息
WebRoot/lib:库
4 详细内容介绍
4.1 src
4.1.1 拦截器
代码中首先配置了两个拦截器:
第一个拦截器为:
com.test.ehcache.CacheMethodInterceptor
内容如下:
package com.test.ehcache;
import java.io.Serializable;
import net.sf.ehcache.Cache;
import net.sf.ehcache.Element;
import org.aopalliance.intercept.MethodInterceptor;
import org.aopalliance.intercept.MethodInvocation;
import org.springframework.beans.factory.InitializingBean;
import org.springframework.util.Assert;
public class CacheMethodInterceptor implements MethodInterceptor,
InitializingBean {
private Cache cache;
public void setCache(Cache cache) {
this.cache = cache;
}
public CacheMethodInterceptor() {
super();
}
/**
* 拦截ServiceManager的方法,并查找该结果是否存在,如果存在就返回cache中的值,
* 否则,返回数据库查询结果,并将查询结果放入cache
*/
public Object invoke(MethodInvocation invocation) throws Throwable {
//获取要拦截的类
String targetName = invocation.getThis().getClass().getName();
//获取要拦截的类的方法
String methodName = invocation.getMethod().getName();
//获得要拦截的类的方法的参数
Object[] arguments = invocation.getArguments();
Object result;
//创建一个字符串,用来做cache中的key
String cacheKey = getCacheKey(targetName, methodName, arguments);
//从cache中获取数据
Element element = cache.get(cacheKey);
if (element == null) {
//如果cache中没有数据,则查找非缓存,例如数据库,并将查找到的放入cache
result = invocation.proceed();
//生成将存入cache的key和value
element = new Element(cacheKey, (Serializable) result);
System.out.println("-----进入非缓存中查找,例如直接查找数据库,查找后放入缓存");
//将key和value存入cache
cache.put(element);
} else {
//如果cache中有数据,则查找cache
System.out.println("-----进入缓存中查找,不查找数据库,缓解了数据库的压力");
}
return element.getValue();
}
/**
* 获得cache的key的方法,cache的key是Cache中一个Element的唯一标识,
* 包括包名+类名+方法名,如:com.test.service.TestServiceImpl.getObject
*/
private String getCacheKey(String targetName, String methodName,
Object[] arguments) {
StringBuffer sb = new StringBuffer();
sb.append(targetName).append(".").append(methodName);
if ((arguments != null) && (arguments.length != 0)) {
for (int i = 0; i < arguments.length; i++) {
sb.append(".").append(arguments[i]);
}
}
return sb.toString();
}
/**
* implement InitializingBean,检查cache是否为空 70
*/
public void afterPropertiesSet() throws Exception {
Assert.notNull(cache,
"Need a cache. Please use setCache(Cache) create it.");
}
}
CacheMethodInterceptor用来拦截以“get”开头的方法,注意这个拦截器是先拦截,后执行原调用接口。
还有一个拦截器:
com.test.ehcache.CacheAfterReturningAdvice
具体内容:
package com.test.ehcache;
import java.lang.reflect.Method;
import java.util.List;
import net.sf.ehcache.Cache;
import org.springframework.aop.AfterReturningAdvice;
import org.springframework.beans.factory.InitializingBean;
import org.springframework.util.Assert;
public class CacheAfterReturningAdvice implements AfterReturningAdvice,
InitializingBean {
private Cache cache;
public void setCache(Cache cache) {
this.cache = cache;
}
public CacheAfterReturningAdvice() {
super();
}
public void afterReturning(Object arg0, Method arg1, Object[] arg2,
Object arg3) throws Throwable {
String className = arg3.getClass().getName();
List list = cache.getKeys();
for (int i = 0; i < list.size(); i++) {
String cacheKey = String.valueOf(list.get(i));
if (cacheKey.startsWith(className)) {
cache.remove(cacheKey);
System.out.println("-----清除缓存");
}
}
}
public void afterPropertiesSet() throws Exception {
Assert.notNull(cache,
"Need a cache. Please use setCache(Cache) create it.");
}
}
CacheAfterReturningAdvice用来拦截以“update”开头的方法,注意这个拦截器是先执行原调用接口,后被拦截。
4.1.2 调用接口
接口名称为:
com.test.service.ServiceManager
具体内容如下:
package com.test.service;
import java.util.List;
public interface ServiceManager {
public List getObject();
public void updateObject(Object Object);
}
实现类名称为:
com.test.service.ServiceManagerImpl
具体内容如下:
package com.test.service;
import java.util.ArrayList;
import java.util.List;
public class ServiceManagerImpl implements ServiceManager {
@Override
public List getObject() {
System.out.println("-----ServiceManager:缓存Cache内不存在该element,查找数据库,并放入Cache!");
return null;
}
@Override
public void updateObject(Object Object) {
System.out.println("-----ServiceManager:更新了对象,这个类产生的cache都将被remove!");
}
}
4.1.3 测试类
测试类名称为:
com.test.service.TestMain
具体内容为:
package com.test.service;
import org.springframework.context.ApplicationContext;
import org.springframework.context.support.ClassPathXmlApplicationContext;
public class TestMain {
public static void main(String[] args) {
String cacheString = "/cache-bean.xml";
ApplicationContext context = new ClassPathXmlApplicationContext(
cacheString);
//获取代理工厂proxyFactory生成的bean,以便产生拦截效果
ServiceManager testService = (ServiceManager) context.getBean("proxyFactory");
// 第一次查找
System.out.println("=====第一次查找");
testService.getObject();
// 第二次查找
System.out.println("=====第二次查找");
testService.getObject();
// 执行update方法(应该清除缓存)
System.out.println("=====第一次更新");
testService.updateObject(null);
// 第三次查找
System.out.println("=====第三次查找");
testService.getObject();
}
}
此处要注意,获取bean是通过代理工厂proxyFactory生产的bean,这样才会有拦截效果。
能够看出来,在测试类里面设置了四次调用,执行顺序为:
第一次查找
第二次查找
第一次更新
第三次查找
4.2 src/cache-bean.xml
cache-bean.xml用来配置Ehcache,拦截器,以及测试类等信息对应的bean,内容如下:
<?xml version="1.0" encoding="UTF-8"?>
<!DOCTYPE beans PUBLIC "-//SPRING//DTD BEAN//EN"
"http://www.springframework.org/dtd/spring-beans.dtd">
<beans>
<!-- 引用ehCache 的配置-->
<bean id="defaultCacheManager"
class="org.springframework.cache.ehcache.EhCacheManagerFactoryBean">
<property name="configLocation">
<value>ehcache.xml</value>
</property>
</bean>
<!-- 定义ehCache的工厂,并设置所使用的Cache的name,即“com.tt” -->
<bean id="ehCache" class="org.springframework.cache.ehcache.EhCacheFactoryBean">
<property name="cacheManager">
<ref local="defaultCacheManager" />
</property>
<!-- Cache的名称 -->
<property name="cacheName">
<value>com.tt</value>
</property>
</bean>
<!-- 创建缓存、查询缓存的拦截器 -->
<bean id="cacheMethodInterceptor" class="com.test.ehcache.CacheMethodInterceptor">
<property name="cache">
<ref local="ehCache" />
</property>
</bean>
<!-- 更新缓存、删除缓存的拦截器 -->
<bean id="cacheAfterReturningAdvice" class="com.test.ehcache.CacheAfterReturningAdvice">
<property name="cache">
<ref local="ehCache" />
</property>
</bean>
<!-- 调用接口,被拦截的对象 -->
<bean id="serviceManager" class="com.test.service.ServiceManagerImpl" />
<!-- 插入拦截器,确认调用哪个拦截器,拦截器拦截的方法名特点等,此处调用拦截器com.test.ehcache.CacheMethodInterceptor -->
<bean id="cachePointCut"
class="org.springframework.aop.support.RegexpMethodPointcutAdvisor">
<!-- 加入切面,切面为当执行完print方法后,在执行加入的切面 -->
<property name="advice">
<ref local="cacheMethodInterceptor" />
</property>
<property name="patterns">
<list>
<!--
### .表示符合任何单一字元
### +表示符合前一个字元一次或多次
### *表示符合前一个字元零次或多次
### \Escape任何Regular expression使用到的符号
-->
<!-- .*表示前面的前缀(包括包名),意思是表示getObject方法-->
<value>.*get.*</value>
</list>
</property>
</bean>
<!-- 插入拦截器,确认调用哪个拦截器,拦截器拦截的方法名特点等,此处调用拦截器com.test.ehcache.CacheAfterReturningAdvice -->
<bean id="cachePointCutAdvice"
class="org.springframework.aop.support.RegexpMethodPointcutAdvisor">
<property name="advice">
<ref local="cacheAfterReturningAdvice" />
</property>
<property name="patterns">
<list>
<!-- .*表示前面的前缀(包括包名),意思是updateObject方法-->
<value>.*update.*</value>
</list>
</property>
</bean>
<!-- 代理工厂 -->
<bean id="proxyFactory" class="org.springframework.aop.framework.ProxyFactoryBean">
<!-- 说明调用接口bean名称 -->
<property name="target">
<ref local="serviceManager" />
</property>
<!-- 说明拦截器bean名称 -->
<property name="interceptorNames">
<list>
<value>cachePointCut</value>
<value>cachePointCutAdvice</value>
</list>
</property>
</bean>
</beans>
各个bean的内容都做了注释说明,值得注意的是,不要忘了代理工厂bean。
4.3 src/ehcache.xml
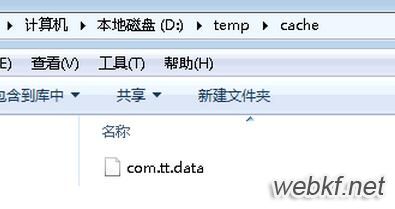
ehcache.xml中存储Ehcache缓存配置的详细信息,内容如下:
<?xml version="1.0" encoding="UTF-8"?>
<ehcache xmlns:xsi="http://www.w3.org/2001/XMLSchema-instance" xsi:noNamespaceSchemaLocation="http://ehcache.org/ehcache.xsd">
<!-- 缓存文件位置 -->
<diskStore path="D:\\temp\\cache" />
<defaultCache maxElementsInMemory="1000" eternal="false"
timeToIdleSeconds="120" timeToLiveSeconds="120" overflowToDisk="true" />
<!-- 定义缓存文件信息,其中“com.tt”为缓存文件的名字 -->
<cache name="com.tt" maxElementsInMemory="10000" eternal="false"
timeToIdleSeconds="300000" timeToLiveSeconds="600000" overflowToDisk="true" />
</ehcache>
能够看到缓存的存储的存储位置设置为“D:\temp\cache”,缓存名称设置成了“com.tt”,如图:
4.4 WebRoot/lib
所需的java库,详见开头的系统结构图片,此处略。
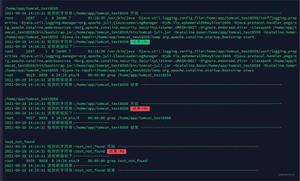
5 测试
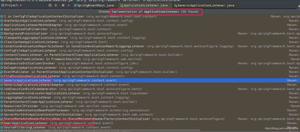
执行测试类,测试结果如下:
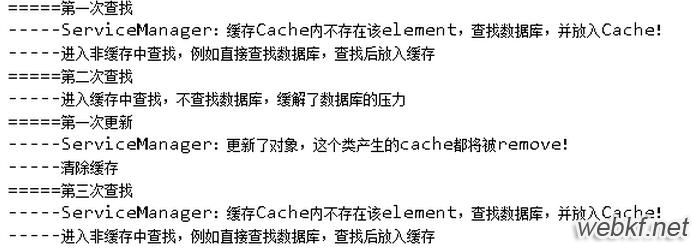
通过执行结果我们能够看出:
第一次查找被拦截后发现是首次拦截,还没有缓存Cache,所以先执行一下原有接口类,得到要查询的数据,有可能是通过数据库查询得到的,然后再生成Cache,并将查询得到的数据放入Cache。
第二次查找被拦截后发现已经存在Cache,于是不再执行原有接口类,也就是不再查询数据库啦,直接通过Cache得到查询数据。当然这里只是简单打印一下。
然后是第一次更新,被拦截后所做的操作是将Cache中的数据全部存入数据库,并将Cache删除。
最后是第三次查询,被拦截后又发现系统不存在Cache,于是执行原接口类查询数据库,创建Cache,并将新查询得到的数据放入Cache。同第一次查询的方式是一样的。
至此我们就实现了Spring搭配Ehcache所需要完成的操作。
6 附件源代码
附件源代码可以从我的github网站上获取。
以上是 Spring搭配Ehcache实例解析 的全部内容, 来源链接: utcz.com/p/213534.html