SpringMVC拦截器实现登录认证
博客以Demo的形式讲诉拦截器的使用
项目结构如图:
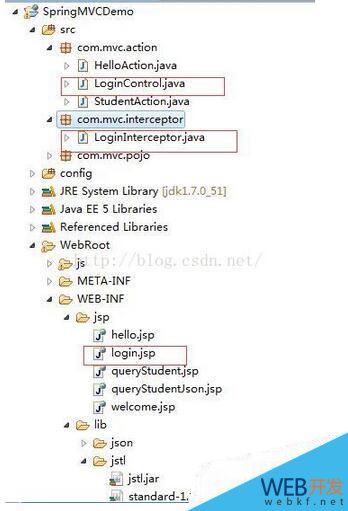
需要的jar:有springMVC配置需要的jar和jstl需要的jar
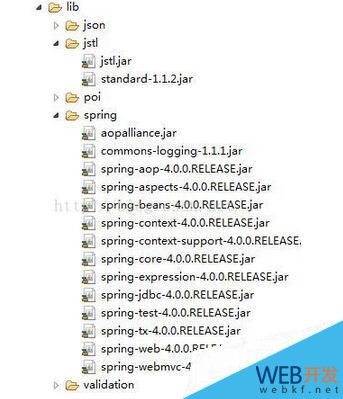
SpringMVC包的作用说明:
aopalliance.jar:这个包是AOP联盟的API包,里面包含了针对面向切面的接口。通常spring等其它具备动态织入功能的框架依赖这个jar
spring-core.jar:这个jar 文件包含Spring 框架基本的核心工具类。Spring 其它组件要都要使用到这个包里的类,是其它组件的基本核心,当然你也可以在自己的应用系统中使用这些工具类。
外部依赖Commons Logging, (Log4J)。
spring-beans.jar:这个jar 文件是所有应用都要用到的,它包含访问配置文件、创建和管理bean 以及进行Inversion of Control /
Dependency Injection(IoC/DI)操作相关的所有类。如果应用只需基本的IoC/DI 支持,引入spring-core.jar 及spring-beans.jar 文件
就可以了。
spring-aop.jar:这个jar 文件包含在应用中使用Spring 的AOP 特性时所需的类和源码级元数据支持。使用基于AOP 的Spring特性,如声明型事务管理(Declarative Transaction Management),也要在应用里包含这个jar包。
外部依赖spring-core, (spring-beans,AOP Alliance, CGLIB,Commons Attributes)。
spring-context.jar:这个jar 文件为Spring 核心提供了大量扩展。可以找到使用Spring ApplicationContext特性时所需的全部类,JDNI
所需的全部类,instrumentation组件以及校验Validation 方面的相关类。
外部依赖spring-beans, (spring-aop)。
spring-context-support:Spring-context的扩展支持,用于MVC方面
spring-web.jar:这个jar 文件包含Web 应用开发时,用到Spring 框架时所需的核心类,包括自动载入Web Application Context 特性的类、Struts 与JSF集成类、文件上传的支持类、Filter 类和大量工具辅助类。
外部依赖spring-context, Servlet API, (JSP API, JSTL, Commons FileUpload, COS)。
spring-webmvc.jar:这个jar 文件包含Spring MVC 框架相关的所有类。包括框架的Servlets,Web MVC框架,控制器和视图支持。当然,如果你的应用使用了独立的MVC 框架,则无需这个JAR 文件里的任何类。
外部依赖spring-web, (spring-support,Tiles,iText,POI)。
spring-aspects.jar:提供对AspectJ的支持,以便可以方便的将面向方面的功能集成进IDE中,比如Eclipse AJDT。
外部依赖。
spring-jdbc.jar:这个jar 文件包含对Spring 对JDBC 数据访问进行封装的所有类。
外部依赖spring-beans,spring-dao。
spring-test.jar:对Junit等测试框架的简单封装
spring-tx.jar:Spring的tx事务处理的jar
spring-expression.jar:Spring表达式语言
编写控制器:
package com.mvc.action;
import javax.servlet.http.HttpSession;
import org.springframework.stereotype.Controller;
import org.springframework.web.bind.annotation.RequestMapping;
/**
* 登录认证的控制器
*/
@Controller
public class LoginControl {
/**
* 登录
* @param session
* HttpSession
* @param username
* 用户名
* @param password
* 密码
* @return
*/
@RequestMapping(value="/login")
public String login(HttpSession session,String username,String password) throws Exception{
//在Session里保存信息
session.setAttribute("username", username);
//重定向
return "redirect:hello.action";
}
/**
* 退出系统
* @param session
* Session
* @return
* @throws Exception
*/
@RequestMapping(value="/logout")
public String logout(HttpSession session) throws Exception{
//清除Session
session.invalidate();
return "redirect:hello.action";
}
}
编写拦截器:
package com.mvc.interceptor;
import javax.servlet.http.HttpServletRequest;
import javax.servlet.http.HttpServletResponse;
import javax.servlet.http.HttpSession;
import org.springframework.web.servlet.HandlerInterceptor;
import org.springframework.web.servlet.ModelAndView;
/**
* 登录认证的拦截器
*/
public class LoginInterceptor implements HandlerInterceptor{
/**
* Handler执行完成之后调用这个方法
*/
public void afterCompletion(HttpServletRequest request,
HttpServletResponse response, Object handler, Exception exc)
throws Exception {
}
/**
* Handler执行之后,ModelAndView返回之前调用这个方法
*/
public void postHandle(HttpServletRequest request, HttpServletResponse response,
Object handler, ModelAndView modelAndView) throws Exception {
}
/**
* Handler执行之前调用这个方法
*/
public boolean preHandle(HttpServletRequest request, HttpServletResponse response,
Object handler) throws Exception {
//获取请求的URL
String url = request.getRequestURI();
//URL:login.jsp是公开的;这个demo是除了login.jsp是可以公开访问的,其它的URL都进行拦截控制
if(url.indexOf("login.action")>=0){
return true;
}
//获取Session
HttpSession session = request.getSession();
String username = (String)session.getAttribute("username");
if(username != null){
return true;
}
//不符合条件的,跳转到登录界面
request.getRequestDispatcher("/WEB-INF/jsp/login.jsp").forward(request, response);
return false;
}
}
SpringMVC的配置文件:
<?xml version="1.0" encoding="UTF-8"?>
<beans xmlns="http://www.springframework.org/schema/beans"
xmlns:aop="http://www.springframework.org/schema/aop"
xmlns:xsi="http://www.w3.org/2001/XMLSchema-instance"
xmlns:context="http://www.springframework.org/schema/context"
xmlns:mvc="http://www.springframework.org/schema/mvc"
xsi:schemaLocation="http://www.springframework.org/schema/beans http://www.springframework.org/schema/beans/spring-beans-4.0.xsd
http://www.springframework.org/schema/aop http://www.springframework.org/schema/aop/spring-aop-4.0.xsd
http://www.springframework.org/schema/context http://www.springframework.org/schema/context/spring-context-4.0.xsd
http://www.springframework.org/schema/mvc http://www.springframework.org/schema/mvc/spring-mvc-4.0.xsd">
<!-- 使用组件扫描 -->
<!-- 将action扫描出来,在spring容器中进行注册,自动对action在spring容器中进行配置 -->
<context:component-scan base-package="com.mvc.action" />
<!-- 项目的Handler
<bean name="/hello.action" class="com.mvc.action.HelloAction"></bean>
-->
<!-- 处理器映射器HandlerMapping -->
<bean class="org.springframework.web.servlet.mvc.method.annotation.RequestMappingHandlerMapping"/>
<!-- 处理器设配器HandlerAdapter -->
<bean class="org.springframework.web.servlet.mvc.method.annotation.RequestMappingHandlerAdapter">
<property name="messageConverters">
<list>
<bean class="org.springframework.http.converter.json.MappingJacksonHttpMessageConverter"></bean>
</list>
</property>
</bean>
<!-- 视图解析器ViewResolver -->
<!-- 解析jsp,默认支持jstl -->
<bean class="org.springframework.web.servlet.view.InternalResourceViewResolver">
<property name="viewClass" value="org.springframework.web.servlet.view.JstlView"></property>
<property name="prefix" value="/WEB-INF/jsp/" />
<property name="suffix" value=".jsp" />
</bean>
<!-- 在实际开发中通常都需配置 mvc:annotation-driven标签,这个标签是开启注解 -->
<mvc:annotation-driven></mvc:annotation-driven>
<!-- 拦截器 -->
<mvc:interceptors>
<!-- 多个拦截器,顺序执行 -->
<mvc:interceptor>
<mvc:mapping path="/**"/>
<bean class="com.mvc.interceptor.LoginInterceptor"></bean>
</mvc:interceptor>
</mvc:interceptors>
</beans>
登录界面:
<%@ page language="java" import="java.util.*" pageEncoding="UTF-8"%>
<%@taglib uri="http://java.sun.com/jsp/jstl/core" prefix="c"%>
<%
String path = request.getContextPath();
String basePath = request.getScheme()+"://"+request.getServerName()+":"+request.getServerPort()+path+"/";
%>
<!DOCTYPE HTML PUBLIC "-//W3C//DTD HTML 4.01 Transitional//EN">
<html>
<head>
<base href="<%=basePath%>">
<title>My JSP 'login.jsp' starting page</title>
<meta http-equiv="pragma" content="no-cache">
<meta http-equiv="cache-control" content="no-cache">
<meta http-equiv="expires" content="0">
<meta http-equiv="keywords" content="keyword1,keyword2,keyword3">
<meta http-equiv="description" content="This is my page">
<!--
<link rel="stylesheet" type="text/css" href="styles.css">
-->
</head>
<body>
<form action="${pageContext.request.contextPath}/login.action" method="post">
用户名:<input type="text" name="username" /><br>
密码:<input type="text" name="password" /><br>
<input type="submit" value="登录" />
</form>
</body>
</html>
登录成功后,跳转的界面
hello.jsp
<%@ page language="java" import="java.util.*" pageEncoding="UTF-8"%>
<%@taglib uri="http://www.springframework.org/tags" prefix="spring" %>
<%@taglib uri="http://www.springframework.org/tags/form" prefix="form" %>
<%@taglib uri="http://java.sun.com/jsp/jstl/core" prefix="c" %>
<%
String path = request.getContextPath();
String basePath = request.getScheme()+"://"+request.getServerName()+":"+request.getServerPort()+path+"/";
%>
<!DOCTYPE HTML PUBLIC "-//W3C//DTD HTML 4.01 Transitional//EN">
<html>
<head>
<base href="<%=basePath%>">
<title>My JSP 'hello.jsp' starting page</title>
<meta http-equiv="pragma" content="no-cache">
<meta http-equiv="cache-control" content="no-cache">
<meta http-equiv="expires" content="0">
<meta http-equiv="keywords" content="keyword1,keyword2,keyword3">
<meta http-equiv="description" content="This is my page">
<!--
<link rel="stylesheet" type="text/css" href="styles.css">
-->
</head>
<body>
当前用户:${username}
<c:if test="${username!=null}">
<a href="${pageContext.request.contextPath }/logout.action">退出</a>
</c:if>
${message}
</body>
</html>
HelloControl.java,我写成HelloWorld形式的,自己要根据项目去改哦
package com.mvc.action;
import org.springframework.stereotype.Controller;
import org.springframework.ui.Model;
import org.springframework.web.bind.annotation.RequestMapping;
//标记这个类是一个Handler处理器
@Controller
public class HelloAction{
@RequestMapping("/hello")//制定这个控制类对应的url
public String hello(Model model){
String message = "SpringMVC";
//为model添加Attribute
model.addAttribute("message",message);
return "hello";
}
// public ModelAndView handleRequest(HttpServletRequest request,
// HttpServletResponse response) throws Exception {
//
// //在页面上提示一行信息
// String message = "hello world!";
//
// //通过request对象将信息在页面上展示
// //request.setAttribute("message", message);
//
// ModelAndView modelAndView = new ModelAndView();
// // 相当于request.setAttribute(), 将数据传到页面展示
// //model数据
// modelAndView.addObject("message", message);
// //设置视图
// modelAndView.setViewName("hello");
//
// return modelAndView;
// }
}

以上就是本文的全部内容,希望对大家的学习有所帮助,也希望大家多多支持。
以上是 SpringMVC拦截器实现登录认证 的全部内容, 来源链接: utcz.com/p/211114.html

