探讨Java验证码制作(下篇)
接着上篇java验证码制作(上篇)给大家介绍有关java验证码的相关知识!
方法三:

用开源组件Jcaptcha实现,与Spring组合使用可产生多种形式的验证码,JCaptcha 即为Java版本的 CAPTCHA 项目,其是一个开源项目,支持生成图形和声音版的验证码,在生成声音版的验证码时,需要使用到 FreeTTS。而CAPTCHA 全称 Completely Automated Public Turing Test to Tell Computers and Humans Apart,最早作为卡内基梅隆大学的一个科研项目,用于生成一个人类容易通过而计算机难以通过的测试,目前广泛应用于网络应用,用于阻止机器人发布垃圾信息。目前,JCaptcha 官方网站显示有 2.0 版本,但二进制版只有 1.0 版可供下载。
首先我们需准备相应的jar包
JCaptcha 项目在实现中,还引用了 commons-collections 和 commons-logging 两个开源项目,再加上 JCaptcha 本身的实现,我们共需要三个包,具体信息如下:
jcaptcha-2.0-all.jarcommons-logging-1.1.1.jarcommons-collections-3.2.jar
其次我们看下面web.xml中的关键配置信息:除配置了Jcaptcha组件的具体class路径外,还配置了SubmitActionServlet这个用于比对验证码的servlet,并且都为二者做了映射,可理解为换了名字,分别为/jcaptcha.jpg和/submit.action调用组件或servlet时直接用这个映射名即可。
<servlet>
<servlet-name>jcaptcha</servlet-name>
<servlet-class>com.octo.captcha.module.servlet.image.SimpleImageCaptchaServlet</servlet-class>
</servlet>
<servlet>
<servlet-name>submit</servlet-name>
<servlet-class>com.octo.captcha.module.servlet.image.sample.SubmitActionServlet</servlet-class>
</servlet>
<servlet-mapping>
<servlet-name>jcaptcha</servlet-name>
<url-pattern>/jcaptcha.jpg</url-pattern>
</servlet-mapping>
<servlet-mapping>
<servlet-name>submit</servlet-name>
<url-pattern>/submit.action</url-pattern>
</servlet-mapping>
web.xml
然后来看SubmitActionServlet怎么实现:由于导入了jcaptcha的组件包,所以直接调用其中封装好的方法SimpleImageCaptchaServlet.validateResponse(request, userCaptchaResponse)来判断验证码中的信息是否与提交的匹配,而不需要去考虑具体的实现过程。
public class SubmitActionServlet extends HttpServlet
{
protected void doPost(HttpServletRequest request, HttpServletResponse response)
throws ServletException, IOException
{
String userCaptchaResponse = request.getParameter("japtcha");
boolean captchaPassed = SimpleImageCaptchaServlet.validateResponse(request, userCaptchaResponse);
if (captchaPassed)
response.getWriter().write("captcha passed");
else {
response.getWriter().write("captcha failed");
}
response.getWriter().write("<br/><a href='index.jsp'>Try again</a>");
}
}
SubmitActionServlet
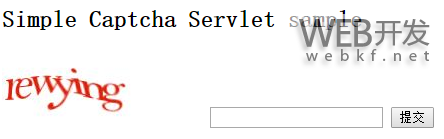
最后我们看一下简单的前台调用:
<html>
<body>
<h>Simple Captcha Servlet sample</h>
<form action="submit.action" method="post">
<img src="jcaptcha.jpg" /> <input type="text" name="japtcha" value="" />
<input type="submit"/>
</form>
</body>
</html>
实现图例:
方法四:
用开源组件kaptcha实现,同样使用kaptcha需要下载其jar组件包,kaptcha 是一个非常实用的验证码生成工具。有了它,你可以生成各种样式的验证码,因为它是可配置的。kaptcha工作的原理是调用 com.google.code.kaptcha.servlet.KaptchaServlet(可以看出他是谷歌的一个开源项目),生成一个图片。同时将生成的验证码字符串放到 HttpSession中。
使用kaptcha可以方便的配置:
验证码的字体验证码字体的大小验证码字体的字体颜色验证码内容的范围(数字,字母,中文汉字!)验证码图片的大小,边框,边框粗细,边框颜色验证码的干扰线(可以自己继承com.google.code.kaptcha.NoiseProducer写一个自定义的干扰线)验证码的样式(鱼眼样式、3D、普通模糊……当然也可以继承com.google.code.kaptcha.GimpyEngine自定义样式)
……
对kaptcha的配置信息同样的是放在了web.xml中:<init-param>标签中即初始化的配置信息
<servlet>
<servlet-name>Kaptcha</servlet-name>
<servlet-class>
com.google.code.kaptcha.servlet.KaptchaServlet
</servlet-class>
<init-param>
<description>图片边框,合法值:yes , no</description>
<param-name>kaptcha.border</param-name>
<param-value>yes</param-value>
</init-param>
<init-param>
<description>
边框颜色,合法值: r,g,b (and optional alpha) 或者
white,black,blue.
</description>
<param-name>kaptcha.border.color</param-name>
<param-value>black</param-value>
</init-param>
<init-param>
<description>边框厚度,合法值:></description>
<param-name>kaptcha.border.thickness</param-name>
<param-value></param-value>
</init-param>
<init-param>
<description>图片宽 </description>
<param-name>kaptcha.image.width</param-name>
<param-value></param-value>
</init-param>
<init-param>
<description>图片高 </description>
<param-name>kaptcha.image.height</param-name>
<param-value></param-value>
</init-param>
<init-param>
<description>图片实现类</description>
<param-name>kaptcha.producer.impl</param-name>
<param-value>
com.google.code.kaptcha.impl.DefaultKaptcha
</param-value>
</init-param>
<init-param>
<description>文本实现类</description>
<param-name>kaptcha.textproducer.impl</param-name>
<param-value>
com.google.code.kaptcha.text.impl.DefaultTextCreator
</param-value>
</init-param>
<init-param>
<description>文本集合,验证码值从此集合中获取</description>
<param-name>kaptcha.textproducer.char.string</param-name>
<param-value></param-value>
<!--<param-value>abcdegfynmnpwx</param-value>-->
<!--<param-value>慕课网教程验证码实例</param-value> -->
</init-param>
<init-param>
<description>验证码长度 </description>
<param-name>kaptcha.textproducer.char.length</param-name>
<param-value></param-value>
</init-param>
<init-param>
<description>字体 Arial, Courier</description>
<param-name>kaptcha.textproducer.font.names</param-name>
<param-value>Arial, Courier</param-value>
</init-param>
<init-param>
<description>字体大小 px.</description>
<param-name>kaptcha.textproducer.font.size</param-name>
<param-value></param-value>
</init-param>
<init-param>
<description>
字体颜色,合法值: r,g,b 或者 white,black,blue.
</description>
<param-name>kaptcha.textproducer.font.color</param-name>
<param-value>black</param-value>
</init-param>
<init-param>
<description>文字间隔 </description>
<param-name>kaptcha.textproducer.char.space</param-name>
<param-value></param-value>
</init-param>
<init-param>
<description>干扰实现类</description>
<param-name>kaptcha.noise.impl</param-name>
<param-value>
<!-- com.google.code.kaptcha.impl.NoNoise -->
com.google.code.kaptcha.impl.DefaultNoise
</param-value>
</init-param>
<init-param>
<description>
干扰颜色,合法值: r,g,b 或者 white,black,blue.
</description>
<param-name>kaptcha.noise.color</param-name>
<param-value>black</param-value>
</init-param>
<init-param>
<description>
图片样式: 水纹com.google.code.kaptcha.impl.WaterRipple
鱼眼com.google.code.kaptcha.impl.FishEyeGimpy
阴影com.google.code.kaptcha.impl.ShadowGimpy
</description>
<param-name>kaptcha.obscurificator.impl</param-name>
<param-value>
com.google.code.kaptcha.impl.WaterRipple
</param-value>
</init-param>
<init-param>
<description>背景实现类</description>
<param-name>kaptcha.background.impl</param-name>
<param-value>
com.google.code.kaptcha.impl.DefaultBackground
</param-value>
</init-param>
<init-param>
<description>背景颜色渐变,开始颜色</description>
<param-name>kaptcha.background.clear.from</param-name>
<param-value>green</param-value>
</init-param>
<init-param>
<description>背景颜色渐变,结束颜色</description>
<param-name>kaptcha.background.clear.to</param-name>
<param-value>white</param-value>
</init-param>
<init-param>
<description>文字渲染器</description>
<param-name>kaptcha.word.impl</param-name>
<param-value>
com.google.code.kaptcha.text.impl.DefaultWordRenderer
</param-value>
</init-param>
<init-param>
<description>
session中存放验证码的key键
</description>
<param-name>kaptcha.session.key</param-name>
<param-value>KAPTCHA_SESSION_KEY</param-value>
</init-param>
<init-param>
<description>
The date the kaptcha is generated is put into the
HttpSession. This is the key value for that item in the
session.
</description>
<param-name>kaptcha.session.date</param-name>
<param-value>KAPTCHA_SESSION_DATE</param-value>
</init-param>
</servlet>
<servlet-mapping>
<servlet-name>Kaptcha</servlet-name>
<url-pattern>/randomcode.jpg</url-pattern>
</servlet-mapping>
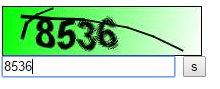
前台调用:验证码图片的路径用了映射名randomcode.jpg,点击事件onclick()调用了js函数,js函数中同样的用当前时间使浏览器缓存失效来刷新验证码图片。
<html>
<head>
<meta http-equiv="Content-Type" content="text/html; charset=UTF-">
<title>randomcode</title>
<script type="text/javascript">
function changeR(node){
// 用于点击时产生不同的验证码
node.src = "randomcode.jpg?time="+new Date().getTime() ;
}
</script>
</head>
<body>
<img alt="random" src="randomcode.jpg" onclick="changeR(this)" style="cursor: pointer;">
<form action="check.jsp">
<input type="text" name="r">
<input type="submit" value="s">
</form>
</body>
</html>
验证码的比对check.jsp:通过(String) session.getAttribute(com.google.code.kaptcha.Constants.KAPTCHA_SESSION_KEY);得到验证码图片中字符串信息。
<html>
<head>
<meta http-equiv="Content-Type" content="text/html; charset=UTF-">
<title>check</title>
</head>
<body>
<%
// 检查是否是正确的验证码
String k = (String) session
.getAttribute(com.google.code.kaptcha.Constants.KAPTCHA_SESSION_KEY);
String str = request.getParameter("r");
if (k.equals(str))
out.print("true");
out.print(k + "---" + str);
%>
</body>
</html>
实现图例:
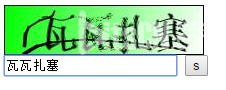
可以发现我们的验证码变得越来越来丰富多彩了,但是还停留在一个只验证英文字母和数字的阶段,那么还能不能玩点高端的呢,答案是肯定的。接下来我们来看一下中文验证码和算术运算验证码怎么实现。都只需基于以上kaptcha的使用进行修改即可。
中文验证码的实现:

首先我们找到kaptcha.jar包下有个DefaultTextCreator.class字节码文件,顾名思义,他是来产生验证码中文本的一个类,我们可以通过自己实现一个继承于他的类,并通过配置来使用自己的实现类来使验证码中的文本变为中文。经过如下反编译后得到的类我们可以看到其是那样实现的,其中的getText()函数用于产生getConfig()配置器将要渲染的验证码文本,所以我们只需继承配置类并实现文本产生接口后重写getText()方法即可。
public class DefaultTextCreator
extends Configurable
implements TextProducer
{
public String getText()
{
int length = getConfig().getTextProducerCharLength();
char[] chars = getConfig().getTextProducerCharString();
int randomContext = chars.length - ;
Random rand = new Random();
StringBuffer text = new StringBuffer();
for (int i = ; i < length; i++) {
text.append(chars[(rand.nextInt(randomContext) + )]);
}
return text.toString();
}
}
如下为ChineseText.java的具体实现:其中程序只执行getText()中的代码,原来代码写到了getText1()中,不执行,大家可以做一个比较。
public class ChineseText extends Configurable implements TextProducer {
public String getText() {
int length = getConfig().getTextProducerCharLength();
//char[] charS = getConfig().getTextProducerCharString();
String[] s = new String[]{"我","爱","扎","瓦","和","卖","塞","扣"};
Random rand = new Random();
StringBuffer sb = new StringBuffer();
for(int i = ; i < length; i++){
int ind = rand.nextInt(s.length);
sb.append(s[ind]);
}
return sb.toString();
}
/**
* 中午实例
* @return
*/
public String getText() {
int length = getConfig().getTextProducerCharLength();
String finalWord = "", firstWord = "";
int tempInt = ;
String[] array = { "", "", "", "", "", "", "", "", "", "",
"a", "b", "c", "d", "e", "f" };
Random rand = new Random();
for (int i = ; i < length; i++) {
switch (rand.nextInt(array.length)) {
case :
tempInt = rand.nextInt() + ;
firstWord = String.valueOf((char) tempInt);
break;
case :
int r,
r,
r,
r;
String strH,
strL;// high&low
r = rand.nextInt() + ; // 前闭后开[,)
if (r == ) {
r = rand.nextInt();
} else {
r = rand.nextInt();
}
r = rand.nextInt() + ;
if (r == ) {
r = rand.nextInt() + ;
} else if (r == ) {
r = rand.nextInt();
} else {
r = rand.nextInt();
}
strH = array[r] + array[r];
strL = array[r] + array[r];
byte[] bytes = new byte[];
bytes[] = (byte) (Integer.parseInt(strH, ));
bytes[] = (byte) (Integer.parseInt(strL, ));
firstWord = new String(bytes);
break;
default:
tempInt = rand.nextInt() + ;
firstWord = String.valueOf((char) tempInt);
break;
}
finalWord += firstWord;
}
return finalWord;
}
}
最后一步就是去web.xml中改文本实现类的值,使组件调用自己写的那个类产生中文验证码。
<init-param>
<description>文本实现类</description>
<param-name>kaptcha.textproducer.impl</param-name>
<param-value>
ChineseText
</param-value>
</init-param>
实现图例:
算数运算验证码的实现:
和上述中文验证码相同,我们需要通过继承类和接口来实现自己的类,并改写其中的函数,然后通过改配置信息来使组件调用自己实现的类从而实现验证码形式的多样化。
KaptchaServlet字节码文件经过反编译后的代码如下:
public class KaptchaServlet
extends HttpServlet
implements Servlet
{
private Properties props = new Properties();
private Producer kaptchaProducer = null;
private String sessionKeyValue = null;
public void init(ServletConfig conf)
throws ServletException
{
super.init(conf);
ImageIO.setUseCache(false);
Enumeration<?> initParams = conf.getInitParameterNames();
while (initParams.hasMoreElements())
{
String key = (String)initParams.nextElement();
String value = conf.getInitParameter(key);
this.props.put(key, value);
}
Config config = new Config(this.props);
this.kaptchaProducer = config.getProducerImpl();
this.sessionKeyValue = config.getSessionKey();
}
public void doGet(HttpServletRequest req, HttpServletResponse resp)
throws ServletException, IOException
{
resp.setDateHeader("Expires", L);
resp.setHeader("Cache-Control", "no-store, no-cache, must-revalidate");
resp.addHeader("Cache-Control", "post-check=, pre-check=");
resp.setHeader("Pragma", "no-cache");
resp.setContentType("image/jpeg");
String capText = this.kaptchaProducer.createText();
req.getSession().setAttribute(this.sessionKeyValue, capText);
BufferedImage bi = this.kaptchaProducer.createImage(capText);
ServletOutputStream out = resp.getOutputStream();
ImageIO.write(bi, "jpg", out);
try
{
out.flush();
}
finally
{
out.close();
}
}
}
然后自己实现的KaptchaServlet.java代码如下:在原来的字节码文件上增加了实现加法验证码的逻辑,通过比对即可发现。
public class KaptchaServlet extends HttpServlet implements Servlet {
private Properties props;
private Producer kaptchaProducer;
private String sessionKeyValue;
public KaptchaServlet() {
this.props = new Properties();
this.kaptchaProducer = null;
this.sessionKeyValue = null;
}
public void init(ServletConfig conf) throws ServletException {
super.init(conf);
ImageIO.setUseCache(false);
Enumeration initParams = conf.getInitParameterNames();
while (initParams.hasMoreElements()) {
String key = (String) initParams.nextElement();
String value = conf.getInitParameter(key);
this.props.put(key, value);
}
Config config = new Config(this.props);
this.kaptchaProducer = config.getProducerImpl();
this.sessionKeyValue = config.getSessionKey();
}
public void doGet(HttpServletRequest req, HttpServletResponse resp)
throws ServletException, IOException {
resp.setDateHeader("Expires", L);
resp.setHeader("Cache-Control", "no-store, no-cache, must-revalidate");
resp.addHeader("Cache-Control", "post-check=, pre-check=");
resp.setHeader("Pragma", "no-cache");
resp.setContentType("image/jpeg");
String capText = this.kaptchaProducer.createText();
String s = capText.substring(, );
String s = capText.substring(, );
int r = Integer.valueOf(s).intValue() + Integer.valueOf(s).intValue();
req.getSession().setAttribute(this.sessionKeyValue, String.valueOf(r));
BufferedImage bi = this.kaptchaProducer.createImage(s+"+"+s+"=?");
ServletOutputStream out = resp.getOutputStream();
ImageIO.write(bi, "jpg", out);
try {
out.flush();
} finally {
out.close();
}
}
}
我们还需在web.xml开头进行更改配置使组件来调用自己实现的servlet:
<servlet-name>Kaptcha</servlet-name>
<servlet-class>
KaptchaServlet
</servlet-class>
实现图例:

总结:
这里只是简单实现了验证码,但要用到商业项目上还是远远不够的,验证码想要不被破解还要加上各种加密算法,即使这样,也可以随处搜索到某某验证码被破解的情况。在网络上有一个地下数据库,里面存储的是我们的个人信息,那些信息都是一条条整理好的,这十分可怕,但这样一个数据库是客观存在的,验证码作为保护账户密码的重要一环,已变得越来越不安全,因为个人信息的泄露,别人掌握了你足够的信息就可以对你实行诈骗,其中验证码是重要一环,近日就有一毕业生被骗取验证码后,几个小时内所有财富都被转走的事件发生。所以请保护好你的验证码,不要轻易泄露给他人。
当然我们也不会坐以待毙,目前的验证码种类繁多也越来越难以破解,像语音识别、面部识别这些都是耳熟能详的就不多说了。
这里我们引入一个验证码“新”概念:双因素认证。
双因素认证是一种采用时间同步技术的系统,采用了基于时间、事件和密钥三变量而产生的一次性密码来代替传统的静态密码。每个动态密码卡都有一个唯一的密钥,该密钥同时存放在服务器端,每次认证时动态密码卡与服务器分别根据同样的密钥,同样的随机参数(时间、事件)和同样的算法计算了认证的动态密码,从而确保密码的一致性,从而实现了用户的认证。因每次认证时的随机参数不同,所以每次产生的动态密码也不同。由于每次计算时参数的随机性保证了每次密码的不可预测性,从而在最基本的密码认证这一环节保证了系统的安全性。解决因口令欺诈而导致的重大损失,防止恶意入侵者或人为破坏,解决由口令泄密导致的入侵问题。
简单来说,双因素身份认证就是通过你所知道再加上你所能拥有的这二个要素组合到一起才能发挥作用的身份认证系统。例如,在ATM上取款的银行卡就是一个双因素认证机制的例子,需要知道取款密码和银行卡这二个要素结合才能使用。目前主流的双因素认证系统是基于时间同步型,市场占有率高的有DKEY双因素认证系统、RSA双因素认证系统等,由于DKEY增加对短信密码认证及短信+令牌混合认证支持,相比RSA,DKEY双因素认证系统更具竞争力。
以上所述是小编给大家介绍的Java验证码制作的相关内容,希望对大家有所帮助!
以上是 探讨Java验证码制作(下篇) 的全部内容, 来源链接: utcz.com/p/209555.html