基于Ajax用户名验证、服务条款加载、验证码生成的实现方法
Ajax(asynchronous javascript and xml)异步的javascript和xml.
是为了解决传统的web应用中"发送请求-等待响应"这种模式的弊端,(浏览器在发送完请求后,只能等待服务器的响应,用户不能做其他的操作,浏览器发送完请求,会抛弃整个页面,等待服务器返回新的页面,也就是说,浏览器和服务器之间交互的数据量很大,不能做到按需获取数据)而创建的技术,该技术的本质是:通过一个浏览器内置的一个对象(XmlHttpRequest)异步地向服务器发送请求.
所谓异步指的是浏览器并没有抛弃整个页面,也就是不是通过表单提交的方式向服务器发送数据,服务器在处理完请求之后,返回数据给XmlHttpRequest对象,通过javascript可以获取XmlHttpRequest中的数据.然后,使用该数据更新页面,整个过程当中,用户不用等待服务器的响应.
说明:网页的异步传输技术.一种不用刷新整个页面便可与服务器通讯的办法,在等待网页的传输过程中,用户依然可以和系统进行交互,页面不用刷新就可以更新内容合理的运用可以让用户感觉更好更方便,但也不要滥用
同步与异步
同步是指:发送方发出数据后,等接收方发回响应以后才发下一个数据包的通讯方式。
Eg.同步:提交请求->等待服务器处理->处理完毕返回 这个期间客户端浏览器不能干任何事异步是指:发送方发出数据后,不等接收方发回响应,接着发送下个数据包的通讯方式
Eg.异步:请求通过事件触发->服务器处理(这时浏览器仍然可以作其他事情)->处理完毕
Ajax的重要对象XMLHttpRequest
重要的Javascript对象,通过它提起对服务器端的请求,可以通过Javascript提起请求,如果要提起多个请求,需要多个XHR对象,请求的结果被预先定义好的方法处理
如何创建XmlHttpRequest对象
function getXmlHttpRequest(){
var xmlHttpRequest = null;
if ((typeof XMLHttpRequest) != 'undefined') {
//非ie浏览器
xmlHttpRequest = new XMLHttpRequest();
}else {
//ie浏览器
xmlHttpRequest = new ActiveXObject('Microsoft.XMLHttp');
}
return xmlHttpRequest;
}
或者
function createXmlHttpRequest(){
var xmlHttpRequest = null;
if(window.ActiveXObject){
xmlHttpRequest = new AvtiveXObject("Microsoft.XMLHTTP");
}else if(window.XMLHttpRequest){
xmlHttpRequest = new XMLHttpRequest();
}
}
responseXml:获取服务器响应的xml数据
status:获取服务器返回的状态码(比如200)
readyState: 获取xmlHttpRequest与服务器通讯的状态(0、1、2、3、4,分别描述不同的状态).(未初始化) : 对象已建立,但是尚未初始化(尚未调用open方法)(初始化) : 对象已经建立,尚未调用send方法(发送数据) : send方法已调用,但是当前的状态以及http头未知(数据传送中) : 已接受部分数据。 (响应结束) : 此时,可以通过responseText/responseXml获取数据了。
个人使用Ajax实现的一个应用实例
系统截图
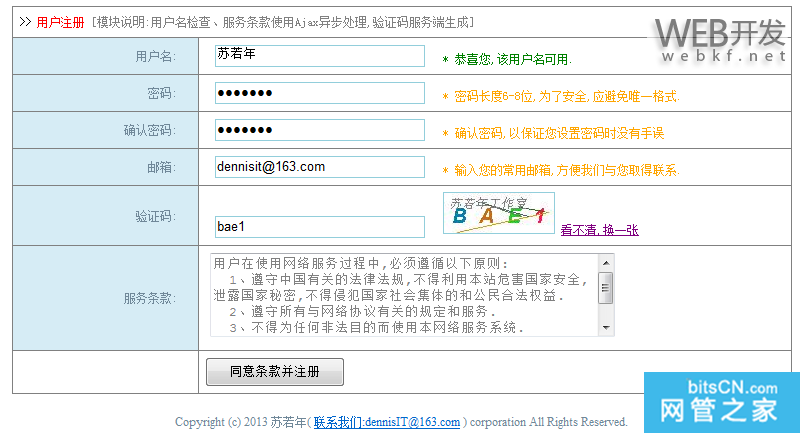
系统说明:
系统结构图
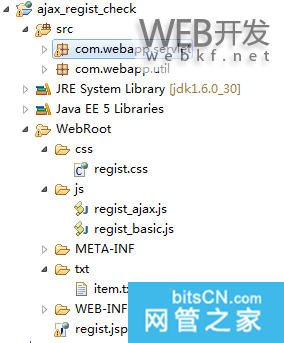
展示前台页regist.jsp
<!DOCTYPE HTML PUBLIC "-//W3C//DTD HTML 4.01 Transitional//EN"><html> <head> <title>用户注册</title> <link href="css/regist.css" rel="stylesheet" type="text/css" /> <script src="js/regist_ajax.js" type="text/javascript"></script> </head> <body > <form action="regist.do" onsubmit="return check(this);"> <table border="1" bordercolor="gray" cellpadding="6" align="center"> <tr> <td colspan="2"> >> <font color="red">用户注册</font> <font color="gray">[模块说明:用户名检查、服务条款使用Ajax异步处理,验证码服务端生成]</font> </td> </tr> <tr> <td align="right" class="left"> 用户名: </td> <td width="580"> <input type="text" name="username" id="username" onblur="postValidate()" class="inpt"/> <span style="color:orange" id="checkMsg" > * 用户名由字母、数字、下划线组成.</span> </td> </tr> <tr> <td align="right" class="left"> 密码: </td> <td> <input type="password" name="password" id="password" class="inpt"> <span style="color:orange" id="pwdMsg" > * 密码长度6-8位,为了安全,应避免唯一格式.</span> </td> </tr> <tr> <td align="right" class="left" class="inpt"> 确认密码: </td> <td> <input type="password" name="repassword" id="repassword" class="inpt"> <span style="color:orange" id="repwdMsg" > * 确认密码,以保证您设置密码时没有手误</span> </td> </tr> <tr> <td align="right" class="left" class="inpt"> 邮箱: </td> <td> <input type="text" id="email" name="email" class="inpt"> <span style="color:orange" id="emailMsg" > * 输入您的常用邮箱,方便我们与您取得联系.</span> </td> </tr> <tr> <td align="right" class="left" class="inpt"> 验证码: </td> <td> <input type="text" id="checkcode" class="inpt"> <img id="ckcodeimage" src="imgsrc" style="border:solid #92CEDB 1px "> <!-- 验证码 --> <a href="javascript:;" onclick="getCheckcode()">看不清,换一张</a> <span style="color:orange" id="ckcodeMsg" > </span> </td> </tr> <tr> <td align="right" class="left"> 服务条款: </td> <td> <textarea rows="5" cols="48" style="margin-bottom:6px;margin-left:5px; color:gray" readonly="readonly" id="item" > </textarea> </td> </tr> <tr> <td align="right"> </td> <td> <input type="submit" value="同意条款并注册" style="width: 140px; height: 30px;"/> </td> </tr> </table> <div class="rghts" align="center"> Copyright (c) 2013 苏若年( <a href="mailto:dennisit@163.com">联系我们:dennisIT@163.com</a> ) corporation All Rights Reserved. </div> </form> </body></html>异步Ajax处理js
} /* 定义表格的整体宽度以及边框样式,并且定义表格内所有文字的样式 */ .left{ font-weight:500; color:#708899; padding-right:20px; background-color: #D6ECF5; } .inpt { border:solid #92CEDB 1px; width: 210px; height: 22px; margin-left: 10px; } .rghts{ margin-top:20px; color:#708899; font-size:12px; }Web.xml中的内容
<servlet-mapping> <servlet-name>UserServlet</servlet-name> <url-pattern>*.do</url-pattern> </servlet-mapping> <welcome-file-list> <welcome-file>regist.jsp</welcome-file> </welcome-file-list></web-app>验证码输出工具类
import java.awt.Color;import java.awt.Font;import java.awt.Graphics;import java.awt.image.BufferedImage;import java.util.HashMap;import java.util.Map;import java.util.Random;
/** * * @version : 1.1 * * @author : 苏若年 <a href="mailto:DennisIT@163.com">发送邮件</a> * * @since : 1.0 创建时间: 2013-1-20 下午04:26:52 * * @function: TODO * */
public class CheckCodeImageUtil {
private static final String[] chars = { "0", "1", "2", "3", "4", "5", "6", "7", "8", "9", "A", "B", "C", "D", "E", "F", "G", "H", "I" }; private static final int SIZE = 4; //验证码上的字符个数 private static final int LINES = 4; //干扰线条数 private static final int WIDTH = 110; //验证码图片宽 private static final int HEIGHT = 40; //验证码图片高 private static final int FONT_SIZE = 21;//验证码上字体大小 /** * 产生验证码 * * @return Map<验证码的值,验证码的图片> * */ public static Map<String,BufferedImage> creatCheckImage(){ //保存产生验证码真实值的串 StringBuffer buffer = new StringBuffer(); //自定义图片对象 BufferedImage image = new BufferedImage(WIDTH,HEIGHT,BufferedImage.TYPE_INT_RGB); Map<String,BufferedImage> map = new HashMap<String,BufferedImage>(); Graphics graphics = image.getGraphics(); graphics.setColor(Color.WHITE); graphics.fillRect(0, 0, WIDTH, HEIGHT); Random random = new Random(); //画随机字符 for(int i=0; i<SIZE; i++){ //随即获取定义字符集中的一个元素 int rand = random.nextInt(chars.length); graphics.setColor(randomColor()); graphics.setFont(new Font(null,Font.BOLD+Font.ITALIC,FONT_SIZE)); graphics.drawString(chars[rand],(i)*WIDTH/SIZE+8 , HEIGHT/2+10); buffer.append(chars[rand]); //将生成的字符串存入到buffer中,将来获取时用于跟用户输入的值比较 } //画干扰线 for(int i=1;i<=LINES;i++){ graphics.setColor(randomColor()); graphics.drawLine(random.nextInt(WIDTH), random.nextInt(HEIGHT), random.nextInt(WIDTH),random.nextInt(HEIGHT)); if(i==LINES){ graphics.setFont(new Font(null,Font.ITALIC,13)); graphics.setColor(Color.GRAY); graphics.drawString("苏若年工作室", 5,15); } } map.put(buffer.toString(), image); return map; } /** * 随即产生颜色 * @return */ public static Color randomColor(){ Random random = new Random(); Color color = new Color(random.nextInt(256),random.nextInt(256),random.nextInt(256)); return color; }}Servlet处理类
import java.awt.image.BufferedImage;import java.io.BufferedReader;import java.io.ByteArrayInputStream;import java.io.ByteArrayOutputStream;import java.io.File;import java.io.FileReader;import java.io.FileWriter;import java.io.IOException;import java.io.InputStream;import java.io.PrintWriter;import java.util.List;import java.util.Map;import java.util.Vector;
import javax.imageio.ImageIO;import javax.servlet.ServletException;import javax.servlet.ServletOutputStream;import javax.servlet.http.HttpServlet;import javax.servlet.http.HttpServletRequest;import javax.servlet.http.HttpServletResponse;
import com.sun.image.codec.jpeg.JPEGCodec;import com.sun.image.codec.jpeg.JPEGImageEncoder;import com.sun.imageio.plugins.common.ImageUtil;import com.webapp.util.CheckCodeImageUtil;
public class UserServlet extends HttpServlet { private List<String> userList; private String txtFilePath = null; public void init() throws ServletException { txtFilePath = this.getInitParameter("rulesfilepath"); //模拟数据库 userList = new Vector<String>(); userList.add("zhangsan"); userList.add("lisi"); userList.add("wangwu"); userList.add("zhaoliu"); }
public void doGet(HttpServletRequest request, HttpServletResponse response) throws ServletException, IOException { doPost(request, response); }
public void doPost(HttpServletRequest request, HttpServletResponse response) throws ServletException, IOException { String uri = request.getRequestURI(); String path = uri.substring(uri.lastIndexOf("/"),uri.lastIndexOf(".")); if(path.equals("/validatename")){ request.setCharacterEncoding("utf-8"); response.setContentType("text/html;charset=utf-8"); try { Thread.sleep(3000); } catch (InterruptedException e) { e.printStackTrace(); } //模拟系统产生异常测试 /*if(1==2){ throw new ServletException("some error"); }*/ String username = request.getParameter("username"); System.out.println("username:" + username); //模拟用户数据查询 boolean exist = userList.contains(username); if(exist){ response.getWriter().print("exists"); }else{ response.getWriter().print("noexists"); } } if(path.equals("/rulesText")){ request.setCharacterEncoding("utf-8"); response.setContentType("text/html;charset=utf-8"); String filePath = this.getServletContext().getRealPath(txtFilePath); File file = new File(filePath); StringBuffer buffer = new StringBuffer(); try { BufferedReader reader = new BufferedReader(new FileReader(file)); String tmp = ""; while((tmp = reader.readLine())!=null){ buffer.append(new String(tmp.getBytes("gbk"),"utf8")).append("\n"); } reader.close(); } catch (Exception e) { e.printStackTrace(); } if(buffer.toString().trim()!=null){ response.getWriter().print(buffer.toString()); } } if(path.equals("/checkcode")){ response.setContentType("image/jpeg"); Map<String, BufferedImage> map = CheckCodeImageUtil.creatCheckImage(); String key = (String)map.keySet().iterator().next(); request.getSession().setAttribute("code",key); System.out.println("checkcode = " + request.getSession().getAttribute("code")); BufferedImage image = map.get(key); ImageIO.write(image, "jpeg", response.getOutputStream()); } }
}
以上是 基于Ajax用户名验证、服务条款加载、验证码生成的实现方法 的全部内容, 来源链接: utcz.com/p/207242.html