【JS】手摸手教你写一个命令行终端[electron实战]
前言
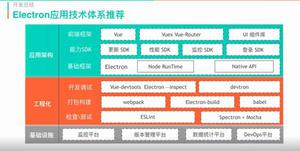
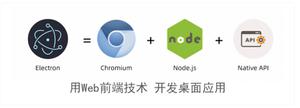
Electron很出名,很多人可能了解过,知道它是用来开发桌面端的应用,但是一直没有在项目中实践过,缺乏练手的实践项目。
很多开源的命令行终端都是使用Electron来开发的,本文将从零开始手把手的教大家用Electron写一个命令行终端。
作为一个完整的实战项目示例,该终端demo也将集成到Electron开源学习项目electron-playground中,目前这个项目拥有800+ Star⭐️,它最大的特点是所见即所得的演示Electron的各种特性,帮助大家快速学习、上手Electron。
大家跟着本文一起来试试Electron吧~
终端效果
开源地址: electron-terminal-demo
giit提交代码演示

目录
- 初始化项目。
- 项目目录结构
- Electron启动入口index-创建窗口
- 进程通信类-processMessage。
- 窗口html页面-命令行面板
命令行面板做了哪些事情
- 核心方法:child_process.spawn-执行命令行监听命令行的输出
- stderr不能直接识别为命令行执行错误
- 命令行终端执行命令保存输出信息的核心代码
- html完整代码
- 命令行终端的更多细节
下载试玩
- 项目演示
- 项目地址
- 启动与调试
- 小结
初始化项目
npm initnpm install electron -D
如果Electron安装不上去,需要添加一个.npmrc文件,来修改Electron的安装地址,文件内容如下:
registry=https://registry.npm.taobao.org/electron_mirror=https://npm.taobao.org/mirrors/electron/
chromedriver_cdnurl=https://npm.taobao.org/mirrors/chromedriver
修改一下package.json的入口main和scripts选项, 现在package.json长这样,很简洁:
{"name": "electron-terminal",
"version": "1.0.0",
"main": "./src/index.js",
"scripts": {
"start": "electron ."
},
"devDependencies": {
"electron": "^11.1.1"
}
}
项目目录结构
我们最终实现的项目将是下面这样子的,页面css文件不算的话,我们只需要实现src下面的三个文件即可。
.├── .vscode // 使用vscode的调试功能启动项目
├── node_dodules
├── src
│ ├── index.js // Electron启动入口-创建窗口
│ └── processMessage.js // 主进程和渲染进程通信类-进程通信、监听时间
│ └── index.html // 窗口html页面-命令行面板、执行命令并监听输出
│ └── index.css // 窗口html的css样式 这部分不写
├── package.json
└── .npmrc // 修改npm安装包的地址
└── .gitignore
Electron启动入口index-创建窗口
- 创建窗口, 赋予窗口直接使用node的能力。
- 窗口加载本地html页面
- 加载主线程和渲染进程通信逻辑
// ./src/index.jsconst { app, BrowserWindow } = require('electron')
const processMessage = require('./processMessage')
// 创建窗口
function createWindow() {
// 创建窗口
const win = new BrowserWindow({
width: 800,
height: 600,
webPreferences: {
nodeIntegration: true, // 页面直接使用node的能力 用于引入node模块 执行命令
},
})
// 加载本地页面
win.loadFile('./src/index.html')
win.webContents.openDevTools() // 打开控制台
// 主线程和渲染进程通信
const ProcessMessage = new processMessage(win)
ProcessMessage.init()
}
// app ready 创建窗口
app.whenReady().then(createWindow)
进程通信类-processMessage
electron分为主进程和渲染进程,因为进程不同,在各种事件发生的对应时机需要相互通知来执行一些功能。
这个类就是用于它们之间的通信的,electron通信这部分封装的很简洁了,照着用就可以了。
// ./src/processMessage.jsconst { ipcMain } = require('electron')
class ProcessMessage {
/**
* 进程通信
* @param {*} win 创建的窗口
*/
constructor(win) {
this.win = win
}
init() {
this.watch()
this.on()
}
// 监听渲染进程事件通信
watch() {
// 页面准备好了
ipcMain.on('page-ready', () => {
this.sendFocus()
})
}
// 监听窗口、app、等模块的事件
on() {
// 监听窗口是否聚焦
this.win.on('focus', () => {
this.sendFocus(true)
})
this.win.on('blur', () => {
this.sendFocus(false)
})
}
/**
* 窗口聚焦事件发送
* @param {*} isActive 是否聚焦
*/
sendFocus(isActive) {
// 主线程发送事件给窗口
this.win.webContents.send('win-focus', isActive)
}
}
module.exports = ProcessMessage
窗口html页面-命令行面板
在创建窗口的时候,我们赋予了窗口使用node的能力, 可以在html中直接使用node模块。
所以我们不需要通过进程通信的方式来执行命令和渲染输出,可以直接在一个文件里面完成。
终端的核心在于执行命令,渲染命令行输出,保存命令行的输出。
这些都在这个文件里面实现了,代码行数不到250行。
命令行面板做了哪些事情
- 页面: 引入vue、element,css文件来处理页面
- template模板-渲染当前命令行执行的输出以及历史命令行的执行输出
核心:执行命令监听命令行输出
- 执行命令并监听执行命令的输出,同步渲染输出。
- 执行完毕,保存命令行输出的信息。
- 渲染历史命令行输出。
- 对一些命令进行特殊处理,比如下面的细节处理。
围绕执行命令行的细节处理
- 识别cd,根据系统保存cd路径
- 识别clear清空所有输出。
- 执行成功与失败的箭头图标展示。
- 聚焦窗口,聚焦输入。
- 命令执行完毕滚动底部。
- 等等细节。
核心方法:child_process.spawn-执行命令行监听命令行的输出
child_process.spawn介绍
spawn是node子进程模块child_process提供的一个异步方法。
它的作用是执行命令并且可以实时监听命令行执行的输出。
当我第一次知道这个API的时候,我就感觉这个方法简直是为命令行终端量身定做的。
终端的核心也是执行命令行,并且实时输出命令行执行期间的信息。
下面就来看看它的使用方式。
使用方式
const { spawn } = require('child_process');const ls = spawn('ls', {
encoding: 'utf8',
cwd: process.cwd(), // 执行命令路径
shell: true, // 使用shell命令
})
// 监听标准输出
ls.stdout.on('data', (data) => {
console.log(`stdout: ${data}`);
});
// 监听标准错误
ls.stderr.on('data', (data) => {
console.error(`stderr: ${data}`);
});
// 子进程关闭事件
ls.on('close', (code) => {
console.log(`子进程退出,退出码 ${code}`);
});
api的使用很简单,但是终端信息的输出,需要很多细节的处理,比如下面这个。
stderr不能直接识别为命令行执行错误
stderr虽然是标准错误输出,但里面的信息不全是错误的信息,不同的工具会有不同的处理。
对于git来说,有很多命令行操作的输出信息都输出在stederr上。
比如git clone、git push等,信息输出在stederr中,我们不能将其视为错误。
git总是将详细的状态信息和进度报告,以及只读信息,发送给stederr。
具体细节可以查看git stderr(错误流)探秘等资料。
暂时还不清楚其他工具/命令行也有没有类似的操作,但是很明显我们不能将stederr的信息视为错误的信息。
PS: 对于git如果想提供更好的支持,需要根据不同的git命令进行特殊处理,比如对下面clear命令和cd命令的特殊处理。
根据子进程close事件判断命令行是否执行成功
我们应该检测close事件的退出码code, 如果code为0则表示命令行执行成功,否则即为失败。
命令行终端执行命令保存输出信息的核心代码
下面这段是命令行面板的核心代码,我贴一下大家重点看一下,
其他部分都是一些细节、优化体验、状态处理这样的代码,下面会将完整的html贴上来。
const { spawn } = require('child_process') // 使用node child_process模块// 执行命令行
actionCommand() {
// 处理command命令
const command = this.command.trim()
this.isClear(command)
if (this.command === '') return
// 执行命令行
this.action = true
this.handleCommand = this.cdCommand(command)
const ls = spawn(this.handleCommand, {
encoding: 'utf8',
cwd: this.path, // 执行命令路径
shell: true, // 使用shell命令
})
// 监听命令行执行过程的输出
ls.stdout.on('data', (data) => {
const value = data.toString().trim()
this.commandMsg.push(value)
console.log(`stdout: ${value}`)
})
ls.stderr.on('data', this.stderrMsgHandle)
ls.on('close', this.closeCommandAction)
},
// 错误或详细状态进度报告 比如 git push
stderrMsgHandle(data) {
console.log(`stderr: ${data}`)
this.commandMsg.push(`stderr: ${data}`)
},
// 执行完毕 保存信息 更新状态
closeCommandAction(code) {
// 保存执行信息
this.commandArr.push({
code, // 是否执行成功
path: this.path, // 执行路径
command: this.command, // 执行命令
commandMsg: this.commandMsg.join('\r'), // 执行信息
})
// 清空
this.updatePath(this.handleCommand, code)
this.commandFinish()
console.log(
`子进程退出,退出码 ${code}, 运行${code === 0 ? '成功' : '失败'}`
)
}
html完整代码
这里是html的完整代码,代码中有详细注释,建议根据上面的命令行面板做了哪些事情,来阅读源码。
<!DOCTYPE html><html>
<head>
<meta charset="UTF-8" />
<meta name="viewport" content="width=device-width, initial-scale=1.0" />
<title>极简electron终端</title>
<link
rel="stylesheet"
href="https://unpkg.com/element-ui/lib/theme-chalk/index.css"
/>
<script></script>
<!-- 引入element -->
<script></script>
<!-- css -->
<link rel="stylesheet" href="https://segmentfault.com/a/index.css" />
</head>
<body>
<div id="app">
<div class="main-class">
<!-- 渲染过往的命令行 -->
<div v-for="item in commandArr">
<div class="command-action">
<!-- 执行成功或者失败图标切换 -->
<i
:class="['el-icon-right', 'command-action-icon', { 'error-icon': item.code !== 0 }]"
></i>
<!-- 过往执行地址和命令行、信息 -->
<span class="command-action-path">{{ item.path }} $</span>
<span class="command-action-contenteditable"
>{{ item.command }}</span
>
</div>
<div class="output-command">{{ item.commandMsg }}</div>
</div>
<!-- 当前输入的命令行 -->
<div
class="command-action command-action-editor"
@mouseup="timeoutFocusInput"
>
<i class="el-icon-right command-action-icon"></i>
<!-- 执行地址 -->
<span class="command-action-path">{{ path }} $</span>
<!-- 命令行输入 -->
<span
:contenteditable="action ? false : 'plaintext-only'"
class="command-action-contenteditable"
@input="onDivInput($event)"
@keydown="keyFn"
></span>
</div>
<!-- 当前命令行输出 -->
<div class="output-command">
<div v-for="item in commandMsg">{{item}}</div>
</div>
</div>
</div>
<script>
const { ipcRenderer } = require('electron')
const { spawn } = require('child_process')
const path = require('path')
var app = new Vue({
el: '#app',
data: {
path: '', // 命令行目录
command: '', // 用户输入命令
handleCommand: '', // 经过处理的用户命令 比如清除首尾空格、添加获取路径的命令
commandMsg: [], // 当前命令信息
commandArr: [], // 过往命令行输出保存
isActive: true, // 终端是否聚焦
action: false, // 是否正在执行命令
inputDom: null, // 输入框dom
addPath: '', // 不同系统 获取路径的命令 mac是pwd window是chdir
},
mounted() {
this.addGetPath()
this.inputDom = document.querySelector(
'.command-action-contenteditable'
)
this.path = process.cwd() // 初始化路径
this.watchFocus()
ipcRenderer.send('page-ready') // 告诉主进程页面准备好了
},
methods: {
// 回车执行命令
keyFn(e) {
if (e.keyCode == 13) {
this.actionCommand()
e.preventDefault()
}
},
// 执行命令
actionCommand() {
const command = this.command.trim()
this.isClear(command)
if (this.command === '') return
this.action = true
this.handleCommand = this.cdCommand(command)
const ls = spawn(this.handleCommand, {
encoding: 'utf8',
cwd: this.path, // 执行命令路径
shell: true, // 使用shell命令
})
// 监听命令行执行过程的输出
ls.stdout.on('data', (data) => {
const value = data.toString().trim()
this.commandMsg.push(value)
console.log(`stdout: ${value}`)
})
// 错误或详细状态进度报告 比如 git push、 git clone
ls.stderr.on('data', (data) => {
const value = data.toString().trim()
this.commandMsg.push(`stderr: ${data}`)
console.log(`stderr: ${data}`)
})
// 子进程关闭事件 保存信息 更新状态
ls.on('close', this.closeCommandAction)
},
// 执行完毕 保存信息 更新状态
closeCommandAction(code) {
// 保存执行信息
this.commandArr.push({
code, // 是否执行成功
path: this.path, // 执行路径
command: this.command, // 执行命令
commandMsg: this.commandMsg.join('\r'), // 执行信息
})
// 清空
this.updatePath(this.handleCommand, code)
this.commandFinish()
console.log(
`子进程退出,退出码 ${code}, 运行${code === 0 ? '成功' : '失败'}`
)
},
// cd命令处理
cdCommand(command) {
let pathCommand = ''
if (this.command.startsWith('cd ')) {
pathCommand = this.addPath
} else if (this.command.indexOf(' cd ') !== -1) {
pathCommand = this.addPath
}
return command + pathCommand
// 目录自动联想...等很多细节功能 可以做但没必要2
},
// 清空历史
isClear(command) {
if (command === 'clear') {
this.commandArr = []
this.commandFinish()
}
},
// 获取不同系统下的路径
addGetPath() {
const systemName = getOsInfo()
if (systemName === 'Mac') {
this.addPath = ' && pwd'
} else if (systemName === 'Windows') {
this.addPath = ' && chdir'
}
},
// 命令执行完毕 重置参数
commandFinish() {
this.commandMsg = []
this.command = ''
this.inputDom.textContent = ''
this.action = false
// 激活编辑器
this.$nextTick(() => {
this.focusInput()
this.scrollBottom()
})
},
// 判断命令是否添加过addPath
updatePath(command, code) {
if (code !== 0) return
const isPathChange = command.indexOf(this.addPath) !== -1
if (isPathChange) {
this.path = this.commandMsg[this.commandMsg.length - 1]
}
},
// 保存输入的命令行
onDivInput(e) {
this.command = e.target.textContent
},
// 点击div
timeoutFocusInput() {
setTimeout(() => {
this.focusInput()
}, 200)
},
// 聚焦输入
focusInput() {
this.inputDom.focus() //解决ff不获取焦点无法定位问题
var range = window.getSelection() //创建range
range.selectAllChildren(this.inputDom) //range 选择obj下所有子内容
range.collapseToEnd() //光标移至最后
this.inputDom.focus()
},
// 滚动到底部
scrollBottom() {
let dom = document.querySelector('#app')
dom.scrollTop = dom.scrollHeight // 滚动高度
dom = null
},
// 监听窗口聚焦、失焦
watchFocus() {
ipcRenderer.on('win-focus', (event, message) => {
this.isActive = message
if (message) {
this.focusInput()
}
})
},
},
})
// 获取操作系统信息
function getOsInfo() {
var userAgent = navigator.userAgent.toLowerCase()
var name = 'Unknown'
if (userAgent.indexOf('win') > -1) {
name = 'Windows'
} else if (userAgent.indexOf('iphone') > -1) {
name = 'iPhone'
} else if (userAgent.indexOf('mac') > -1) {
name = 'Mac'
} else if (
userAgent.indexOf('x11') > -1 ||
userAgent.indexOf('unix') > -1 ||
userAgent.indexOf('sunname') > -1 ||
userAgent.indexOf('bsd') > -1
) {
name = 'Unix'
} else if (userAgent.indexOf('linux') > -1) {
if (userAgent.indexOf('android') > -1) {
name = 'Android'
} else {
name = 'Linux'
}
}
return name
}
</script>
</body>
</html>
以上就是整个项目的代码实现,总共只有三个文件。
更多细节
本项目终究是一个简单的demo,如果想要做成一个完整的开源项目,还需要补充很多细节。
还会有各种各样奇奇怪怪的需求和需要定制的地方,比如下面这些:
command+c终止命令cd目录自动补全- 命令保存上下键滑动
- git等常用功能单独特殊处理。
- 输出信息颜色变化
- 等等
下载试玩
即使这个终端demo的代码量很少,注释足够详细,但还是需要上手体验一下一个Electron项目运行的细节。
项目演示
clear命令演示
实际上就是将历史命令行输出的数组重置为空数组。
![【JS】手摸手教你写一个命令行终端[electron实战]](/wp-content/uploads/2021/01/1460000038966976.gif "【JS】手摸手教你写一个命令行终端[electron实战]")
执行失败箭头切换
根据子进程close事件,判断执行是否成功,切换一下图标。
![【JS】手摸手教你写一个命令行终端[electron实战]](/wp-content/uploads/2021/01/1460000038966971.gif "【JS】手摸手教你写一个命令行终端[electron实战]")
cd命令
识别cd命令,根据系统添加获取路径(pwd/chdir)的命令,再将获取到的路径,更改为最终路径。

giit提交代码演示
项目地址
开源地址: electron-terminal-demo
启动与调试
安装
npm install启动
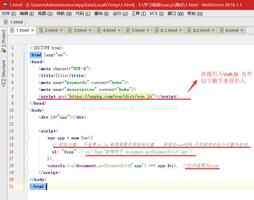
- 通过vscode的调试运行项目,这种形式可以直接在VSCode中进行debugger调试。
![【JS】手摸手教你写一个命令行终端[electron实战]](/wp-content/uploads/2021/01/1460000038966972.jpg "【JS】手摸手教你写一个命令行终端[electron实战]")
- 如果不是使用vscode编辑器, 也可以通过使用命令行启动。
npm run start小结
命令行终端的实现原理就是这样啦,强烈推荐各位下载体验一下这个项目,最好单步调试一下,这样会更熟悉Electron。
项目idea诞生于我们团队开源的另一个开源项目:electron-playground, 目的是为了让小伙伴学习electron实战项目。
electron-playground是用来帮助前端小伙伴们更好、更快的学习和理解前端桌面端技术Electron, 尽量少走弯路。
它通过如下方式让我们快速学习electron。
- 带有gif示例和可操作的demo的教程文章。
- 系统性的整理了Electron相关的api和功能。
- 搭配演练场,自己动手尝试electron的各种特性。
前端进阶积累、公众号、GitHub、wx:OBkoro1、邮箱:[email protected]
以上2021/01/12
以上是 【JS】手摸手教你写一个命令行终端[electron实战] 的全部内容, 来源链接: utcz.com/a/98052.html