【Java】基于springboot的文件上传
第一步:在vo包下创建上传前端响应类
`import com.alibaba.druid.filter.AutoLoad;import lombok.AllArgsConstructor;
import lombok.Data;
import lombok.NoArgsConstructor;
/**
* 上传响应参数
* @param <E>
*/
//以下是lombok插件注解
@Data
@AllArgsConstructor
@NoArgsConstructor
public class Resp<E> {
//返回状态码 如 200 403
private String code;
//返回信息
private String Msg;
//也可定义为 Object body 都表示任意类型的意思
private E body;//模板类型
/**
* 成功时候方法
* @param body
* @param <E>
* @return
*/
public static<E> Resp<E> success(E body){
return new Resp<E>("200","上传成功!",body);
}
/**
* 上传失败时的方法
* @param code
* @param msg
* @param <E>
* @return
*/
public static<E> Resp<E> fail(String code,String msg){
return new Resp<E>(code,msg,null);
}
}`
* 1
* 2
* 3
* 4
* 5
* 6
* 7
* 8
* 9
* 10
* 11
* 12
* 13
* 14
* 15
* 16
* 17
* 18
* 19
* 20
* 21
* 22
* 23
* 24
* 25
* 26
* 27
* 28
* 29
* 30
* 31
* 32
* 33
* 34
* 35
* 36
* 37
* 38
* 39
* 40
* 41
* 42
* 43
第二步:在controller层接收前端上传的文件
`import com.qf.springboot_ssm_day02.service.UploadService;import com.qf.springboot_ssm_day02.vo.Resp;
import org.springframework.beans.factory.annotation.Autowired;
import org.springframework.stereotype.Controller;
import org.springframework.web.bind.annotation.RequestMapping;
import org.springframework.web.bind.annotation.RequestMethod;
import org.springframework.web.bind.annotation.RequestParam;
import org.springframework.web.bind.annotation.ResponseBody;
import org.springframework.web.multipart.MultipartFile;
@Controller
public class uploadController {
@Autowired
private UploadService uploadService;
@RequestMapping(value = "upload",method = RequestMethod.POST)
@ResponseBody
//返回类型根据自定义的返回类型 不一定和我一样
public Resp<String> upload(@RequestParam("file")MultipartFile file){
return uploadService.upload(file);
}
}`
* 1
* 2
* 3
* 4
* 5
* 6
* 7
* 8
* 9
* 10
* 11
* 12
* 13
* 14
* 15
* 16
* 17
* 18
* 19
* 20
* 21
* 22
* 23
* 24
* 25
第三步:在servcie包下建立upload接口及其实现类处理业务
`import com.qf.springboot_ssm_day02.vo.Resp;import org.springframework.web.multipart.MultipartFile;
/**
*上传业务类
*/
public interface UploadService {
//上传接口
Resp<String > upload(MultipartFile file);
}`
* 1
* 2
* 3
* 4
* 5
* 6
* 7
* 8
* 9
* 10
`import com.qf.springboot_ssm_day02.service.UploadService;import com.qf.springboot_ssm_day02.vo.Resp;
import org.springframework.stereotype.Service;
import org.springframework.web.multipart.MultipartFile;
import java.io.File;
/**
* 上传业务实现类
*/
@Service
public class UploadServiceImpl implements UploadService {
@Override
public Resp<String> upload(MultipartFile file) {
//判断上传的文件是不是空
if (file.isEmpty()){
return Resp.fail("400","文件为空!");
}
//文件不为空的情况
//获得原始文件名(前端传过来的文件名) 带有拓展名
//原始文件名存在一定问题
String OriginalFilename=file.getOriginalFilename();
//根据 时间戳+拓展名=服务器文件名
// 确定服务器文件名(经过字符操作加上拓展名)
String fileName= System.currentTimeMillis()+"."+OriginalFilename.substring(OriginalFilename.lastIndexOf(".")+1);
//控制台查看服务器文件名
System.out.println(fileName);
//确定文件储存位置
// 文件保存路径 注意最后加上双反斜杠 转义字符所有双反斜杠
String filePath="F:Test";
//目标文件路径 (实际创建在硬盘的文件)
File dest=new File(filePath+fileName);
//判断dest的父目录是否存在
if(dest.getParentFile().exists())
dest.getParentFile().mkdirs();
try {
//前端传过来的文件拷贝在本地
file.transferTo(dest);
}catch (Exception e){
e.printStackTrace();
return Resp.fail("500",OriginalFilename+"上传失败!");
}
//上传成功 返回前端穿过来的文件名
return Resp.success(fileName);
}
}`
* 1
* 2
* 3
* 4
* 5
* 6
* 7
* 8
* 9
* 10
* 11
* 12
* 13
* 14
* 15
* 16
* 17
* 18
* 19
* 20
* 21
* 22
* 23
* 24
* 25
* 26
* 27
* 28
* 29
* 30
* 31
* 32
* 33
* 34
* 35
* 36
* 37
* 38
* 39
* 40
* 41
* 42
* 43
* 44
* 45
* 46
* 47
* 48
* 49
* 50
* 51
* 52
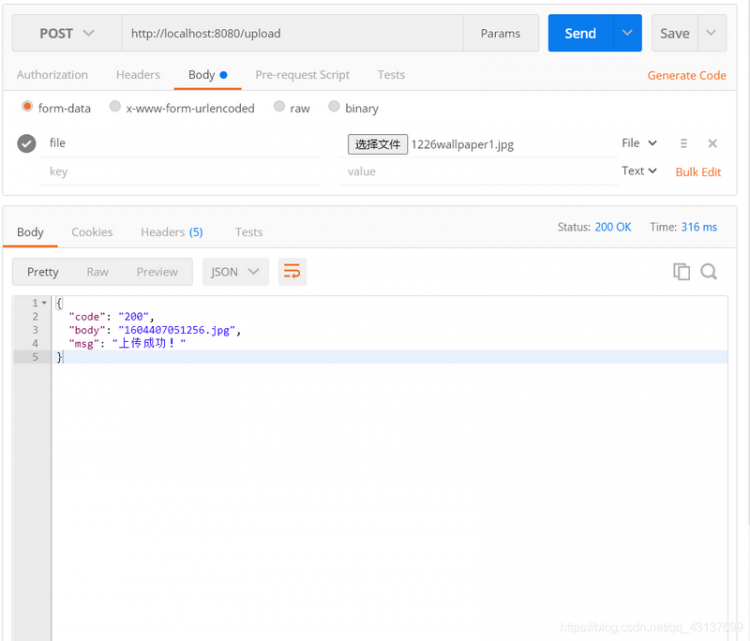
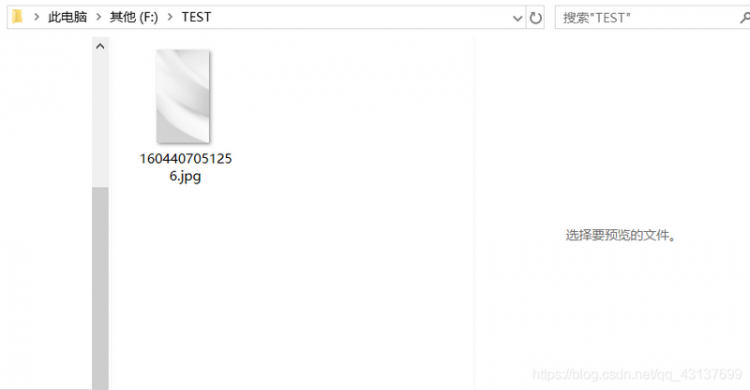
第四步:postman测试上传


以上是 【Java】基于springboot的文件上传 的全部内容, 来源链接: utcz.com/a/96938.html


