【JS】webpack5源码导读:如何实现自定义 target
webpack5 正式版已经发布三个月了,目前最新版本是 5.11.1。具体的迁移指南请参考 webpack 官方的文档:
- Webpack 5 release
- migrating to webpack 5
建议参考 webpack 官方的这些文档,比参考一些不完全、不准确的翻译有效的多,唯一的问题是有可能每个词都认识,连在一起却不知道是什么意思。
1. 阅读源码的初衷
在 webpack4 中, target 选项可以设置为 function,以实现自定义的代码生成方式。但是在 webpack5 中,target 只能设置为特定的字符串或字符串数组了。最坑的是,此功能直接就废弃了,webpack 没有给任何过渡提示。而在我们的打包工具中,一些重要的功能是通过自定义 target 来实现的。所以我们需要研究 webpack5 源码来探索一种替代的实现方式。
2. 本文写作的初衷
本文并不是一篇基础的 webpack5 配置教程, webpack5 配置参考上面介绍的官方文档即可。本文想要展示的有三点:
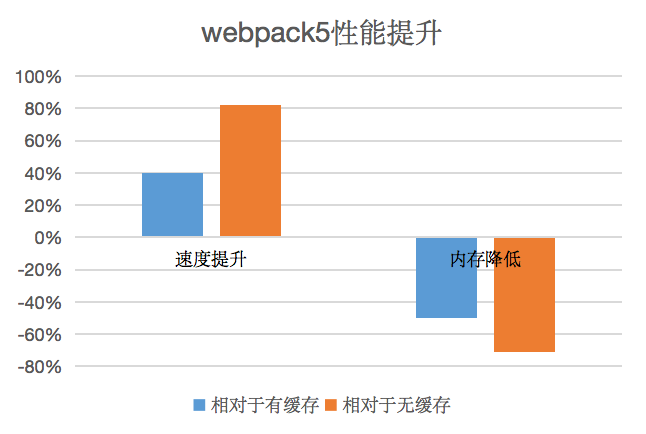
- Webpack5 的性能提升有多大?
最终升级 webpack5 后,配合 webpack5 的持久化缓存,打包工具的二次打包速度相对于使用 cache-loader 缓存提高了 40%,二次打包内存占用相对于使用 cache-loader 缓存二次打包内存占用相对于使用 cache-loader 缓存降低了 40%,相对于不使用任何缓存,打包工具的二次打包速度提高了约 70%,二次打包内存占用降低了约 70%。

为什么我们需要阅读源码?
众所周知 webpack 的官方文档是有些烂的,中文文档更是烂的不行。如果你多次阅读文档之后还是不清楚某项配置应该怎么配,或者我们有一些特殊的功能需求(比如实现与 webpack4 中一样的 target 为 function 时的功能),也许你需要看看源码了。
同时 webpack 有些配置或 api 的使用是文档里没有介绍的,很多 hooks 的介绍也是模棱两可,webpack 的源码可以看成是一个非常完备的 webpack demo,阅读源码能给我们使用方式的启发。
- 实现自定义 target
本文提供了一种实现与 webpack4 中自定义 target 一样的功能的实现思路,并且不会影响到其他的目标环境代码。
3. webpack5 demo
我们可以使用一个简单的 webpack demo 来配合我们更方便的调试阅读源码。demo 的源码在这里
安装依赖后,添加 vscode 的调试配置文件,然后按 f5 开始调试。
// demo/.vscode/launch.json{
"version": "0.2.0",
"configurations": [
{
"type": "pwa-node",
"request": "launch",
"name": "Launch Program",
"skipFiles": [
"<node_internals>/**"
],
"program": "${workspaceFolder}/../qa/bin/index.js",
"args": ["build"]
}
]
}
直接进入 webpack 的依赖安装目录阅读源码即可,npm 上 webpack 的代码未压缩。(本项目中 webpack 的安装目录为 webpack5-demo/qa/node_modules/webpack)。webpack 精简后的项目目录如下:
webpack├── bin
│ └── webpack.js
├── lib
│ ├── Cache.js
│ ├── CacheFacade.js
│ ├── Compilation.js
│ ├── Compiler.js
│ ├── Stats.js
│ ├── Watching.js
│ ├── WebpackOptionsApply.js
│ ├── WebpackOptionsDefaulter.js
│ ├── cache
│ ├── electron
│ ├── index.js
│ ├── javascript
│ ├── node
│ ├── rules
│ ├── schemes
│ ├── stats
│ ├── validateSchema.js
│ ├── wasm
│ ├── wasm-async
│ ├── wasm-sync
│ ├── web
│ ├── webpack.js
├── node_modules
├── package.json
├── schemas
├── WebpackOptions.json
└── plugins
4. Webpack5 的执行流程
如果通过 api 调用 webpack,require('webpack') 首先会 require 导入 lib/index.js ,lib/index.js 会调用 lib/webpack.js , lib/webpack.js 的执行流程如下。请从默认导出的 webpack 方法开始阅读。
// lib/webpack.js// 一些模块导入...
// 当传给 webpack 方法的配置是多个配置对象组成的数组时,调用此方法创建 compiler 用于打包
const createMultiCompiler = childOptions => {
// 省略不关注的代码...
return compiler;
};
// 当传给 webpack 方法的配置是一个配置对象时,调用此方法创建 compiler 用于打包
const createCompiler = rawOptions => {
// 下面两步是对我们传给 webpack 的配置做一些默认处理
const options = getNormalizedWebpackOptions(rawOptions);
applyWebpackOptionsBaseDefaults(options);
// 创建 compiler 对象用于编译
const compiler = new Compiler(options.context);
compiler.options = options;
new NodeEnvironmentPlugin({
infrastructureLogging: options.infrastructureLogging
}).apply(compiler);
// 依次将我们配置的 plugins 数组中的 plugin 挂载到 webpack 的 compiler 上,以便挂载 plugin 中的各种 hook
if (Array.isArray(options.plugins)) {
for (const plugin of options.plugins) {
if (typeof plugin === "function") {
plugin.call(compiler, compiler);
} else {
plugin.apply(compiler);
}
}
}
// 进行另外一些默认配置的处理
// 跳转到 applyWebpackOptionsDefaults 方法定义的位置(看下一个代码块),
// 可以看到我们配置的 options.target 会通过影响 targetProperties 来控制生成的代码需要
// 具备运行时(web/node/electron/...) 的哪些属性
applyWebpackOptionsDefaults(options);
compiler.hooks.environment.call();
compiler.hooks.afterEnvironment.call();
// WebpackOptionsApply 是一个非常重要的步骤,请看下一个代码块的讲解
new WebpackOptionsApply().process(options, compiler);
compiler.hooks.initialize.call();
return compiler;
};
const webpack = /** @type {WebpackFunctionSingle & WebpackFunctionMulti} */ ((
options,
callback
) => {
// 用于创建 webpack 的 compiler
const create = () => {
// 首先对我们传给 webpack 的配置进行 schema 校验,配置不符合 webpackOptionsSchema 会直接停止打包
validateSchema(webpackOptionsSchema, options);
let compiler;
// 是否开启 watch 模式,默认不开启
let watch = false;
let watchOptions;
// 当传给 webpack 方法的配置是多个配置对象组成的数组时,开启多个打包
if (Array.isArray(options)) {
compiler = createMultiCompiler(options);
watch = options.some(options => options.watch);
watchOptions = options.map(options => options.watchOptions || {});
} else {
// 当传给 webpack 方法的配置是一个配置对象时
compiler = createCompiler(options);
watch = options.watch;
watchOptions = options.watchOptions || {};
}
return { compiler, watch, watchOptions };
};
// 在 webpack5 中, webpack api 的调用方式发生了变化,就是对应下面这部分代码
// ----当以 compiler = webpack(webpackConfig, compileCallback) 方法调用时,
// 开启/不开启 watch 模式都可以
// 如果需要给 webpack 传 callback,建议始终以这种方式调用 webpack api
// ----当以 webpack(webpackConfig).run(compileCallback) 方式调用时
// watch 必须为 false
// 如果不需要给 webpack 传 callback,建议始终以这种方式调用 webpack api
// ================================
// 而在 webpack4 中通过 api 调用 webpack 时,如果webpack函数接收了回调callback,
// 则直接执行compiler.run()方法,那么webpack自动开启编译之旅。
// 如果未指定callback回调,则需要用户自己调用run方法来启动编译。
if (callback) {
try {
const { compiler, watch, watchOptions } = create();
// 对应 options.watch = true,开始打包,打包完成后监听文件变化
if (watch) {
compiler.watch(watchOptions, callback);
} else {
// 开始打包
compiler.run((err, stats) => {
compiler.close(err2 => {
// 运行完毕触发我们传给 webpack 的 callback
callback(err || err2, stats);
});
});
}
return compiler;
} catch (err) {
process.nextTick(() => callback(err));
return null;
}
} else {
const { compiler, watch } = create();
if (watch) {
util.deprecate(
() => {},
"A 'callback' argument need to be provided to the 'webpack(options, callback)' function when the 'watch' option is set. There is no way to handle the 'watch' option without a callback.",
"DEP_WEBPACK_WATCH_WITHOUT_CALLBACK"
)();
}
return compiler;
}
});
module.exports = webpack;
5. applyWebpackOptionsDefaults
解释上面提到的 applyWebpackOptionsDefaults 方法
// ...// lib/config/defaults.js#applyWebpackOptionsDefaults
const applyWebpackOptionsDefaults = options => {
F(options, "context", () => process.cwd());
// 规范化处理 options.target
F(options, "target", () => {
return getDefaultTarget(options.context);
});
const { mode, name, target } = options;
// 当 options.target 是数组时,getTargetsProperties 会将不同运行时(web/node/electron/... ) 需要的属性进行合并
let targetProperties =
target === false
? /** @type {false} */ (false)
: typeof target === "string"
? getTargetProperties(target, options.context)
: getTargetsProperties(target, options.context);
// 省略...
// 在省略的代码中,targetProperties 会影响 60 多处代码,所以修改 webpackOptionsSchema 再通过其他少量代码,
// 以达到我们最初的目的(允许 target 为 function),这条途径是不可行的。
}
既然不能直接允许 target 为 function,我们就需要继续阅读源码,以期发现其他的实现方式。
6. WebpackOptionsApply
解释上面提到的 WebpackOptionsApply
// lib/WebpackOptionsApply.js/WebpackOptionsApply// 一大堆模块导入...
class WebpackOptionsApply extends OptionsApply {
constructor() {
super();
}
// 在 WebpackOptionsApply.process 方法内 apply 了非常多的插件,代码有 500 多行
process(options, compiler) {
compiler.outputPath = options.output.path;
compiler.recordsInputPath = options.recordsInputPath || null;
compiler.recordsOutputPath = options.recordsOutputPath || null;
compiler.name = options.name;
// options.externalsPresets.node/electronMain 等的值由 options.target 控制
// 从这也能看出我们直接修改 target 为 function 是不可行的。
if (options.externalsPresets.node) {
// options.target 包含 node 时,会进入这里
// 由于快应用的目标运行时坏境类似于浏览器,所以我们只需要关注 options.externalsPresets.web = true 部分的代码
const NodeTargetPlugin = require("./node/NodeTargetPlugin");
new NodeTargetPlugin().apply(compiler);
}
if (options.externalsPresets.electronMain) {
// ...
}
if (options.externalsPresets.electronPreload) {
// ...
}
if (options.externalsPresets.electronRenderer) {
// ...
}
if (
options.externalsPresets.electron &&
!options.externalsPresets.electronMain &&
!options.externalsPresets.electronPreload &&
!options.externalsPresets.electronRenderer
) {
// ...
}
if (options.externalsPresets.nwjs) {
// ...
}
if (options.externalsPresets.webAsync) {
// ...
} else if (options.externalsPresets.web) {
//@ts-expect-error https://github.com/microsoft/TypeScript/issues/41697
// 在 ExternalsPlugin 及其依赖的插件中我们依然没有发现可以达到目的的方法
// 继续往下阅读
const ExternalsPlugin = require("./ExternalsPlugin");
new ExternalsPlugin("module", /^(https?:\/\/|std:)/).apply(compiler);
}
new ChunkPrefetchPreloadPlugin().apply(compiler);
if (typeof options.output.chunkFormat === "string") {
// ...
}
if (options.output.enabledChunkLoadingTypes.length > 0) {
// 当 options.target = 'web' ,并且没有配置 output.outputenabledchunkloadingtypes 时
// output.outputenabledchunkloadingtypes = ['jsonp', 'import-scripts']
for (const type of options.output.enabledChunkLoadingTypes) {
// 该部分的配置参考 webpack 官方文档
// https://webpack.js.org/configuration/output/#outputenabledchunkloadingtypes
// 在官方文档上提到,enabledChunkLoadingTypes 的值一般是 webpack 自动生成的(受 options.target 影响),
// 不需要用户配置。
// 但是进入 EnableChunkLoadingPlugin(type).apply 我们会发现,
// 通过自定义 outputenabledchunkloadingtypes 的值
// 配合自定义插件,我们可以实现与 target 为 function 时同样的功能。
// EnableChunkLoadingPlugin(type).apply 的解释请看下面一个代码块
const EnableChunkLoadingPlugin = require("./javascript/EnableChunkLoadingPlugin");
new EnableChunkLoadingPlugin(type).apply(compiler);
}
}
// 一大堆内部插件的 apply...
}
7. EnableChunkLoadingPlugin(type).apply
解释上面提到的 EnableChunkLoadingPlugin(type).apply
// lib/javascript/EnableChunkLoadingPlugin.jsclass EnableChunkLoadingPlugin {
constructor(type) {
this.type = type;
}
apply(compiler) {
const { type } = this;
// Only enable once
const enabled = getEnabledTypes(compiler);
if (enabled.has(type)) return;
enabled.add(type);
if (typeof type === "string") {
// 上面提到
// 当 options.target = 'web' ,并且没有配置 output.outputenabledchunkloadingtypes 时
// output.outputenabledchunkloadingtypes = ['jsonp', 'import-scripts']
// 我们可以通过设置 output.outputenabledchunkloadingtypes = ['import-scripts'] 、
// options.target = 'web' 来禁用掉 JsonpChunkLoadingPlugin 这个插件,然后通过自定义
// 一个 myJsonpChunkLoadingPlugin 来实现自定义的 jsonp 加载逻辑或其他功能,以此达到与使用
// webpack4 的自定义 target 一样的功能
switch (type) {
case "jsonp": {
const JsonpChunkLoadingPlugin = require("../web/JsonpChunkLoadingPlugin");
new JsonpChunkLoadingPlugin().apply(compiler);
break;
}
case "import-scripts": {
const ImportScriptsChunkLoadingPlugin = require("../webworker/ImportScriptsChunkLoadingPlugin");
new ImportScriptsChunkLoadingPlugin().apply(compiler);
break;
}
case "require": {
// ...
}
case "async-node": {
// ...
}
case "import":
// ...
case "universal":
// ...
default:
// ...
}
} else {
// TODO support plugin instances here
// apply them to the compiler
}
}
}
module.exports = EnableChunkLoadingPlugin;
通过上面的讲解,我们了解了 webpack 大致的执行流程,也达到了我们最初的目标——实现与 webpack4 中 target 为自定义 function 时一样的功能。并且我们会发现,只有阅读了源码我们才能更好的理解 webpack 的配置,甚至能配置出 webpack 文档上都没有提及的用法。
关于 Compiler 和 Compilation 对象,请参考这里
在下篇文章中,我们将会探讨一下 webpack 持久换缓存的实现原理,以期理解为何 webpack 持久换缓存能带来如此巨大的性能提升。
以上是 【JS】webpack5源码导读:如何实现自定义 target 的全部内容, 来源链接: utcz.com/a/94989.html


