怎么让DolphinDB开机自动运行
我在2台服务器上部署了一个DolphinDB集群,一台服务器上部署了一个控制节点+一个代理节点+二个数据节点,另一台部署了一个代理节点+二个数据节点。操作系统是centos 8,请问服务器重启后,怎么才能让DolphinDB集群自动启动?
回答
1.按照官网的多服务器集群部署,配置好上述的环境,教程网址:https://gitee.com/dolphindb/Tutorials_CN/blob/master/multi_machine_cluster_deploy.md
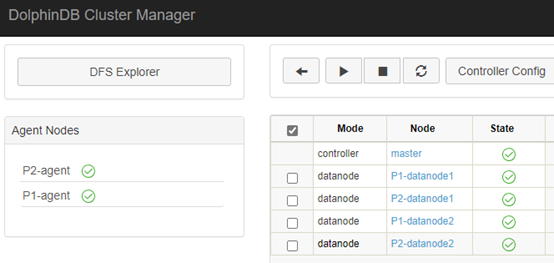
最后能够成功启动该集群,web端控制界面如下图所示,State状态为绿色。
2.完成多服务器集群部署后,进入服务器A,终端执行:
ps aux |grep dolphindb
获得如下信息:
[[email protected] server]$ ps aux |grep dolphindbxhtang 2167 0.3 1.5 300564 29396 tty2 Sl+ 18:16 0:01 ./dolphindb -console 0 -mode controller -home data -config config/controller.cfg -clusterConfig config/cluster.cfg -logFile log/controller.log -nodesFile config/cluster.nodes
xhtang 2168 0.1 1.3 232952 24744 tty2 Sl+ 18:16 0:00 ./dolphindb -console 0 -mode agent -home data -config config/agent.cfg -logFile log/agent.log
xhtang 2169 0.8 1.4 381504 26168 tty2 Sl+ 18:16 0:02 ./dolphindb -home /home/xhtang/dolphindb_cluster/server/data/P1-datanode2 -logFile /home/xhtang/dolphindb_cluster/server/log/P1-datanode2.log -jobLogFile /home/xhtang/dolphindb_cluster/server/log/P1-datanode2_job.log -keyPath /home/xhtang/dolphindb_cluster/server/data/P1-agent/keys -subPort 24120 -console 0 -mode datanode -localSite 192.168.1.122:24117:P1-datanode2 -webLoginRequired 0 -lanCluster 1 -perfMonitoring 1 -maxMemSize 5 -sites 192.168.1.126:24117:P2-datanode2,192.168.1.126:24115:P2-datanode1,192.168.1.122:24117:P1-datanode2,192.168.1.122:24115:P1-datanode1 -dfsReplicationFactor 1 -workerNum 4 -localExecutors 3 -dataSync 0 -maxPubConnections 5 -enableHTTPS 0 -maxPartitionNumPerQuery 9999999999 -subThrottle 1 -config /noconfig -maxSubConnections 64 -chunkCacheEngineMemSize 5 -controllerSite 192.168.1.122:24111:master
xhtang 2170 0.8 1.4 381504 26656 tty2 Sl+ 18:16 0:02 ./dolphindb -home /home/xhtang/dolphindb_cluster/server/data/P1-datanode1 -logFile /home/xhtang/dolphindb_cluster/server/log/P1-datanode1.log -jobLogFile /home/xhtang/dolphindb_cluster/server/log/P1-datanode1_job.log -keyPath /home/xhtang/dolphindb_cluster/server/data/P1-agent/keys -subPort 24118 -console 0 -mode datanode -localSite 192.168.1.122:24115:P1-datanode1 -webLoginRequired 0 -lanCluster 1 -perfMonitoring 1 -maxMemSize 5 -sites 192.168.1.126:24117:P2-datanode2,192.168.1.126:24115:P2-datanode1,192.168.1.122:24117:P1-datanode2,192.168.1.122:24115:P1-datanode1 -dfsReplicationFactor 1 -workerNum 4 -localExecutors 3 -dataSync 0 -maxPubConnections 5 -enableHTTPS 0 -maxPartitionNumPerQuery 9999999999 -subThrottle 1 -config /noconfig -maxSubConnections 64 -chunkCacheEngineMemSize 5 -controllerSite 192.168.1.122:24111:master
xhtang 3105 0.0 0.1 12108 2452 pts/0 S+ 18:21 0:00 grep --color=auto dolphindb
根据上述信息,创建一个自动运行dolphindb的脚本,例如在home/user/shell中创建dolphindb.sh,脚本内容如下:
#!/bin/bash#dolphindb Auto
cd /home/user/dolphindb_cluster/server/
nohup ./dolphindb -console 0 -mode controller -home data -config config/controller.cfg -clusterConfig config/cluster.cfg -logFile log/controller.log -nodesFile config/cluster.nodes &
nohup ./dolphindb -console 0 -mode agent -home data -config config/agent.cfg -logFile log/agent.log &
nohup ./dolphindb -home /home/xhtang/dolphindb_cluster/server/data/P1-datanode2 -logFile /home/xhtang/dolphindb_cluster/server/log/P1-datanode2.log -jobLogFile /home/xhtang/dolphindb_cluster/server/log/P1-datanode2_job.log -keyPath /home/xhtang/dolphindb_cluster/server/data/P1-agent/keys -subPort 24120 -console 0 -mode datanode -localSite 192.168.1.122:24117:P1-datanode2 -webLoginRequired 0 -lanCluster 1 -perfMonitoring 1 -maxMemSize 5 -sites 192.168.1.126:24117:P2-datanode2,192.168.1.126:24115:P2-datanode1,192.168.1.122:24117:P1-datanode2,192.168.1.122:24115:P1-datanode1 -dfsReplicationFactor 1 -workerNum 4 -localExecutors 3 -dataSync 0 -maxPubConnections 5 -enableHTTPS 0 -maxPartitionNumPerQuery 9999999999 -subThrottle 1 -config /noconfig -maxSubConnections 64 -chunkCacheEngineMemSize 5 -controllerSite 192.168.1.122:24111:master &
nohup ./dolphindb -home /home/xhtang/dolphindb_cluster/server/data/P1-datanode1 -logFile /home/xhtang/dolphindb_cluster/server/log/P1-datanode1.log -jobLogFile /home/xhtang/dolphindb_cluster/server/log/P1-datanode1_job.log -keyPath /home/xhtang/dolphindb_cluster/server/data/P1-agent/keys -subPort 24118 -console 0 -mode datanode -localSite 192.168.1.122:24115:P1-datanode1 -webLoginRequired 0 -lanCluster 1 -perfMonitoring 1 -maxMemSize 5 -sites 192.168.1.126:24117:P2-datanode2,192.168.1.126:24115:P2-datanode1,192.168.1.122:24117:P1-datanode2,192.168.1.122:24115:P1-datanode1 -dfsReplicationFactor 1 -workerNum 4 -localExecutors 3 -dataSync 0 -maxPubConnections 5 -enableHTTPS 0 -maxPartitionNumPerQuery 9999999999 -subThrottle 1 -config /noconfig -maxSubConnections 64 -chunkCacheEngineMemSize 5 -controllerSite 192.168.1.122:24111:master &
注意:
cd的路径是dolphindb安装的路径,需要根据自己的设置进行修改;
第6、7行(较长的两行,启动数据节点的命令行)内容从终端窗口执行ps aux |grep dolphindb返回的信息中复制粘贴即可。
再将home/user/shell文件夹下创建好的dolphindb.sh复制到/etc/profile.d/下,具体可以执行:
sudo cp dolphindb.sh /etc/profile.d
3. 进进入服务器B,终端执行:
ps aux |grep dolphindb
获得如下信息:
[[email protected] server]$ ps aux |grep dolphindbxhtang 2177 0.1 1.3 232952 24524 tty2 Sl+ 18:17 0:01 ./dolphindb -console 0 -mode agent -home data -config config/agent.cfg -logFile log/agent.log
xhtang 2178 0.9 1.5 381500 27744 tty2 Sl+ 18:17 0:14 ./dolphindb -home /home/xhtang/dolphindb_cluster/server/data/P2-datanode2 -logFile /home/xhtang/dolphindb_cluster/server/log/P2-datanode2.log -jobLogFile /home/xhtang/dolphindb_cluster/server/log/P2-datanode2_job.log -keyPath /home/xhtang/dolphindb_cluster/server/data/P2-agent/keys -subPort 24120 -console 0 -mode datanode -localSite 192.168.1.126:24117:P2-datanode2 -webLoginRequired 0 -lanCluster 1 -perfMonitoring 1 -maxMemSize 5 -sites 192.168.1.126:24117:P2-datanode2,192.168.1.126:24115:P2-datanode1,192.168.1.122:24117:P1-datanode2,192.168.1.122:24115:P1-datanode1 -dfsReplicationFactor 1 -workerNum 4 -localExecutors 3 -dataSync 0 -maxPubConnections 5 -enableHTTPS 0 -maxPartitionNumPerQuery 9999999999 -subThrottle 1 -config /noconfig -maxSubConnections 64 -chunkCacheEngineMemSize 5 -controllerSite 192.168.1.122:24111:master
xhtang 2179 0.9 1.5 381500 28548 tty2 Sl+ 18:17 0:14 ./dolphindb -home /home/xhtang/dolphindb_cluster/server/data/P2-datanode1 -logFile /home/xhtang/dolphindb_cluster/server/log/P2-datanode1.log -jobLogFile /home/xhtang/dolphindb_cluster/server/log/P2-datanode1_job.log -keyPath /home/xhtang/dolphindb_cluster/server/data/P2-agent/keys -subPort 24118 -console 0 -mode datanode -localSite 192.168.1.126:24115:P2-datanode1 -webLoginRequired 0 -lanCluster 1 -perfMonitoring 1 -maxMemSize 5 -sites 192.168.1.126:24117:P2-datanode2,192.168.1.126:24115:P2-datanode1,192.168.1.122:24117:P1-datanode2,192.168.1.122:24115:P1-datanode1 -dfsReplicationFactor 1 -workerNum 4 -localExecutors 3 -dataSync 0 -maxPubConnections 5 -enableHTTPS 0 -maxPartitionNumPerQuery 9999999999 -subThrottle 1 -config /noconfig -maxSubConnections 64 -chunkCacheEngineMemSize 5 -controllerSite 192.168.1.122:24111:master
根据上述信息,创建一个自动运行dolphindb的脚本,例如在home/user/shell中创建dolphindb.sh,脚本内容如下:
#!/bin/bash#dolphindb Auto
cd /home/user/dolphindb_cluster/server/
nohup ./dolphindb -console 0 -mode agent -home data -config config/agent.cfg -logFile log/agent.log &
nohup ./dolphindb -home /home/xhtang/dolphindb_cluster/server/data/P2-datanode2 -logFile /home/xhtang/dolphindb_cluster/server/log/P2-datanode2.log -jobLogFile /home/xhtang/dolphindb_cluster/server/log/P2-datanode2_job.log -keyPath /home/xhtang/dolphindb_cluster/server/data/P2-agent/keys -subPort 24120 -console 0 -mode datanode -localSite 192.168.1.126:24117:P2-datanode2 -webLoginRequired 0 -lanCluster 1 -perfMonitoring 1 -maxMemSize 5 -sites 192.168.1.126:24117:P2-datanode2,192.168.1.126:24115:P2-datanode1,192.168.1.122:24117:P1-datanode2,192.168.1.122:24115:P1-datanode1 -dfsReplicationFactor 1 -workerNum 4 -localExecutors 3 -dataSync 0 -maxPubConnections 5 -enableHTTPS 0 -maxPartitionNumPerQuery 9999999999 -subThrottle 1 -config /noconfig -maxSubConnections 64 -chunkCacheEngineMemSize 5 -controllerSite 192.168.1.122:24111:master &
nohup ./dolphindb -home /home/xhtang/dolphindb_cluster/server/data/P2-datanode1 -logFile /home/xhtang/dolphindb_cluster/server/log/P2-datanode1.log -jobLogFile /home/xhtang/dolphindb_cluster/server/log/P2-datanode1_job.log -keyPath /home/xhtang/dolphindb_cluster/server/data/P2-agent/keys -subPort 24118 -console 0 -mode datanode -localSite 192.168.1.126:24115:P2-datanode1 -webLoginRequired 0 -lanCluster 1 -perfMonitoring 1 -maxMemSize 5 -sites 192.168.1.126:24117:P2-datanode2,192.168.1.126:24115:P2-datanode1,192.168.1.122:24117:P1-datanode2,192.168.1.122:24115:P1-datanode1 -dfsReplicationFactor 1 -workerNum 4 -localExecutors 3 -dataSync 0 -maxPubConnections 5 -enableHTTPS 0 -maxPartitionNumPerQuery 9999999999 -subThrottle 1 -config /noconfig -maxSubConnections 64 -chunkCacheEngineMemSize 5 -controllerSite 192.168.1.122:24111:master &
注意:
cd的路径是dolphindb安装的路径,需要根据自己的设置进行修改;
第5、6行(较长的两行,启动数据节点的命令行)内容从终端窗口执行ps aux |grep dolphindb返回的信息中复制粘贴即可。
再将home/user/shell文件夹下创建好的dolphindb.sh复制到/etc/profile.d/下,具体可以执行:
sudo cp dolphindb.sh /etc/profile.d
4.重启电脑即可完成自动启动dolphindb
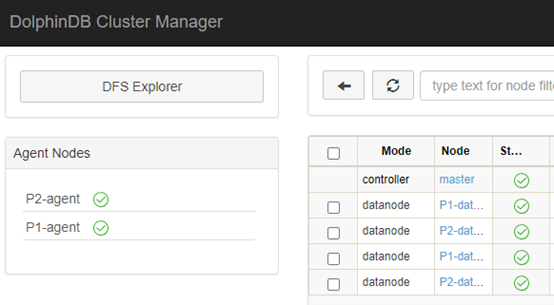
5.可以打开web控制界面,看到:
说明设置成功
以上是 怎么让DolphinDB开机自动运行 的全部内容, 来源链接: utcz.com/a/71381.html


