BMP图像的旋转-C++实现
最近数字图像处理课要求用C++处理BMP图像,我很无语,有大好的matlab不用。。。。
但是,利用C++去写的话确实会对原理和codeing水平有些帮助,所以认真写了。。
实验环境:windows10+Clion+MinGW64
参考资料:https://blog.csdn.net/qq_36752072/article/details/78151770
本工程所使用的头文件:
#include<iostream>#include
<cmath>#include
<windows.h>#include
<stdio.h>
1、原理部分:
要进行BMP图像的处理,那我们首先就要了解BMP图片的格式,其实主要分为四个部分:
1、位图文件头数据(BITMAPFILEHEADER):这个数据结构包含了BMP图像文件的类型、大小等信息;
typedef struct targetBITMAPFILEHEADER{WORD bfType;
//文件类型,对于位图来说,这一部分为0x4d42DWORD bfSize; //文件大小(包含这14字节)
WORD bfReserved1; //保留字,不考虑
WORD bfReserved2; //保留字,同上
DWORD bfOffBits; //实际位图数据的偏移字节数,即前三个部分长度之和
}BITMAPFILEHEADER;
2、位图信息头数据(BITMAPINFOHEADER):这个数据结构则是包含了BMP图像数据的宽、高、压缩方法、定义颜色、占用空间等等信息;
typedef struct targetBITMAPINFOHEADER{DWORD biSize;
//指定此结构体的长度,为40LONG biWidth; //位图宽
LONG biHeight; //位图高
WORD biPlanes; //平面数,为1
WORD biBitCount; //采用颜色位数,可以是1,2,4,8,16,24,新的可以是32
DWORD biCompression; //压缩方式,可以是0,1,2,其中0表示不压缩
DWORD biSizeImage; //实际位图数据占用的字节数
LONG biXPelsPerMeter; //X方向分辨率
LONG biYPelsPerMeter; //Y方向分辨率
DWORD biClrUsed; //使用的颜色数,如果为0,则表示默认值(2^颜色位数)
DWORD biClrImportant; //重要颜色数,如果为0,则表示所有颜色都是重要的
}BITMAPINFOHEADER;
3、调色板(RGBQUAD):其中,这一部分的数据结构是可选择的,有些为徒需要调色板,有些位图则不需要(比如24位的真彩图就不需要);
//为什么需要调色板呢?//理由是:可以用调色板对颜色进行映射,从而压缩储存空间。//正常情况下,24bit的位图每一个像素都有RGB三个通道,一共需要24bit//但是,一幅图里可能用不到那么多颜色,比如256级灰度图像。//此时,只需要用4bit,就可以表示2^8种通过调色板定义的颜色。typedef struct tagRGBQUAD{
BYTE rgbBlue;
BYTE rgbGreen;
BYTE rgbRed;
BYTE rgbReserved; //不用管设为0即可
}RGBQUAD;
4、位图数据:这部分的内容根据BMP位图使用的位数不同而不同,在24位真彩图中,直接使用RGB,而其他的小于24位的则使用调色板中颜色的索引值。
typedef struct tagIMAGEDATA{
BYTE blue;
BYTE green;
BYTE red;
}IMAGEDATA;
接下来我们需要了解的是,如何进行图像旋转。首先,最重要的是,我们要知道旋转之后,整个图片的大小其实是改变了的(以图片中心旋转的话)。图片来自《数字图像处理编程入门》。
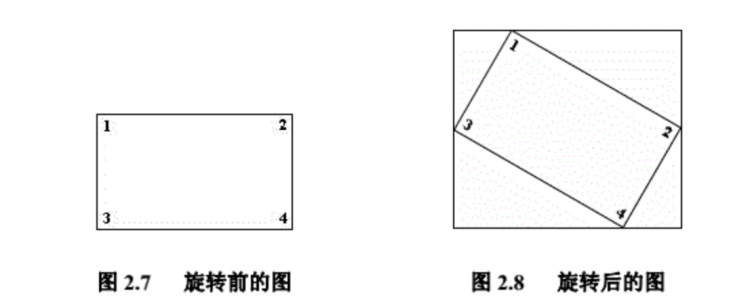
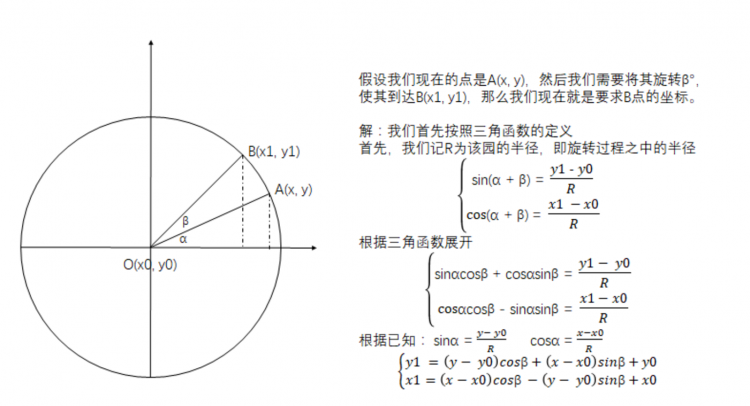
可以明显地看出,从原来的点到现在的点是一种线性变换,那么我们就可以用矩阵来表示这种运算,然后求逆运算就可以由(x1,y1)求出原来的坐标(x0,y0),这相当于把旋转后图上的像素,映射到原图的像素上,然后把原图该映射点的数据复制给新图该点,这样就完成了图片的旋转。
对于无法映射到原图的点,我们可以把它们的RGB值设为0,这样就会显示成黑色。
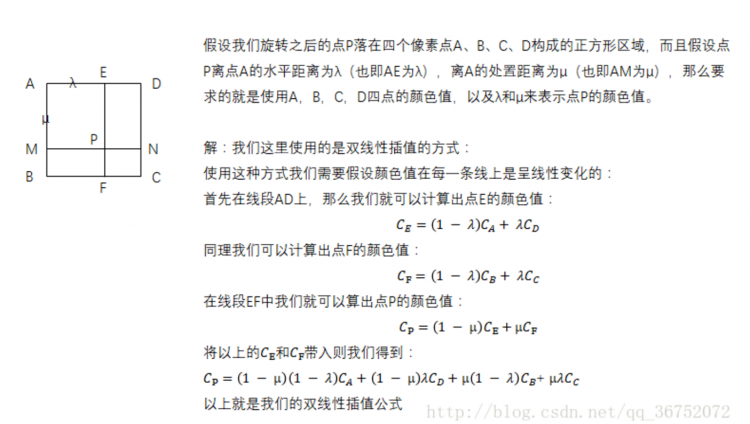
但是像素毕竟不是点,旋转之后会有误差,,如果旋转之后的像素点并不是很如人意的落在像素点上,而是落在临近的四个像素点构成的正方形区域内(而且这种情况应该是很常见的一种),我们使用双线性插值法来估计该点像素值。
代码部分:
/***注意,由于包含了头文件<windows.h>,所以文件头和信息头还有调色板的定义都用不到
*/
void rotateBMP(string path, string resPath, int angle) {//获取路径名constchar *picture_name=path.c_str();
constchar *res_name=resPath.c_str();
//定义文件指针
FILE *file, *targetFile;
//定义文件头和信息头
BITMAPFILEHEADER bmpFile, writeBmpFile;
BITMAPINFOHEADER bmpInfo, writeBmpInfo;
//角度转弧度
auto thelta=(double)(angle*PI/180);
auto cosa=(float)cos((double)thelta);
auto sina=(float)sin((double)thelta);
file = fopen(picture_name, "rb");
targetFile=fopen(res_name,"wb");
fread(&bmpFile, sizeof(BITMAPFILEHEADER), 1, file);
fseek(file, sizeof(BITMAPFILEHEADER), 0);//跳过位图文件头结构
fread(&bmpInfo, sizeof(BITMAPINFOHEADER), 1, file);
////fseek(file,sizeof(BITMAPINFOHEADER),0);//跳过信息头
this->ShowBMPHead(bmpFile);
this->ShowBMPInfoHead(bmpInfo);
/**
step 1 : 图片处理第一步,首先是完成将文件头,信息头等的数据迁移
**/
writeBmpFile = bmpFile;
writeBmpInfo = bmpInfo;
int width = bmpInfo.biWidth;
int height = bmpInfo.biHeight;
cout<<width<<","<<height<<endl;
//原图的四个角坐标
auto SrcX1=(float)(-0.5*width);
auto SrcY1=(float)(0.5*height);
auto SrcX2=(float)(0.5*width);
auto SrcY2=(float)(0.5*height);
auto SrcX3=(float)(-0.5*width);
auto SrcY3=(float)(-0.5*height);
auto SrcX4=(float)(0.5*width);
auto SrcY4=(float)(-0.5*height);
//新图的四个角坐标
float DstX1=cosa*SrcX1+sina*SrcY1;
float DstY1=-sina*SrcX1+cosa*SrcY1;
float DstX2=cosa*SrcX2+sina*SrcY2;
float DstY2=-sina*SrcX2+cosa*SrcY2;
float DstX3=cosa*SrcX3+sina*SrcY3;
float DstY3=-sina*SrcX3+cosa*SrcY3;
float DstX4=cosa*SrcX4+sina*SrcY4;
float DstY4=-sina*SrcX4+cosa*SrcY4;
//计算新图的宽度和高度
auto newWidth=(int)(max(fabs(DstX4-DstX1),fabs(DstX3-DstX2))+0.5);
auto newHeight=(int)(max(fabs(DstY4-DstY1),fabs(DstY3-DstY2))+0.5);
writeBmpInfo.biWidth = newWidth;
writeBmpInfo.biHeight = newHeight;
// 在计算实际占用的空间的时候我们需要将宽度为4byte的倍数
int writewidth = WIDTHBYTES(newWidth * writeBmpInfo.biBitCount);
writeBmpInfo.biSizeImage = writewidth * writeBmpInfo.biHeight;
writeBmpFile.bfSize = 54 + writeBmpInfo.biSizeImage;
//把修改过的文件头和信息头写入目标文件
fwrite(&writeBmpFile, 1, sizeof(BITMAPFILEHEADER), targetFile);
fwrite(&writeBmpInfo, 1, sizeof(BITMAPINFOHEADER), targetFile);
//申请空间
if(bmpInfo.biBitCount==24)//如果是24位的BMP图
{
int l_width=WIDTHBYTES(width * bmpInfo.biBitCount);
BYTE *preData = (BYTE *)malloc(height * l_width);
memset(preData, 0, height * l_width);
BYTE *aftData = (BYTE *)malloc(newHeight * writewidth);
memset(aftData, 0, newHeight * writewidth);
//原来的旋转中心
int rotateX = width / 2;
int rotateY = height / 2;
//新图的中心
int write_rotateX = newWidth / 2;
int write_rotateY = newHeight / 2;
int OriginalImg = l_width * height;
int LaterImg = writewidth * newHeight;
fread(preData, 1, OriginalImg, file);
for (int i = 0; i < newHeight; ++i) {
for (int j = 0; j < newWidth; ++j) {
int index = i * writewidth + j * 3;
// 利用公式计算这个原来的点的地方
double y0 =
(j - write_rotateX) * sina + (i - write_rotateY) * cosa + rotateY;
double x0 =
(j - write_rotateX) * cosa - (i - write_rotateY) * sina + rotateX;
if((x0>=0)&&(x0<width)&&(y0>=0)&&(y0<=height))
{
/**
* 我们在这里使用双线性插值法来完成对应
*/
int y0_True = y0;
int x0_True = x0;
double distance_to_a_X = x0 - x0_True;
double distance_to_a_Y = y0 - y0_True;
int original_point_A = y0_True * l_width + x0_True * 3;
int original_point_B = y0_True * l_width + (x0_True + 1) * 3;
int original_point_C = (y0_True + 1) * l_width + x0_True * 3;
int original_point_D = (y0_True + 1) * l_width + (x0_True + 1) * 3;
if (x0_True == width - 1) {
original_point_A = original_point_B;
original_point_C = original_point_D;
}
if (y0_True == height - 1) {
original_point_C = original_point_A;
original_point_D = original_point_B;
}
//相当于blue
aftData[index] = (1 - distance_to_a_X) * (1 - distance_to_a_Y) * preData[original_point_A]
+ (1 - distance_to_a_X) * distance_to_a_Y * preData[original_point_B]
+ distance_to_a_X * (1 - distance_to_a_Y) * preData[original_point_C]
+ distance_to_a_X * distance_to_a_Y * preData[original_point_D];
//相当于green
aftData[index + 1] = (1 - distance_to_a_X) * (1 - distance_to_a_Y) * preData[original_point_A + 1]
+ (1 - distance_to_a_X) * distance_to_a_Y * preData[original_point_B + 1]
+ distance_to_a_X * (1 - distance_to_a_Y) * preData[original_point_C + 1]
+ distance_to_a_X * distance_to_a_Y * preData[original_point_D + 1];
//相当于red
aftData[index + 2] = (1 - distance_to_a_X) * (1 - distance_to_a_Y) * preData[original_point_A + 2]
+ (1 - distance_to_a_X) * distance_to_a_Y * preData[original_point_B + 2]
+ distance_to_a_X * (1 - distance_to_a_Y) * preData[original_point_C + 2]
+ distance_to_a_X * distance_to_a_Y * preData[original_point_D + 2];
}
}
}
fwrite(aftData,1,LaterImg,targetFile);
fclose(file);
fclose(targetFile);
delete [] preData;
delete [] aftData;
}
elseif(bmpInfo.biBitCount==8)//如果是8位的BMP图
{
RGBQUAD strPla[256];//复制调色板
for (unsigned int nCounti = 0; nCounti < 256; nCounti++) {
fread((char *)&(strPla[nCounti].rgbBlue), 1, sizeof(BYTE), file);
fread((char *)&(strPla[nCounti].rgbGreen), 1, sizeof(BYTE), file);
fread((char *)&(strPla[nCounti].rgbRed), 1, sizeof(BYTE), file);
fread((char *)&(strPla[nCounti].rgbReserved), 1, sizeof(BYTE), file);
}
//写入调色板
for (int nCounti = 0; nCounti < 256; nCounti++) {
fwrite((char *)&(strPla[nCounti].rgbBlue), 1, sizeof(BYTE), targetFile);
fwrite((char *)&(strPla[nCounti].rgbGreen), 1, sizeof(BYTE), targetFile);
fwrite((char *)&(strPla[nCounti].rgbRed), 1, sizeof(BYTE), targetFile);
fwrite((char *)&(strPla[nCounti].rgbReserved), 1, sizeof(BYTE), targetFile);
}
int l_width=WIDTHBYTES(width * bmpInfo.biBitCount);
BYTE *preData = (BYTE *)malloc(height * l_width);
memset(preData, 0, height * l_width);
BYTE *aftData = (BYTE *)malloc(newHeight * writewidth);
memset(aftData, 0, newHeight * writewidth);
//读取原图像素数据
fread(preData, sizeof(GRAYDATA)*width, height, file);
//初始化新图的像素点
for (int i = 0; i < newHeight; ++i) {
for (int j = 0; j < newWidth; ++j) {
*(aftData+i*newWidth+j)=0;
}
}
int rotateX = width / 2;
int rotateY = height / 2;
//新图的中心
int write_rotateX = newWidth / 2;
int write_rotateY = newHeight / 2;
int OriginalImg = l_width * height;
int LaterImg = writewidth * newHeight;
fread(preData, 1, OriginalImg, file);
for (int i = 0; i < newHeight; ++i) {
for (int j = 0; j < newWidth; ++j) {
int index = i * writewidth + j ;
// 利用公式计算这个原来的点的地方
double y0 =
(j - write_rotateX) * sina + (i - write_rotateY) * cosa + rotateY;
double x0 =
(j - write_rotateX) * cosa - (i - write_rotateY) * sina + rotateX;
if((x0>=0)&&(x0<width)&&(y0>=0)&&(y0<=height))
{
/**
* 我们在这里使用双线性插值法来完成对应
*/
int y0_True = y0;
int x0_True = x0;
double distance_to_a_X = x0 - x0_True;
double distance_to_a_Y = y0 - y0_True;
int original_point_A = y0_True * l_width + x0_True ;
int original_point_B = y0_True * l_width + (x0_True + 1) ;
int original_point_C = (y0_True + 1) * l_width + x0_True ;
int original_point_D = (y0_True + 1) * l_width + (x0_True + 1) ;
if (x0_True == width - 1) {
original_point_A = original_point_B;
original_point_C = original_point_D;
}
if (y0_True == height - 1) {
original_point_C = original_point_A;
original_point_D = original_point_B;
}
//相当于blue
aftData[index] = (1 - distance_to_a_X) * (1 - distance_to_a_Y) * preData[original_point_A]
+ (1 - distance_to_a_X) * distance_to_a_Y * preData[original_point_B]
+ distance_to_a_X * (1 - distance_to_a_Y) * preData[original_point_C]
+ distance_to_a_X * distance_to_a_Y * preData[original_point_D];
}
}
}
fwrite(aftData,1,LaterImg,targetFile);
fclose(file);
fclose(targetFile);
delete [] preData;
delete [] aftData;
}
else
{
cout<<"错误的输入!!!!!!!!!!!!!"<<endl;
}
}
以上是 BMP图像的旋转-C++实现 的全部内容, 来源链接: utcz.com/a/62693.html


