Node.js企业级Web服务器认证登录
认证登录过程
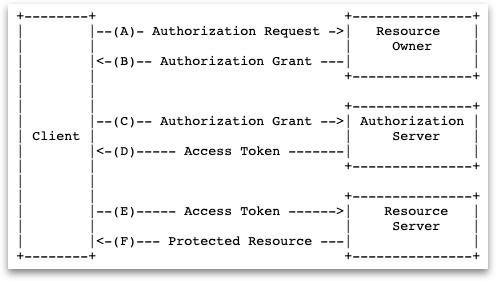
认证登录就是通过第三方授权来鉴别用户信息的登录方式,比如:微信扫码登录。目前最为广泛接受的授权标准是 OAuth2.0,基于 OAuth2.0 的认证登录本质上是 Web 应用在用户授权下获取该用户在第三方应用上的个人信息的过程:
关于 passport
OAuth2.0 定义了框架但具体实现根据厂商不同多少存在差异,而 passport 模块提供了抹平这种差异的机制,通过接入不同的 strategy 对象可以对接不同的第三方登录。本章将基于上一章已完成的工程 host1-tech/nodejs-server-examples - 06-session 接入 passport 模块实现 Github 认证登录。先在工程根目录安装 passport 与 passport-github:
$ yarn add passport # 本地安装 passport# ...
info Direct dependencies
└─ passport@0.4.1
# ...
$ yarn add passport-github # 本地安装 passport-github
# ...
info Direct dependencies
└─ passport-github@1.1.0
# ...
加上 Github 认证登录
接下来在 Github 上新建 OAuth 应用:
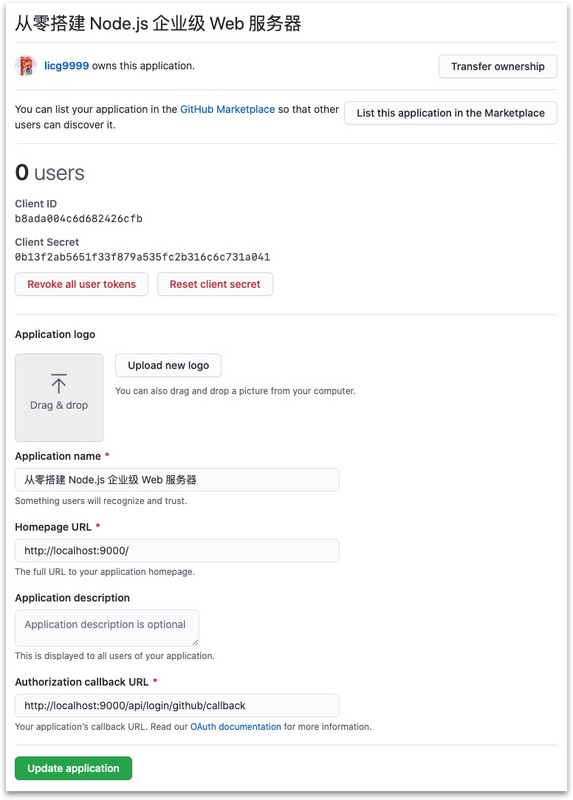
然后加上 Github 登录方式:
// src/middlewares/auth.jsconst passport = require('passport');
const { Strategy: GithubStrategy } = require('passport-github');
const GITHUB_STRATEGY_OPTIONS = {
clientID: 'b8ada004c6d682426cfb',
clientSecret: '0b13f2ab5651f33f879a535fc2b316c6c731a041',
callbackURL: 'http://localhost:9000/api/login/github/callback',
};
const githubStrategy = new GithubStrategy(
GITHUB_STRATEGY_OPTIONS,
(accessToken, refreshToken, profile, done) => {
/**
* 根据 profile 查找或新建 user 信息
*/
const user = {};
done(null, user);
}
);
passport.use(githubStrategy);
passport.serializeUser((user, done) => {
/**
* 根据 user 信息获取 userId
*/
const userId = '46e5';
done(null, userId);
});
passport.deserializeUser((userId, done) => {
/**
* 根据 userId 获取 user 信息
*/
const user = {};
done(null, user);
});
module.exports = function authMiddleware() {
return [passport.initialize(), passport.session()];
};
Object.assign(module.exports, { passport });
// src/middlewares/index.jsconst { Router } = require('express');
const cookieParser = require('cookie-parser');
const sessionMiddleware = require('./session');
const urlnormalizeMiddleware = require('./urlnormalize');
const loginMiddleware = require('./login');
+const authMiddleware = require('./auth');
const secret = '842d918ced1888c65a650f993077c3d36b8f114d';
module.exports = async function initMiddlewares() {
const router = Router();
router.use(urlnormalizeMiddleware());
router.use(cookieParser(secret));
router.use(sessionMiddleware(secret));
router.use(loginMiddleware());
+ router.use(authMiddleware());
return router;
};
// src/middlewares/login.jsconst { parse } = require('url');
module.exports = function loginMiddleware(
homepagePath = '/',
loginPath = '/login.html',
whiteList = {
'/500.html': ['get'],
'/api/health': ['get'],
'/api/login': ['post'],
+ '/api/login/github': ['get'],
+ '/api/login/github/callback': ['get'],
}
) {
//...
};
// src/controllers/login.jsconst { Router } = require('express');
+const { passport } = require('../middlewares/auth');
class LoginController {
+ homepagePath;
+ loginPath;
+
async init() {
const router = Router();
router.post('/', this.post);
+ router.get(
+ '/github',
+ passport.authenticate('github', { scope: ['read:user'] })
+ );
+ router.get(
+ '/github/callback',
+ passport.authenticate('github', {
+ failureRedirect: this.loginPath,
+ }),
+ this.getGithubCallback
+ );
return router;
}
post = (req, res) => {
req.session.logined = true;
- res.redirect('/');
+ res.redirect(this.homepagePath);
};
+
+ getGithubCallback = (req, res) => {
+ req.session.logined = true;
+ res.redirect(this.homepagePath);
+ };
}
-module.exports = async () => {
+module.exports = async (homepagePath = '/', loginPath = '/login.html') => {
const c = new LoginController();
+ Object.assign(c, { homepagePath, loginPath });
return await c.init();
};
<!-- public/login.html --><html>
<head>
<meta charset="utf-8" />
</head>
<body>
<form method="post" action="/api/login">
<button type="submit">一键登录</button>
</form>
+ <a href="https://segmentfault.com/api/login/github"><button>Github 登录</button></a>
</body>
</html>
访问 http://localhost:9000/login.html 即可体验 Github 认证登录逻辑:
需要注意由于 Github 服务器在海外,偶尔会出现网络不通导致的认证异常,此时只要稍等一段时间再试就可以了。另外,登录过的读者可以通过清除 Cookie 重置登录状态。
以上是 Node.js企业级Web服务器认证登录 的全部内容, 来源链接: utcz.com/a/36042.html

