Node.js企业级Web服务器:接口与分层实现
分层规范
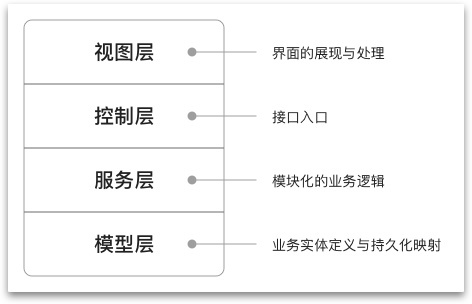
从本章起,正式进入企业级 Web 服务器核心内容。通常,一块完整的业务逻辑是由视图层、控制层、服务层、模型层共同定义与实现的,如下图:

从上至下,抽象层次逐渐加深。从下至上,业务细节逐渐清晰。视图层属于 Web 前端内容,本文采用 JavaScript Modules 进行演示。
本章着重说说控制层与服务层,对业务逻辑核心部分进行展开。
写一个简易版的商铺管理
直接从上一章已完成的工程 host1-tech/nodejs-server-examples - 00-static 开始着手,先编写服务层内容:
$ mkdir src/services # 新建 src/services 目录存放服务层逻辑$ tree -L 2 -I node_modules # 展示除了 node_modules 之外的目录内容结构
.
├── Dockerfile
├── package.json
├── public
│ └── index.html
├── src
│ ├── server.js
│ └── services
└── yarn.lock
// src/services/shop.js// 店铺数据
const memoryStorage = {
'1001': { name: '良品铺子' },
'1002': { name: '来伊份' },
'1003': { name: '三只松鼠' },
'1004': { name: '百草味' },
};
// 模拟延时
async function delay(ms = 200) {
await new Promise((r) => setTimeout(r, ms));
}
class ShopService {
async init() {
await delay();
}
async find({ id, pageIndex = 0, pageSize = 10 }) {
await delay();
if (id) {
return [memoryStorage[id]].filter(Boolean);
}
return Object.keys(memoryStorage)
.slice(pageIndex * pageSize, (pageIndex + 1) * pageSize)
.map((id) => ({ id, ...memoryStorage[id] }));
}
async modify({ id, values }) {
await delay();
const target = memoryStorage[id];
if (!target) {
return null;
}
return Object.assign(target, values);
}
async remove({ id }) {
await delay();
const target = memoryStorage[id];
if (!target) {
return false;
}
return delete memoryStorage[id];
}
}
// 单例模式
let service;
module.exports = async function () {
if (!service) {
service = new ShopService();
await service.init();
}
return service;
};
以上服务层提供了店铺管理所需的基础业务逻辑,存储暂时以内存和延时模拟,现在通过控制层向外暴露 RESTful 接口:
$ mkdir src/controllers # 新建 src/controllers 目录存放控制层逻辑$ tree -L 2 -I node_modules # 展示除了 node_modules 之外的目录内容结构
.
├── Dockerfile
├── package.json
├── public
│ └── index.html
├── src
│ ├── controllers
│ ├── server.js
│ └── services
└── yarn.lock
// src/controllers/shop.jsconst { Router } = require('express');
const shopService = require('../services/shop');
class ShopController {
shopService;
async init() {
this.shopService = await shopService();
const router = Router();
router.get('/', this.getAll);
router.get('/:shopId', this.getOne);
router.put('/:shopId', this.put);
router.delete('/:shopId', this.delete);
return router;
}
getAll = async (req, res) => {
const { pageIndex, pageSize } = req.query;
const shopList = await this.shopService.find({ pageIndex, pageSize });
res.send({ success: true, data: shopList });
};
getOne = async (req, res) => {
const { shopId } = req.params;
const shopList = await this.shopService.find({ id: shopId });
if (shopList.length) {
res.send({ success: true, data: shopList[0] });
} else {
res.status(404).send({ success: false, data: null });
}
};
put = async (req, res) => {
const { shopId } = req.params;
const { name } = req.query;
const shopInfo = await this.shopService.modify({
id: shopId,
values: { name },
});
if (shopInfo) {
res.send({ success: true, data: shopInfo });
} else {
res.status(404).send({ success: false, data: null });
}
};
delete = async (req, res) => {
const { shopId } = req.params;
const success = await this.shopService.remove({ id: shopId });
if (!success) {
res.status(404);
}
res.send({ success });
};
}
module.exports = async () => {
const c = new ShopController();
return await c.init();
};
// src/controllers/index.jsconst { Router } = require('express');
const shopController = require('./shop');
module.exports = async function initControllers() {
const router = Router();
router.use('/api/shop', await shopController());
return router;
};
// src/server.jsconst express = require('express');
const { resolve } = require('path');
const { promisify } = require('util');
+const initControllers = require('./controllers');
const server = express();
const port = parseInt(process.env.PORT || '9000');
const publicDir = resolve('public');
async function bootstrap() {
server.use(express.static(publicDir));
+ server.use(await initControllers());
await promisify(server.listen.bind(server, port))();
console.log(`> Started on port ${port}`);
}
bootstrap();
现在使用 yarn start 启动应用,通过浏览器即可直接访问接口 http://localhost:9000/api/shop 与 http://localhost:9000/api/shop/1001。
补充一个店铺管理界面
以 JavaScript Modules 写一个店铺管理界面仅作演示(实际生产中建议使用 React 或 Vue),调用 GET、PUT、DELETE 接口对店铺信息进行查询、修改、删除:
<!-- public/index.html --><html>
<head>
<meta charset="utf-8" />
</head>
<body>
- <h1>It works!</h1>
+ <div id="root"></div>
+
+ <script type="module">
+ import { refreshShopList, bindShopInfoEvents } from './index.js';
+
+ async function bootstrap() {
+ await refreshShopList();
+ await bindShopInfoEvents();
+ }
+
+ bootstrap();
+ </script>
</body>
</html>
// public/index.jsexport async function refreshShopList() {
const res = await fetch('/api/shop');
const { data: shopList } = await res.json();
const htmlItems = shopList.map(
({ id, name }) => `
<li data-shop-id="${id}">
<div data-type="text">${name}</div>
<input type="text" placeholder="输入新的店铺名称" />
<a href="#" data-type="modify">确认修改</a>
<a href="#" data-type="remove">删除店铺</a>
</li>`
);
document.querySelector('#root').innerHTML = `
<h1>店铺列表:</h1>
<ul class="shop-list">${htmlItems.join('')}</ul>`;
}
export async function bindShopInfoEvents() {
document.querySelector('#root').addEventListener('click', async (e) => {
e.preventDefault();
switch (e.target.dataset.type) {
case 'modify':
await modifyShopInfo(e);
break;
case 'remove':
await removeShopInfo(e);
break;
}
});
}
export async function modifyShopInfo(e) {
const shopId = e.target.parentElement.dataset.shopId;
const name = e.target.parentElement.querySelector('input').value;
await fetch(`/api/shop/${shopId}?name=${encodeURIComponent(name)}`, {
method: 'PUT',
});
await refreshShopList();
}
export async function removeShopInfo(e) {
const shopId = e.target.parentElement.dataset.shopId;
const res = await fetch(`/api/shop/${shopId}`, { method: 'DELETE' });
await refreshShopList();
}
访问 http://localhost:9000/ 即可体验店铺管理功能
以上是 Node.js企业级Web服务器:接口与分层实现 的全部内容, 来源链接: utcz.com/a/34686.html


