Neety学习系列(五)-内存分配
前言
本篇是Netty的第五篇文章,这篇文章我主要分析的是Netty的内存分配。Java NIO提供了ByteBuffer作为它的字节容器,但是这个类使用起来过于复杂,而且也有些繁琐。Netty用ByteBuf替代了ByteBuffer,解决了JDK API的局限性,又为网络应用程序的开发者提供了更好的API。本篇文章,我大概会介绍Netty的内存类别有哪些、Netty是如何减少多线程内存分配之间的竞争和不同大小内存是如何分配的,这些问题。当然在本章中我还会细分的讲解,内存与内存管理器的抽象,不同规格大小和类别的内存的分配策略和内存的回收过程。
一、Netty内存与内存管理器
1.1 ByteBuf结构以及重要API
讲这一节之前我们先看看Netty中关于ByteBuf的源码,里面有段注释画出了ByteBuf的结构,如下:
* <pre>* +-------------------+------------------+------------------+
* | discardable bytes | readable bytes | writable bytes |
* | | (CONTENT) | |
* +-------------------+------------------+------------------+
* | | | |
* 0 <= readerIndex <= writerIndex <= capacity
* </pre>
这里的readerIndex表示如果需要读数据就从这个指针开始读,writerIndex表示当前需要写数据就从这个指针开始写。从上面可以看到readerIndex、writerIndex和capacity这三个指针有严格的递增关系。然后我们看看内存结构,最前面discardable bytes表示不可用的数据区间,紧接着readable bytes表示可读数据区间,最后writable bytes表示可写数据区间。其实除了上面三个指针外还存在一个指针maxCapacity,表示这个ByteBuf最大能扩充到多大。
然后Bytebuf中还有很多read,write和set方法。常见的read方法有readByte、readInt和readLong等方法,同理write和set方法都有类似的接口方法。另外需要注意的是在read方法调用是readerIndex指针会移动相应的位数,在write方法调用时writerIndex指针会移动相应的位数,但是在set方法调用是不会移动任何指针。
最后在ByteBuf中还有两类方法,分别是mark和reset方法。这两个类方法具体是什么作用我用一个例子来说明,例如我们要读数据但是不想改变readerIndex指针,那么在读之前我们可以调用markReaderIndex方法记录当前读指针,读完数据后再调用resetReaderIndex方法恢复readerIndex指针,同理markWriterIndex和resetWriterIndex两个方法的作用也类似。另外ByteBuf中还有一些工具api这里就不过多的介绍了。
1.2 ByteBuf分类
这一节主要是说一说bytebuf的分类,看一看他的继承结构和具体的设计实现,下面我们先用一幅图来讲解,如图:
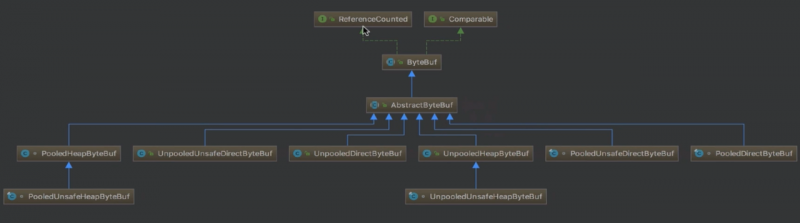
首先上面的ByteBuf就是我们上面小节讲到的,这里我们先看看直接继承至他的AbstractByteBuf,这个类是对ByteBuf骨架代码的抽象实现。首先我们先看看这个类的部分代码,如下:
/*** A skeletal implementation of a buffer.
*/
publicabstractclassAbstractByteBufextendsByteBuf{
privatestaticfinal InternalLogger logger = InternalLoggerFactory.getInstance(AbstractByteBuf.class);
privatestaticfinal String PROP_MODE = "io.netty.buffer.bytebuf.checkAccessible";
privatestaticfinalboolean checkAccessible;
static {
checkAccessible = SystemPropertyUtil.getBoolean(PROP_MODE, true);
if (logger.isDebugEnabled()) {
logger.debug("-D{}: {}", PROP_MODE, checkAccessible);
}
}
staticfinal ResourceLeakDetector<ByteBuf> leakDetector =
ResourceLeakDetectorFactory.instance().newResourceLeakDetector(ByteBuf.class);
int readerIndex;
int writerIndex;
privateint markedReaderIndex;
privateint markedWriterIndex;
privateint maxCapacity;
protectedAbstractByteBuf(int maxCapacity){
if (maxCapacity < 0) {
thrownew IllegalArgumentException("maxCapacity: " + maxCapacity + " (expected: >= 0)");
}
this.maxCapacity = maxCapacity;
}
......
}
可以看出在上一节我们提到的几个指针都以成员变量的形式保存着,并且在构造函数中需传入具体的最大容量。另外跟读写无关的一些操作的实现,我们也是基于这几个指针来实现的,下面我们可以看看一些函数的相关实现,如下:
publicabstractclassAbstractByteBufextendsByteBuf{......
//143行起
@Override
publicbooleanisReadable(){
return writerIndex > readerIndex;
}
@Override
publicbooleanisReadable(int numBytes){
return writerIndex - readerIndex >= numBytes;
}
@Override
publicbooleanisWritable(){
return capacity() > writerIndex;
}
@Override
publicbooleanisWritable(int numBytes){
return capacity() - writerIndex >= numBytes;
}
@Override
publicintreadableBytes(){
return writerIndex - readerIndex;
}
@Override
publicintwritableBytes(){
return capacity() - writerIndex;
}
......
}
那下面我们看看与读写相关的一些操作的骨架代码是怎样实现的呢,这里也先看看一个例子,readByte() 这个方法,具体的源码如下:
@OverridepublicbytereadByte(){
checkReadableBytes0(1);
int i = readerIndex;
byte b = _getByte(i);
readerIndex = i + 1;
return b;
}
从上面可以看出这个方法的骨架代码里面会对读指针进行加1,真正实现读的是一个以下划线开头的方法实现的,这里当然就是 _getByte() 方法,同理的在这个类中其他类似的操作也是这样子实现的,具体的我们看看有哪些抽象出来的方法,如下图所示:
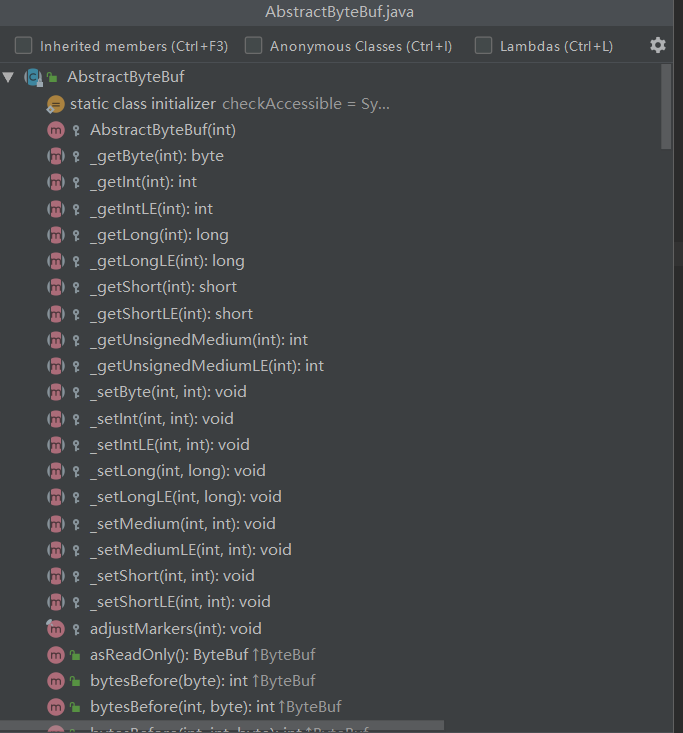
这样子具体的实现就放给子类来实现,不同的子类可以有不同的实现。现在我们继续看前面的结构图,我们可以从三个角度去进行分类。
Pooled和UnPooled:也就是池化和非池化,他们的区别是,Pooled每次申请内存都是从jdk已经分配好的内存池中取,Unpooled每次申请内存都是新的一次申请,在结构图中的具体表现就是每个类名的前缀对应的哪一个,就是哪一类。
unsafe和非unsafe:unsafe指调用native方法底层直接操作内存(一般不会由用户调用),非unsafe通过jdk的api间接操作底层内存。
Heap和Direct:堆内和堆外内存,Heap就是指jvm的堆内存,Direct即系统直接内存,不受jvm管控,需要手动释放。
ByteBuf的分类大概就是上面三类,他们的具体实现区别,我这里就不分析了,可以每一类都可以找两个类对比着看实现很简单。
1.3 内存分配器
Netty中的所有类型的内存分配都是以一个ByteBufAllocator的对象分配除来的,这也就是Netty的内存管理器,我们下面具体的看看其继承结构,如图:

这里我们先分析ByteBufAllocator,首先我们看看其具体源码,如下:
publicinterfaceByteBufAllocator{ByteBufAllocator DEFAULT = ByteBufUtil.DEFAULT_ALLOCATOR;
/**
* Allocate a {@link ByteBuf}. If it is a direct or heap buffer
* depends on the actual implementation.
*/
ByteBuf buffer();
/**
* Allocate a {@link ByteBuf} with the given initial capacity.
* If it is a direct or heap buffer depends on the actual implementation.
*/
ByteBuf buffer(int initialCapacity);
/**
* Allocate a {@link ByteBuf} with the given initial capacity and the given
* maximal capacity. If it is a direct or heap buffer depends on the actual
* implementation.
*/
ByteBuf buffer(int initialCapacity, int maxCapacity);
/**
* Allocate a {@link ByteBuf}, preferably a direct buffer which is suitable for I/O.
*/
ByteBuf ioBuffer();
/**
* Allocate a {@link ByteBuf}, preferably a direct buffer which is suitable for I/O.
*/
ByteBuf ioBuffer(int initialCapacity);
/**
* Allocate a {@link ByteBuf}, preferably a direct buffer which is suitable for I/O.
*/
ByteBuf ioBuffer(int initialCapacity, int maxCapacity);
/**
* Allocate a heap {@link ByteBuf}.
*/
ByteBuf heapBuffer();
/**
* Allocate a heap {@link ByteBuf} with the given initial capacity.
*/
ByteBuf heapBuffer(int initialCapacity);
/**
* Allocate a heap {@link ByteBuf} with the given initial capacity and the given
* maximal capacity.
*/
ByteBuf heapBuffer(int initialCapacity, int maxCapacity);
/**
* Allocate a direct {@link ByteBuf}.
*/
ByteBuf directBuffer();
/**
* Allocate a direct {@link ByteBuf} with the given initial capacity.
*/
ByteBuf directBuffer(int initialCapacity);
/**
* Allocate a direct {@link ByteBuf} with the given initial capacity and the given
* maximal capacity.
*/
ByteBuf directBuffer(int initialCapacity, int maxCapacity);
/**
* Allocate a {@link CompositeByteBuf}.
* If it is a direct or heap buffer depends on the actual implementation.
*/
CompositeByteBuf compositeBuffer();
/**
* Allocate a {@link CompositeByteBuf} with the given maximum number of components that can be stored in it.
* If it is a direct or heap buffer depends on the actual implementation.
*/
CompositeByteBuf compositeBuffer(int maxNumComponents);
/**
* Allocate a heap {@link CompositeByteBuf}.
*/
CompositeByteBuf compositeHeapBuffer();
/**
* Allocate a heap {@link CompositeByteBuf} with the given maximum number of components that can be stored in it.
*/
CompositeByteBuf compositeHeapBuffer(int maxNumComponents);
/**
* Allocate a direct {@link CompositeByteBuf}.
*/
CompositeByteBuf compositeDirectBuffer();
/**
* Allocate a direct {@link CompositeByteBuf} with the given maximum number of components that can be stored in it.
*/
CompositeByteBuf compositeDirectBuffer(int maxNumComponents);
/**
* Returns {@code true} if direct {@link ByteBuf}'s are pooled
*/
booleanisDirectBufferPooled();
/**
* Calculate the new capacity of a {@link ByteBuf} that is used when a {@link ByteBuf} needs to expand by the
* {@code minNewCapacity} with {@code maxCapacity} as upper-bound.
*/
intcalculateNewCapacity(int minNewCapacity, int maxCapacity);
}
由上面的代码可以看出,首先是buffer() 的抽象,这个方法的含义是分配一块内存,根据具体的实现来确定。然后是 ioBuffer() 的抽象,这个方法的含义是用于io的buffer,这个也是最好分配一个direct buffer。紧接着是一个 heapBuffer(),这个buffer是是直接在堆上面分配的一个buffer。紧接着是一个 directBuffer(),这个buffer主要是在堆外分配内存的。最后是一个使用比较少的 compositeHeapBuffer(),这个buffer存在的意义就是,创建buffer可以不用单一的基于堆内或者堆外,而是可以组合使用。
可以看出这个内存分配器的抽象在区分buffer的时候只是以堆内和堆外的维度来区分的,根据我们上面一节分析的不只是只有这一个维度,下面我们继续分析 ByteBufAllocator的子类 AbstractByteBufAllocator,这里我们只是简单的分析一下buffer() 这个抽象的实现,具体源码如下:
/*** AbstractByteBufAllocator.java 96行起
*/
@Override
public ByteBuf buffer(){
if (directByDefault) {
return directBuffer();
}
return heapBuffer();
}
可以看到这里是分配堆内还是堆外内存是根据具体的实现来的,我们继续跟进directBuffer() 看看,具体的源码如下:
/*** AbstractByteBufAllocator.java 163行起
*/
@Override
public ByteBuf directBuffer(){
return directBuffer(DEFAULT_INITIAL_CAPACITY, Integer.MAX_VALUE);
}
@Override
public ByteBuf directBuffer(int initialCapacity){
return directBuffer(initialCapacity, Integer.MAX_VALUE);
}
@Override
public ByteBuf directBuffer(int initialCapacity, int maxCapacity){
if (initialCapacity == 0 && maxCapacity == 0) {
return emptyBuf;
}
validate(initialCapacity, maxCapacity);
return newDirectBuffer(initialCapacity, maxCapacity);
}
这里首先是进行一些参数的验证,然后是最后是调用到一个newDirectBuffer 的方法,我们继续跟进看看,具体源码如下:
//AbstractByteBufAllocator.java 229行起/**
* Create a heap {@link ByteBuf} with the given initialCapacity and maxCapacity.
*/
protectedabstract ByteBuf newHeapBuffer(int initialCapacity, int maxCapacity);
/**
* Create a direct {@link ByteBuf} with the given initialCapacity and maxCapacity.
*/
protectedabstract ByteBuf newDirectBuffer(int initialCapacity, int maxCapacity);
从上面可以看到不管是堆内还是堆外内存的分配,都是定义一个接口让子类来实现的。有上面的结构图可以看出,其子类有两个类型一个是PooledByteBufAllocator另一个是UnpooledByteBufAllocator,这样子就对应这我们上面小节讲到的Pooled和Unpooled,这个维度的划分,另外的还有一个unsafe和非unsafe的维度是怎样来区分的呢,这个是Netty自动给我们区分的,如果jdk底层能调用到unsafe的就直接使用unsafe,反之使用非unsafe。这里我们可以跟一下UnpooledByteBufAllocator的具体实现看看,具体源码如下:
/*** UnPooledByteBufAllocator.java 57行起
*/
@Override
protected ByteBuf newHeapBuffer(int initialCapacity, int maxCapacity){
return PlatformDependent.hasUnsafe() ? new UnpooledUnsafeHeapByteBuf(this, initialCapacity, maxCapacity)
: new UnpooledHeapByteBuf(this, initialCapacity, maxCapacity);
}
从上面的代码我们就能很明显的观察到,这里的判断时候Netty来给我们进行的,不需要我们过多的操心。那么下面小节我们将详细介绍UnPooledByteBufAllocator和PooledByteBufAllocator的具体实现。
1.4 UnPooledByteBufAllocator
有了上面几个小节的基础,我们这个小节的重点就很明确了主要是讲解newHeapBuffer和newDirectBuffer这两个接口的实现,下面我们具体来看看。先看看newHeapBuffer,具体源码如下:
/*** UnPooledByteBufAllocator.java 57行起
*/
@Override
protected ByteBuf newHeapBuffer(int initialCapacity, int maxCapacity){
return PlatformDependent.hasUnsafe() ? new UnpooledUnsafeHeapByteBuf(this, initialCapacity, maxCapacity)
: new UnpooledHeapByteBuf(this, initialCapacity, maxCapacity);
}
从上面可以看到,这就是我们在上面讲到的第三个维度的判断Unsafe和非Unsafe的维度,那我们先看看UnpooledUnsafeHeapByteBuf的实现,具体的如下:
finalclassUnpooledUnsafeHeapByteBufextendsUnpooledHeapByteBuf{/**
* Creates a new heap buffer with a newly allocated byte array.
*
* @param initialCapacity the initial capacity of the underlying byte array
* @param maxCapacity the max capacity of the underlying byte array
*/
UnpooledUnsafeHeapByteBuf(ByteBufAllocator alloc, int initialCapacity, int maxCapacity) {
super(alloc, initialCapacity, maxCapacity);
}
@Override
publicbytegetByte(int index){
checkIndex(index);
return _getByte(index);
}
@Override
protectedbyte_getByte(int index){
return UnsafeByteBufUtil.getByte(array, index);
}
@Override
publicshortgetShort(int index){
checkIndex(index, 2);
return _getShort(index);
}
......
}
可以看到他就是创造的一个 UnpooledHeapByteBuf对象,那么这里表明Unsafe和非Unsafe都是创造的一个UnpooledHeapByteBuf对象,这里我们先看看他是怎样创建的,继续跟进父类构造函数,具体源码如下:
/*** UnpooledHeapByteBuf.java 38行起
*/
/**
* Creates a new heap buffer with a newly allocated byte array.
*
* @param initialCapacity the initial capacity of the underlying byte array
* @param maxCapacity the max capacity of the underlying byte array
*/
protectedUnpooledHeapByteBuf(ByteBufAllocator alloc, int initialCapacity, int maxCapacity){
this(alloc, newbyte[initialCapacity], 0, 0, maxCapacity);
}
/**
* Creates a new heap buffer with an existing byte array.
*
* @param initialArray the initial underlying byte array
* @param maxCapacity the max capacity of the underlying byte array
*/
protectedUnpooledHeapByteBuf(ByteBufAllocator alloc, byte[] initialArray, int maxCapacity){
this(alloc, initialArray, 0, initialArray.length, maxCapacity);
}
privateUnpooledHeapByteBuf(
ByteBufAllocator alloc, byte[] initialArray, int readerIndex, int writerIndex, int maxCapacity){
super(maxCapacity);
if (alloc == null) {
thrownew NullPointerException("alloc");
}
if (initialArray == null) {
thrownew NullPointerException("initialArray");
}
if (initialArray.length > maxCapacity) {
thrownew IllegalArgumentException(String.format(
"initialCapacity(%d) > maxCapacity(%d)", initialArray.length, maxCapacity));
}
this.alloc = alloc;
setArray(initialArray);
setIndex(readerIndex, writerIndex);
}
首先我们可以看到这里创建buffer的时候是直接创建的一个byte数组,然后通过**setArray()**方法保存数组,这里我们可以先看看这个方法的实现,具体源码如下:
privatevoidsetArray(byte[] initialArray){array = initialArray;
tmpNioBuf = null;
}
这里可以看到,失败 直接用一个成员变量来进行保存的。然后我们回到构造函数中,紧接着是通过一个setIndex() 的方法来保存读写指针的,我们可以看看这个方法的源码,具体如下:
@Overridepublic ByteBuf setIndex(int readerIndex, int writerIndex){
if (readerIndex < 0 || readerIndex > writerIndex || writerIndex > capacity()) {
thrownew IndexOutOfBoundsException(String.format(
"readerIndex: %d, writerIndex: %d (expected: 0 <= readerIndex <= writerIndex <= capacity(%d))",
readerIndex, writerIndex, capacity()));
}
setIndex0(readerIndex, writerIndex);
returnthis;
}
finalvoidsetIndex0(int readerIndex, int writerIndex){
this.readerIndex = readerIndex;
this.writerIndex = writerIndex;
}
这里首先是进行的一个验证的功能,然后通过setIndex0() 的方法来进行读写指针的保存,这个方法也在上面,我们可以看到他也是直接用成员变量进行了保存。
上面我们将UnpooledHeapByteBuf的构造方法分析了一下,另外的UnpooledUnsafeHeapByteBuf也是一样的,那么他们的区别在哪里呢?其实前面在讲分类的时候说过,unsafe指调用native方法底层直接操作内存(一般不会由用户调用),非unsafe通过jdk的api间接操作底层内存,这里我们分析一下他们的**_getByte()**方法就清楚了,先看看 UnpooledUnsafeHeapByteBuf 的 _getByte() 方法,具体源码如下:
/*** UnpooledHeapByteBuf.java 322行起
*/
@Override
protectedbyte_getByte(int index){
return HeapByteBufUtil.getByte(array, index);
}
/**
* HeapByteBufUtil.java 23行起
*/
staticbytegetByte(byte[] memory, int index){
return memory[index];
}
这里可以看到,他的底层就直接是一个数组,直接操作数组。然后我们看看UnpooledUnsafeHeapByteBuf,具体源码如下:
/*** UnpooledUnsafeHeapByteBuf.java 38行起
*/
@Override
protectedbyte_getByte(int index){
return UnsafeByteBufUtil.getByte(array, index);
}
/**
* UnsafeByteBufUtil.java 246行起
*/
staticbytegetByte(byte[] array, int index){
return PlatformDependent.getByte(array, index);
}
/**
* PlatformDependent.java 408行起
*/
publicstaticbytegetByte(byte[] data, int index){
return PlatformDependent0.getByte(data, index);
}
/**
* PlatformDependent0.java 355行起
*/
staticbytegetByte(byte[] data, int index){
return UNSAFE.getByte(data, BYTE_ARRAY_BASE_OFFSET + index);
}
这里可以看出最后是通过一个UNSAFE.getByte的方法实现的操作,这个getByte是一个native方法,这里就不过多的介绍了。紧接着下面我们看看newDirectBuffer的第三个维度的区分,newUnsafeDirectByteBuf和UnpooledDirectByteBuf两个bytebuf的区别。首先我们看看他们的构造函数吧,先看看UnpooledDirectByteBuf的构造函数,具体的如下:
/*** UnpooledDirectByteBuf.java 44行起
*/
/**
* Creates a new direct buffer.
*
* @param initialCapacity the initial capacity of the underlying direct buffer
* @param maxCapacity the maximum capacity of the underlying direct buffer
*/
protectedUnpooledDirectByteBuf(ByteBufAllocator alloc, int initialCapacity, int maxCapacity){
super(maxCapacity);
if (alloc == null) {
thrownew NullPointerException("alloc");
}
if (initialCapacity < 0) {
thrownew IllegalArgumentException("initialCapacity: " + initialCapacity);
}
if (maxCapacity < 0) {
thrownew IllegalArgumentException("maxCapacity: " + maxCapacity);
}
if (initialCapacity > maxCapacity) {
thrownew IllegalArgumentException(String.format(
"initialCapacity(%d) > maxCapacity(%d)", initialCapacity, maxCapacity));
}
this.alloc = alloc;
setByteBuffer(ByteBuffer.allocateDirect(initialCapacity));
}
/**
* UnpooledDirectByteBuf.java 116行起
*/
privatevoidsetByteBuffer(ByteBuffer buffer){
ByteBuffer oldBuffer = this.buffer;
if (oldBuffer != null) {
if (doNotFree) {
doNotFree = false;
} else {
freeDirect(oldBuffer);
}
}
this.buffer = buffer;
tmpNioBuf = null;
capacity = buffer.remaining();
}
在够着函数中首先进行的是一些校验工作,然后就是调用setByteBuffer方法,保存buf,这里传入的ByteBuffer就是jdk底层的一个ByteBuffer。然后我们看到在setByteBuffer中做的事情就是保存一些ByteBuffer。下面我们看看newUnsafeDirectByteBuf的创建过程,具体的源码如下:
/*** UnsafeByteBufUtil.java 621行
*/
static UnpooledUnsafeDirectByteBuf newUnsafeDirectByteBuf(
ByteBufAllocator alloc, int initialCapacity, int maxCapacity){
if (PlatformDependent.useDirectBufferNoCleaner()) {
returnnew UnpooledUnsafeNoCleanerDirectByteBuf(alloc, initialCapacity, maxCapacity);
}
returnnew UnpooledUnsafeDirectByteBuf(alloc, initialCapacity, maxCapacity);
}
/**
* UnpooledUnsafeDirectByteBuf.java 45行
*/
/**
* Creates a new direct buffer.
*
* @param initialCapacity the initial capacity of the underlying direct buffer
* @param maxCapacity the maximum capacity of the underlying direct buffer
*/
protectedUnpooledUnsafeDirectByteBuf(ByteBufAllocator alloc, int initialCapacity, int maxCapacity){
super(maxCapacity);
if (alloc == null) {
thrownew NullPointerException("alloc");
}
if (initialCapacity < 0) {
thrownew IllegalArgumentException("initialCapacity: " + initialCapacity);
}
if (maxCapacity < 0) {
thrownew IllegalArgumentException("maxCapacity: " + maxCapacity);
}
if (initialCapacity > maxCapacity) {
thrownew IllegalArgumentException(String.format(
"initialCapacity(%d) > maxCapacity(%d)", initialCapacity, maxCapacity));
}
this.alloc = alloc;
setByteBuffer(allocateDirect(initialCapacity), false);
}
/**
* UnpooledUnsafeDirectByteBuf.java 121行起
*/
finalvoidsetByteBuffer(ByteBuffer buffer, boolean tryFree){
if (tryFree) {
ByteBuffer oldBuffer = this.buffer;
if (oldBuffer != null) {
if (doNotFree) {
doNotFree = false;
} else {
freeDirect(oldBuffer);
}
}
}
this.buffer = buffer;
memoryAddress = PlatformDependent.directBufferAddress(buffer);
tmpNioBuf = null;
capacity = buffer.remaining();
}
上面的构造函数和前面比其实是差不多的,他们最主要的区别就是在setByteBuffer的方法上,UnpooledUnsafeDirectByteBuf多了一个memoryAddress的参数,这个参数保存的是内存地址,是通过directBufferAddress这个方法来进行计算的,这里我就不过多的介绍了,有兴趣可以跟进去看看。下面我们还是按照上面的惯例分析一下他们的 _getByte方法,这里我们先看看UnpooledDirectByteBuf,的具体实现,源码如下:
/*** UnpooledDirectByteBuf.java 22行起
*/
@Override
protectedbyte_getByte(int index){
return buffer.get(index);
}
这里很明显就是一个buffer的get操作,那么下面我们看看UnpooledUnsafeDirectByteBuf的具体实现是怎样的呢,具体源码如下:
/*** UnpooledUnsafeDirectByteBuf.java 222行起
*/
@Override
protectedbyte_getByte(int index){
return UnsafeByteBufUtil.getByte(addr(index));
}
/**
* UnpooledUnsafeDirectByteBuf.java 499行起
*/
longaddr(int index){
return memoryAddress + index;
}
在这里可以看到,我们去数据是通过直接地址加上index来取的,这样子最后是通过一个native方法来操作内存地址取的。
1.5 PooledByteBufAllocator
这一小节其实和上一小节的知识点差不多,我们还是主要分析newHeapBuffer和newDirectBuffer这两个方法,有上面一个小节可得则两个方法的实现是差不多的,这里我们只是来分析一下newDirectBuffer这个方法,具体的源码如下:
/*** PooledByteBufAllocator.java 255行起
*/
@Override
protected ByteBuf newDirectBuffer(int initialCapacity, int maxCapacity){
PoolThreadCache cache = threadCache.get();
PoolArena<ByteBuffer> directArena = cache.directArena;
ByteBuf buf;
if (directArena != null) {
buf = directArena.allocate(cache, initialCapacity, maxCapacity);
} else {
if (PlatformDependent.hasUnsafe()) {
buf = UnsafeByteBufUtil.newUnsafeDirectByteBuf(this, initialCapacity, maxCapacity);
} else {
buf = new UnpooledDirectByteBuf(this, initialCapacity, maxCapacity);
}
}
return toLeakAwareBuffer(buf);
}
这里我们一步一步的分析,首先是拿到一个线程局部缓存PoolThreadCache,在上面对应的源码就是调用threadCache.get() 拿到一个cache。threadCache是PooledByteBufAllocator类的一个成员变量, 类型是PoolThreadLocalCache。
privatefinal PoolThreadLocalCache threadCache;我们这里看看PoolThreadLocalCache的构造函数,看看其实现,具体源码如下:
/*** PooledByteBufAllocator.java 345行起
*/
.....
finalclassPoolThreadLocalCacheextendsFastThreadLocal<PoolThreadCache> {
@Override
protectedsynchronized PoolThreadCache initialValue(){
final PoolArena<byte[]> heapArena = leastUsedArena(heapArenas);
final PoolArena<ByteBuffer> directArena = leastUsedArena(directArenas);
returnnew PoolThreadCache(
heapArena, directArena, tinyCacheSize, smallCacheSize, normalCacheSize,
DEFAULT_MAX_CACHED_BUFFER_CAPACITY, DEFAULT_CACHE_TRIM_INTERVAL);
}
.....
}
这里继承的是一个一个FastThreadLocal类, 这个类相当于jdk的ThreadLocal, 只是性能更快,这里继承FastThreadLocal类并且重写了initialValue方法, 则通过其get方法就能获得initialValue返回的对象, 并且这个对象是线程共享的。
在这里我们看到, 在重写的initialValue方法中, 初始化了heapArena和directArena两个属性之后, 通过new PoolThreadCache()这种方式创建了PoolThreadCache对象。这里注意, PoolThreadLocalCache是一个FastThreadLocal, 而PoolThreadCache才是线程局部缓存, 其中heapArena和directArena是分别是用来分配堆和堆外内存用的两个对象, 以directArena为例, 我们看到是通过leastUsedArena(directArenas)这种方式获得的, directArenas是一个directArena类型的数组, leastUsedArena(directArenas)这个方法是用来获取数组中一个使用最少的directArena对象。directArenas是PooledByteBufAllocator的成员变量, 是在其构造方法中初始化的,具体的我们可以看源码,如下:
/*** PooledByteBufAllocator.java 157行起
*/
publicPooledByteBufAllocator(boolean preferDirect, int nHeapArena, int nDirectArena, int pageSize, int maxOrder,
int tinyCacheSize, int smallCacheSize, int normalCacheSize){
super(preferDirect);
threadCache = new PoolThreadLocalCache();
this.tinyCacheSize = tinyCacheSize;
this.smallCacheSize = smallCacheSize;
this.normalCacheSize = normalCacheSize;
finalint chunkSize = validateAndCalculateChunkSize(pageSize, maxOrder);
if (nHeapArena < 0) {
thrownew IllegalArgumentException("nHeapArena: " + nHeapArena + " (expected: >= 0)");
}
if (nDirectArena < 0) {
thrownew IllegalArgumentException("nDirectArea: " + nDirectArena + " (expected: >= 0)");
}
int pageShifts = validateAndCalculatePageShifts(pageSize);
if (nHeapArena > 0) {
heapArenas = newArenaArray(nHeapArena);
List<PoolArenaMetric> metrics = new ArrayList<PoolArenaMetric>(heapArenas.length);
for (int i = 0; i < heapArenas.length; i ++) {
PoolArena.HeapArena arena = new PoolArena.HeapArena(this, pageSize, maxOrder, pageShifts, chunkSize);
heapArenas[i] = arena;
metrics.add(arena);
}
heapArenaMetrics = Collections.unmodifiableList(metrics);
} else {
heapArenas = null;
heapArenaMetrics = Collections.emptyList();
}
if (nDirectArena > 0) {
directArenas = newArenaArray(nDirectArena);
List<PoolArenaMetric> metrics = new ArrayList<PoolArenaMetric>(directArenas.length);
for (int i = 0; i < directArenas.length; i ++) {
PoolArena.DirectArena arena = new PoolArena.DirectArena(
this, pageSize, maxOrder, pageShifts, chunkSize);
directArenas[i] = arena;
metrics.add(arena);
}
directArenaMetrics = Collections.unmodifiableList(metrics);
} else {
directArenas = null;
directArenaMetrics = Collections.emptyList();
}
}
我们看到这里通过directArenas = newArenaArray(nDirectArena) 初始化了directArenas, 其中nDirectArena, 默认是cpu核心数的2倍, 这点我们可以跟踪构造方法的调用链可以分析到这样保证了每一个线程会有一个独享的arena。在这里我们继续跟进,newArenaArray这个方法,具体的源码如下:
/*** PooledByteBufAllocator.java 205行起
*/
@SuppressWarnings("unchecked")
privatestatic <T> PoolArena<T>[] newArenaArray(int size) {
returnnew PoolArena[size];
}
我们可以看到,这里只是创建了一个数组, 默认长度为nDirectArena,我们继续继续跟PooledByteBufAllocator的构造方法, 创建完了数组, 后面在for循环中为数组赋值,首先通过new PoolArena.DirectArena创建一个DirectArena实例, 然后再为新创建的directArenas数组赋值。那我们再回到,PoolThreadLocalCache的构造方法中,在其够着方法的最后面创建了一个PoolThreadCache对象,我们跟进这个构造方法看看,具体源码如下:
/*** PoolThreadCache.java 71行起
*/
......
PoolThreadCache(PoolArena<byte[]> heapArena, PoolArena<ByteBuffer> directArena,
int tinyCacheSize, int smallCacheSize, int normalCacheSize,
int maxCachedBufferCapacity, int freeSweepAllocationThreshold) {
......
//保存成两个成员变量
this.heapArena = heapArena;
this.directArena = directArena;
......
}
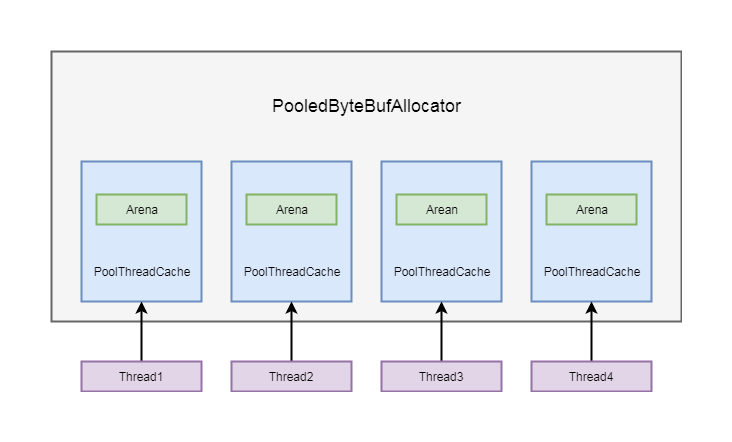
这里的中间就是将两个值保存在PoolThreadCache的成员变量中,上面跟进了代码,下面我简单的分析一下流程。在通常情况下会创建和线程数量相等的arena, 并以数组的形式存储在PooledByteBufAllocator的成员变量中, 每一个PoolThreadCache创建的时候, 都会在当前线程拿到一个arena, 并保存在自身的成员变量中,具体的如下图所示:
PoolThreadCache除了维护了一个arena之外, 还维护了一个缓存列表, 我们在重复分配ByteBuf的时候, 并不需要每次都通过arena进行分配, 可以直接从缓存列表中拿一个ByteBuf。我们回到PooledByteBufAllocator的newDirectBuffer方法中,具体源码如下:
@Overrideprotected ByteBuf newDirectBuffer(int initialCapacity, int maxCapacity){
PoolThreadCache cache = threadCache.get();
PoolArena<ByteBuffer> directArena = cache.directArena;
ByteBuf buf;
if (directArena != null) {
buf = directArena.allocate(cache, initialCapacity, maxCapacity);
} else {
if (PlatformDependent.hasUnsafe()) {
buf = UnsafeByteBufUtil.newUnsafeDirectByteBuf(this, initialCapacity, maxCapacity);
} else {
buf = new UnpooledDirectByteBuf(this, initialCapacity, maxCapacity);
}
}
return toLeakAwareBuffer(buf);
}
下面应该分析directArena.allocate()方法,我们下一章节分析这个,然后就是最后的toLeakAwareBuffer(),和我们上一章节的源码分析是一样的,这里我们也不分析了。
二、Netty缓存与内存分配
2.1 directArena分配direct内存
这一小节,我们继续跟着上一章节的末尾处讲解。应该分析directArena.allocate() 这个方法了。下面我们跟进这个方法,其源码如下:
/*** PoolArena.java 139行起
*/
PooledByteBuf<T> allocate(PoolThreadCache cache, int reqCapacity, int maxCapacity){
PooledByteBuf<T> buf = newByteBuf(maxCapacity);
allocate(cache, buf, reqCapacity);
return buf;
}
可以看到这里通过调用newByteBuf() 方法来创建一个PooledByteBuf,这里的这个方法有两个实现,我们关注与DirectArena对此方法的实现,下面我们跟进这个方法看看,具体源码如下:
@Overrideprotected PooledByteBuf<ByteBuffer> newByteBuf(int maxCapacity){
if (HAS_UNSAFE) {
return PooledUnsafeDirectByteBuf.newInstance(maxCapacity);
} else {
return PooledDirectByteBuf.newInstance(maxCapacity);
}
}
这里我们分析的是有unsafe的我们继续跟进上面的代码,具体源码如下:
/*** PooledUnsafeDirectByteBuf.java 39行起
*/
static PooledUnsafeDirectByteBuf newInstance(int maxCapacity){
PooledUnsafeDirectByteBuf buf = RECYCLER.get();
buf.reuse(maxCapacity);
return buf;
}
这里首先通过RECYCLER.get(),在回收池里面拿到一个PooledUnsafeDirectByteBuf,这里需要说明的是在回收池中拿对象是如果没有就会创建一个。接下来就是调用PooledUnsafeDirectByteBuf 的复用函数reuse,我们可以具体的看看这个方法做了啥,具体源码如下:
/*** PooledByteBuf.java 70行起
*/
/**
* Method must be called before reuse this {@link PooledByteBufAllocator}
*/
finalvoidreuse(int maxCapacity){
maxCapacity(maxCapacity);
setRefCnt(1);
setIndex0(0, 0);
discardMarks();
}
这里首先是设置最大能扩容多少,然后设置当前的bytebuf被多少地方引用,紧接着就是设置一些读写指针的初始化,最后重置一些标记相关的值。到这里我们就分析完了newByteBuf这个方法,就是拿到了一个ByteBuf,紧接着的下一步就是从缓存上进行内存分配,对应的方法就是allocate() 方法,下面我们来看看具体的代码逻辑,源码如下:
/*** PoolArena.java 169行起
*/
privatevoidallocate(PoolThreadCache cache, PooledByteBuf<T> buf, finalint reqCapacity){
finalint normCapacity = normalizeCapacity(reqCapacity);
if (isTinyOrSmall(normCapacity)) { // capacity < pageSize
int tableIdx;
PoolSubpage<T>[] table;
boolean tiny = isTiny(normCapacity);
if (tiny) { // < 512
if (cache.allocateTiny(this, buf, reqCapacity, normCapacity)) {
// was able to allocate out of the cache so move on
return;
}
tableIdx = tinyIdx(normCapacity);
table = tinySubpagePools;
} else {
if (cache.allocateSmall(this, buf, reqCapacity, normCapacity)) {
// was able to allocate out of the cache so move on
return;
}
tableIdx = smallIdx(normCapacity);
table = smallSubpagePools;
}
final PoolSubpage<T> head = table[tableIdx];
/**
* Synchronize on the head. This is needed as {@link PoolChunk#allocateSubpage(int)} and
* {@link PoolChunk#free(long)} may modify the doubly linked list as well.
*/
synchronized (head) {
final PoolSubpage<T> s = head.next;
if (s != head) {
assert s.doNotDestroy && s.elemSize == normCapacity;
long handle = s.allocate();
assert handle >= 0;
s.chunk.initBufWithSubpage(buf, handle, reqCapacity);
if (tiny) {
allocationsTiny.increment();
} else {
allocationsSmall.increment();
}
return;
}
}
allocateNormal(buf, reqCapacity, normCapacity);
return;
}
if (normCapacity <= chunkSize) {
if (cache.allocateNormal(this, buf, reqCapacity, normCapacity)) {
// was able to allocate out of the cache so move on
return;
}
allocateNormal(buf, reqCapacity, normCapacity);
} else {
// Huge allocations are never served via the cache so just call allocateHuge
allocateHuge(buf, reqCapacity);
}
}
这里的代码逻辑看起来比较复杂,其实就是分为两步。首先从缓存上进行内存分配,如果分配失败就从内存对立面进行内存分配。
2.2 内存规格
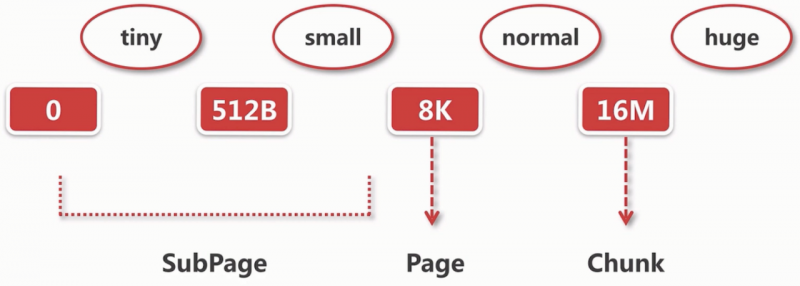
在Netty中内存按照大小可以分为4种,tiny、small、normal和huge这四种,他们的具体的内存范围如下:
tiny:指0~512B的内存大小。
small:指512B到8K的内存大小。
normal:指8K到16M的内存大小。
huge:指大于16M的内存大小,在平常使用中只是不很常见。
这里什么以这几个节点来进行分段呢,其实这里面是有原因的。首先为什么以16M作为分界点,16M在netty中就是一个Chunk,我们所有的内存申请都是以chunk为单位向内存申请的,后续所有的内存分配都是在chunk中进行分配的。然后为什么又以8k作为分界点的,8K在Netty中就是一个Page,每个Chunk中有2^11个Page这样就能更细粒度的分配内存。最后在0到8K的内存区间中有一个SubPage的对象来进行精确的分配内存。然后说了这么多我们以一张图来表示这个内存规格吧,如下图:
2.3 命中缓存的分配逻辑
2.3.1 缓存的数据结构
在Netty中缓存的数据结构是一个叫做MemoryRegionCache的类,首先我们用一幅图来表示其结构,如下图:
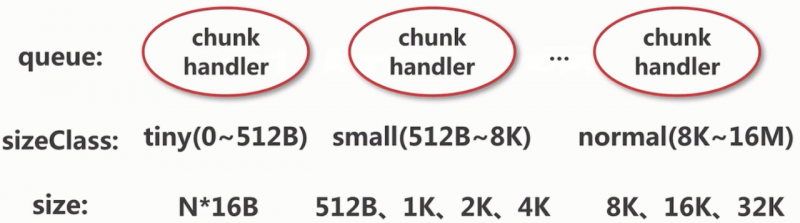
由上图可以看出,这个类有三部分组成。首先是一个queue,每一个节点都是一个entity实体,每一个实体中都有一个chunk和handler,注意这里的handler和我们先前的Handler不一样。然后就是一个sizeClass,这个就是Netty中的一个内存规格,还有三种分别是tiny、small和normal,关于huge直接走的是一个非缓存的逻辑,所以不在此。最后一部分就是size,这就是对每个内存规格的节点再分配。那么在Netty中有哪些规格的MemoryRegionCache呢?具体的我们可以由一幅图来表示,如下图:
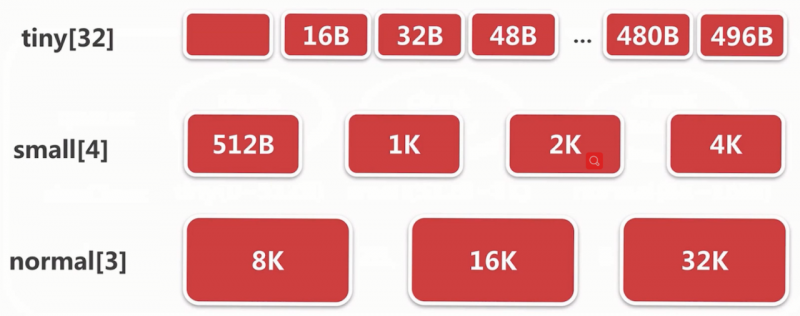
上面列出了Netty中的所有类型的MemoryRegionCache结构,其中每一个节点都表示一种MemoryRegionCache的类型结构。如果是需要取出缓存,就会在缓存中取出一个与上面类型大小最接近的一个。有了上面的基础,我们对照着源码看看这个对象,具体源码如下:
/*** PoolThreadCache.java 365行起
*/
privateabstractstaticclassMemoryRegionCache<T> {
privatefinalint size;
privatefinal Queue<Entry<T>> queue;
privatefinal SizeClass sizeClass;
privateint allocations;
MemoryRegionCache(int size, SizeClass sizeClass) {
this.size = MathUtil.safeFindNextPositivePowerOfTwo(size);
queue = PlatformDependent.newFixedMpscQueue(this.size);
this.sizeClass = sizeClass;
}
......
}
然后有上面的代码可知,其实就是有三部分Queue,size和SizeClass,其中这个SizeClass有三种类型,我们可以看看SizeClass 这个枚举类型,具体额源码如下:
/*** PoolArena.java 34行起
*/
enum SizeClass {
Tiny,
Small,
Normal
}
MemoryRegionCache对应有三种类型的缓存数组,那么这个数组是在哪里进行维护的呢,其实他就是在PoolThreadCache中维护的,这里PoolThreadCache其实是每个线程都会维护的一个对象,那么我们在源码中具体来看看他的缓存数组,源码如下:
/*** PoolThreadCache.java 38行起
*/
finalclassPoolThreadCache{
privatestaticfinal InternalLogger logger = InternalLoggerFactory.getInstance(PoolThreadCache.class);
final PoolArena<byte[]> heapArena;
final PoolArena<ByteBuffer> directArena;
// Hold the caches for the different size classes, which are tiny, small and normal.
privatefinal MemoryRegionCache<byte[]>[] tinySubPageHeapCaches;
privatefinal MemoryRegionCache<byte[]>[] smallSubPageHeapCaches;
privatefinal MemoryRegionCache<ByteBuffer>[] tinySubPageDirectCaches;
privatefinal MemoryRegionCache<ByteBuffer>[] smallSubPageDirectCaches;
privatefinal MemoryRegionCache<byte[]>[] normalHeapCaches;
privatefinal MemoryRegionCache<ByteBuffer>[] normalDirectCaches;
......
}
有这里可以看到有6个数组,其实他是分为Heap和Direct两大类。他们两个的实现逻辑是差不多的,这里我们就只分析Direct了,首先我们看看器初始化的地方,具体源码如下:
/*** PoolThreadCache.java 71行起
*/
PoolThreadCache(PoolArena<byte[]> heapArena, PoolArena<ByteBuffer> directArena,
int tinyCacheSize, int smallCacheSize, int normalCacheSize,
int maxCachedBufferCapacity, int freeSweepAllocationThreshold) {
if (maxCachedBufferCapacity < 0) {
thrownew IllegalArgumentException("maxCachedBufferCapacity: "
+ maxCachedBufferCapacity + " (expected: >= 0)");
}
if (freeSweepAllocationThreshold < 1) {
thrownew IllegalArgumentException("freeSweepAllocationThreshold: "
+ freeSweepAllocationThreshold + " (expected: > 0)");
}
this.freeSweepAllocationThreshold = freeSweepAllocationThreshold;
this.heapArena = heapArena;
this.directArena = directArena;
if (directArena != null) {
tinySubPageDirectCaches = createSubPageCaches(
tinyCacheSize, PoolArena.numTinySubpagePools, SizeClass.Tiny);
smallSubPageDirectCaches = createSubPageCaches(
smallCacheSize, directArena.numSmallSubpagePools, SizeClass.Small);
numShiftsNormalDirect = log2(directArena.pageSize);
normalDirectCaches = createNormalCaches(
normalCacheSize, maxCachedBufferCapacity, directArena);
directArena.numThreadCaches.getAndIncrement();
} else {
// No directArea is configured so just null out all caches
tinySubPageDirectCaches = null;
smallSubPageDirectCaches = null;
这里我们看到tinySubPageDirectCaches这个数组是由一个 createSubPageCaches() 的方法创建的,具体的我们跟进这个方法看看,具体源码如下:
/*** PoolThreadCache.java 128行起
*/
privatestatic <T> MemoryRegionCache<T>[] createSubPageCaches(
int cacheSize, int numCaches, SizeClass sizeClass) {
if (cacheSize > 0) {
@SuppressWarnings("unchecked")
MemoryRegionCache<T>[] cache = new MemoryRegionCache[numCaches];
for (int i = 0; i < cache.length; i++) {
// TODO: maybe use cacheSize / cache.length
cache[i] = new SubPageMemoryRegionCache<T>(cacheSize, sizeClass);
}
return cache;
} else {
returnnull;
}
}
有上面的代码我们可以看到,首先创建的是一个MemoryRegionCache数组,然后会创建SubPageMemoryRegionCache给数组的每个值赋值,其中这个SubPageMemoryRegionCache也是一个MemoryRegionCache,我们在创建时传入了相应的参数,就可以确定创建相应规格的对象了。
2.3.2 命中缓存的分配流程
这一小节的开始我们还是以allocate方法作为入口,具体源码如下:
privatevoidallocate(PoolThreadCache cache, PooledByteBuf<T> buf, finalint reqCapacity){finalint normCapacity = normalizeCapacity(reqCapacity);
if (isTinyOrSmall(normCapacity)) { // capacity < pageSize
int tableIdx;
PoolSubpage<T>[] table;
boolean tiny = isTiny(normCapacity);
if (tiny) { // < 512
if (cache.allocateTiny(this, buf, reqCapacity, normCapacity)) {
// was able to allocate out of the cache so move on
return;
}
tableIdx = tinyIdx(normCapacity);
table = tinySubpagePools;
} else {
if (cache.allocateSmall(this, buf, reqCapacity, normCapacity)) {
// was able to allocate out of the cache so move on
return;
}
tableIdx = smallIdx(normCapacity);
table = smallSubpagePools;
}
final PoolSubpage<T> head = table[tableIdx];
/**
* Synchronize on the head. This is needed as {@link PoolChunk#allocateSubpage(int)} and
* {@link PoolChunk#free(long)} may modify the doubly linked list as well.
*/
synchronized (head) {
final PoolSubpage<T> s = head.next;
if (s != head) {
assert s.doNotDestroy && s.elemSize == normCapacity;
long handle = s.allocate();
assert handle >= 0;
s.chunk.initBufWithSubpage(buf, handle, reqCapacity);
if (tiny) {
allocationsTiny.increment();
} else {
allocationsSmall.increment();
}
return;
}
}
allocateNormal(buf, reqCapacity, normCapacity);
return;
}
if (normCapacity <= chunkSize) {
if (cache.allocateNormal(this, buf, reqCapacity, normCapacity)) {
// was able to allocate out of the cache so move on
return;
}
allocateNormal(buf, reqCapacity, normCapacity);
} else {
// Huge allocations are never served via the cache so just call allocateHuge
allocateHuge(buf, reqCapacity);
}
}
这里首先是一个normalizeCapacity()方法,这个方法就是将需要分配的大小规格化,至于规格化就是找到我们上节所讲到到MemoryRegionCache类型中最接近的一个数值。接下来就是调用一个isTinyOrSmall(),来判断是否是Tiny或者Small类型。如果是的话,就继续进入里面的代码逻辑,在里面又把Tiny和Small区分开了。然后接下来就是缓存分配了,这里的缓存分配有三种,cache.allocateTiny()、**cache.allocateSmall()和cache.allocateNormal()**其实他们的逻辑差不多,这里我们就只分析 allocateTiny() 了,具体的看源码,如下:
/*** PoolThreadCache.java 169行起
*/
/**
* Try to allocate a tiny buffer out of the cache. Returns {@code true} if successful {@code false} otherwise
*/
booleanallocateTiny(PoolArena<?> area, PooledByteBuf<?> buf, int reqCapacity, int normCapacity){
return allocate(cacheForTiny(area, normCapacity), buf, reqCapacity);
}
这里我们可以看到调用了一个cacheForTiny() 的方法,这个方法的作用就是找到对应size的MemoryRegionCache,具体的源码,如下:
/*** PoolThreadCache.java 303行起
*/
private MemoryRegionCache<?> cacheForTiny(PoolArena<?> area, int normCapacity) {
int idx = PoolArena.tinyIdx(normCapacity);
if (area.isDirect()) {
return cache(tinySubPageDirectCaches, idx);
}
return cache(tinySubPageHeapCaches, idx);
}
这里他对normCapacity进行了除以16的操作,来计算cache数组的下标,然后直接在数组中取出此对象。然后我们继续跟进allocate方法,具体源码如下:
/*** PoolThreadCache.java 190行起
*/
@SuppressWarnings({ "unchecked", "rawtypes" })
privatebooleanallocate(MemoryRegionCache<?> cache, PooledByteBuf buf, int reqCapacity){
if (cache == null) {
// no cache found so just return false here
returnfalse;
}
boolean allocated = cache.allocate(buf, reqCapacity);
if (++ allocations >= freeSweepAllocationThreshold) {
allocations = 0;
trim();
}
return allocated;
}
/**
* PoolThreadCache.java 398行起
*/
/**
* Allocate something out of the cache if possible and remove the entry from the cache.
*/
publicfinalbooleanallocate(PooledByteBuf<T> buf, int reqCapacity){
Entry<T> entry = queue.poll();
if (entry == null) {
returnfalse;
}
initBuf(entry.chunk, entry.handle, buf, reqCapacity);
entry.recycle();
// allocations is not thread-safe which is fine as this is only called from the same thread all time.
++ allocations;
returntrue;
}
上面的函数会调用的哦下面这个函数,我们分析下面这个函数。首先会从queue中弹出一个entry给ByteBuf,如果弹出成功则初根据这个entry的值会对buf中进行初始化。最后调用entry的recycle() 方法,将弹出的entry扔到对象池中进行复用。这里就不过多的分析了。
2.4 有关内存分配的相关概念
2.4.1 arena
根据前面的分析,Netty在每个线程去申请内存的时候,他首先会通过ThreadLocal这种方式去获得当前线程的PoolThreadCache对象,然后调用他的allocate方法去申请内存,他一共分为两部分,一个是cache,在申请内存的时候首先会尝试从缓存中获取,另外一个就是arena,如果从缓存中获取不到对应的内存,那么就要通过arena从内存池中获。这里我们可以看看源码,具体源码如下:
/*** PoolThreadCache.java 38行起
*/
finalclassPoolThreadCache{
privatestaticfinal InternalLogger logger = InternalLoggerFactory.getInstance(PoolThreadCache.class);
final PoolArena<byte[]> heapArena;
final PoolArena<ByteBuffer> directArena;
......
}
可以看到他其实也是分为了一个heap数组和一个direct数组,这里和上面讲到的缓存的区别就是,没事内存分配的时候都去申请内存。那么arena的具体结构是怎样子的呢,我们先看一幅图片,如图:
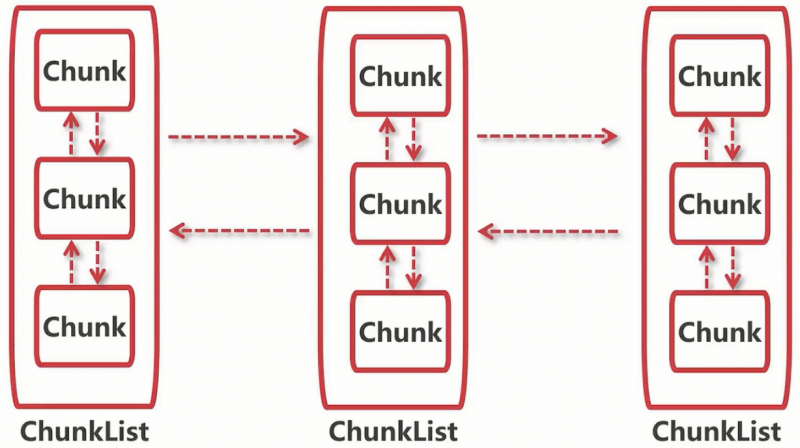
每个arena维护着多个ChunkList,每个ChunkList之间使用双向链表连接起来的,另外每个ChunkList内部都以双向链表来维护着chunk。ChunkList代表着他们里面的Chunk使用率是多少,这些Chunk也会动态的移动,每次分配完后都会计算他们的使用率,应该被分到那个ChunkList,就会移动到对应的List中。每次进行内存分配的时候,首先会通过指定的算法定位到对应的ChunkList,然后从里面选择对应的Chunk进行内存分配。
2.4.2 Chunk
在Netty中,一个Chunk是16M。在进行一次内存分配,不可能一次将一个Chunk全部分配,于是又将Chunk分割成更小的Page,每个Page占8K。这样子一个Chunk会以8K的大小进行划分,分成一个个的Page,到时候分配内存的时候只需要级Page为单位进行内存划分。但是,为了更细粒度的分配内存于是又继续将Page进行划分成更小的subpage。这里我还是以一幅图来说明,具体如图:
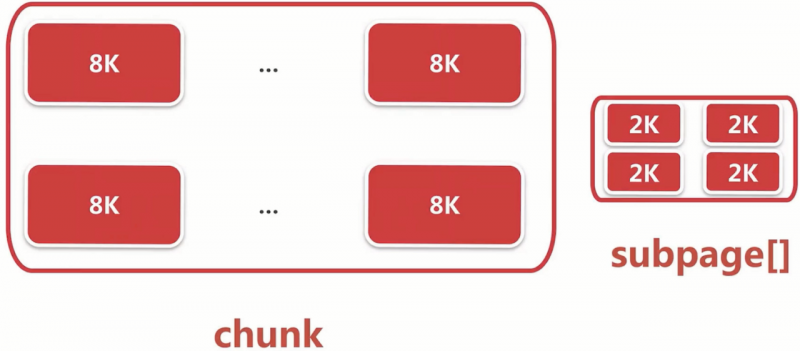
上面的图中的subpage是以2K的大小分配的,但是在实际的使用中可能以1K的大小进行分配,我们这里可以看看他的具体源码,如下:
finalclassPoolSubpage<T> implementsPoolSubpageMetric{final PoolChunk<T> chunk;
privatefinalint memoryMapIdx;
privatefinalint runOffset;
privatefinalint pageSize;
privatefinallong[] bitmap;
PoolSubpage<T> prev;
PoolSubpage<T> next;
boolean doNotDestroy;
int elemSize;
privateint maxNumElems;
privateint bitmapLength;
privateint nextAvail;
privateint numAvail;
......
}
我们这里挑选几个变量进行讲解,首先chunk这个成员变量代表这个subpage所属于哪个chunk,bitmap表示记录子叶的内存分配情况,然后elemSize,代表这个subpage是以多大的内存分配的,另外prev和next这两个成员变量表示这个数据结构是以双向链表来进行维护的。
2.5 page级别的内存分配
在讲这章的开始,我们还是回到先前讲到的PoolArena中的allocate方法,他里面有这样几行代码,具体源码如下:
allocate{/**
* PoolArena.java 216行起
*/
....
if (normCapacity <= chunkSize) {
if (cache.allocateNormal(this, buf, reqCapacity, normCapacity)) {
// was able to allocate out of the cache so move on
return;
}
allocateNormal(buf, reqCapacity, normCapacity);
} else {
// Huge allocations are never served via the cache so just call allocateHuge
allocateHuge(buf, reqCapacity);
}
}
....
这里首先是调用allocateNormal()缓存级别的分配,一般第一次分配不到。然后就是调用allocateNormal() 方法,这个方法就是page级别的内存分配,这个方法的意思就是分配整数个page,那么我们跟进这个方法看看他的源码,如下:
/*** PoolArena.java 228行起
*/
privatesynchronizedvoidallocateNormal(PooledByteBuf<T> buf, int reqCapacity, int normCapacity){
if (q050.allocate(buf, reqCapacity, normCapacity) || q025.allocate(buf, reqCapacity, normCapacity) ||
q000.allocate(buf, reqCapacity, normCapacity) || qInit.allocate(buf, reqCapacity, normCapacity) ||
q075.allocate(buf, reqCapacity, normCapacity)) {
++allocationsNormal;
return;
}
// Add a new chunk.
PoolChunk<T> c = newChunk(pageSize, maxOrder, pageShifts, chunkSize);
long handle = c.allocate(normCapacity);
++allocationsNormal;
assert handle > 0;
c.initBuf(buf, handle, reqCapacity);
qInit.add(c);
}
我们看上面的代码,首先是一个条件语句,这段代码的逻辑就是尝试在现有的chunk上分配,但是这里首次是没法分配的,那么就会进入下面的代码逻辑。然后就是调用newChunk() 方法创建一个chunk进行内存分配,这里后面紧跟着调用了allocate() 方法,这个方法会返回一个handle,这个handle指向chunk中的一块连续内存。最后调用initBuffa() 进行ByteBuf初始化,下面我们一部分一部分的分析这段代码。首先是尝试在现有的chunk上分配,这个部分最主要的是allocate 方法,我们具体来看看这个方法的源码,如下:
booleanallocate(PooledByteBuf<T> buf, int reqCapacity, int normCapacity){if (head == null || normCapacity > maxCapacity) {
// Either this PoolChunkList is empty or the requested capacity is larger then the capacity which can
// be handled by the PoolChunks that are contained in this PoolChunkList.
returnfalse;
}
for (PoolChunk<T> cur = head;;) {
long handle = cur.allocate(normCapacity);
if (handle < 0) {
cur = cur.next;
if (cur == null) {
returnfalse;
}
} else {
cur.initBuf(buf, handle, reqCapacity);
if (cur.usage() >= maxUsage) {
remove(cur);
nextList.add(cur);
}
returntrue;
}
}
}
这里我大概讲一下这里的代码逻辑,首先充head节点 向下遍历,然后调用cur.allocate方法,这个方法如果返回的handle小于0,表示分配失败,那么就继续向下遍历直至取到最后一个。另外如果返回的handle大于等于0就表示可以分配,然后就进行ByteBuf的初始化,紧接着就是对使用率的判断,如果使用率大于最大使用率就移除当前PoolChunk,最后在加在下一个链表。紧接着就是创建一个chunk进行内存分配,首先是调用newChunk() 创建一个PoolChunk,我们这里具体看看这个方法的源码,如下:
/*** PoolArena.java 696行起
*/
@Override
protected PoolChunk<ByteBuffer> newChunk(int pageSize, int maxOrder, int pageShifts, int chunkSize){
returnnew PoolChunk<ByteBuffer>(
this, allocateDirect(chunkSize),
pageSize, maxOrder, pageShifts, chunkSize);
}
这里面调用了一个allocateDirect()方法,这个方法就是调用jdk底层申请一块内存,然后创建了一个PoolChunk对象。我们来具体看看这个源码,如下:
/*** PoolChunk.java 134行起
*/
PoolChunk(PoolArena<T> arena, T memory, int pageSize, int maxOrder, int pageShifts, int chunkSize) {
unpooled = false;
this.arena = arena;
this.memory = memory;
this.pageSize = pageSize;
this.pageShifts = pageShifts;
this.maxOrder = maxOrder;
this.chunkSize = chunkSize;
unusable = (byte) (maxOrder + 1);
log2ChunkSize = log2(chunkSize);
subpageOverflowMask = ~(pageSize - 1);
freeBytes = chunkSize;
assert maxOrder < 30 : "maxOrder should be < 30, but is: " + maxOrder;
maxSubpageAllocs = 1 << maxOrder;
// Generate the memory map.
memoryMap = newbyte[maxSubpageAllocs << 1];
depthMap = newbyte[memoryMap.length];
int memoryMapIndex = 1;
for (int d = 0; d <= maxOrder; ++ d) { // move down the tree one level at a time
int depth = 1 << d;
for (int p = 0; p < depth; ++ p) {
// in each level traverse left to right and set value to the depth of subtree
memoryMap[memoryMapIndex] = (byte) d;
depthMap[memoryMapIndex] = (byte) d;
memoryMapIndex ++;
}
}
subpages = newSubpageArray(maxSubpageAllocs);
}
在这里,首先将参数传入的值进行赋值this.memory = memory就是将参数中创建的堆外内存进行保存, 就是chunk 所指向的那块连续的内存, 在这个chunk 中所分配的ByteBuf, 都会在这块内存中进行读写。我们重点关注memoryMap = new byte[maxSubpageAllocs << 1] 和depthMap = new byte[memoryMap.length]这两步:首先看memoryMap = new byte[maxSubpageAllocs << 1];这里初始化了一个字节数组memoryMap, 大小为maxSubpageAllocs << 1, 也就是4096;depthMap = new byte[memoryMap.length] 同样也是初始化了一个字节数组, 大小为memoryMap 的大小, 也就是4096。继续往下分析之前, 我们看chunk的一个层级关系。
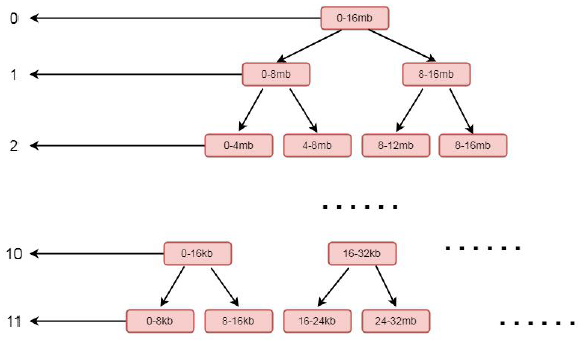
这是一个二叉树的结构, 左侧的数字代表层级, 右侧代表一块连续的内存, 每个父节点下又拆分成多个子节点, 最顶层表示的内存范围为0-16MB, 其又下分为两层, 范围为0-8MB, 8-16MB, 以此类推, 最后到11 层, 以8k 的大小划分, 也就是一个page 的大小。如果我们分配一个8mb的缓冲区, 则会将第二层的第一个节点, 也就是0-8这个连续的内存进行分配, 分配完成之后,会将这个节点设置为不可用。结合上面的图, 我们再看构造方法中的for循环,源码如下:
for (int d = 0; d <= maxOrder; ++ d) { // move down the tree one level at a timeint depth = 1 << d;
for (int p = 0; p < depth; ++ p) {
// in each level traverse left to right and set value to the depth of subtree
memoryMap[memoryMapIndex] = (byte) d;
depthMap[memoryMapIndex] = (byte) d;
memoryMapIndex ++;
}
}
实际上这个for 循环就是将上面的结构包装成一个字节数组memoryMap, 外层循环用于控制层数, 内层循环用于控制里面每层的节点, 这里经过循环之后, memoryMap 和depthMap 内容为以下表现形式:[0, 0, 1, 1, 2, 2, 2, 2, 3, 3, 3, 3, 3, 3, 3, 3, 4, 4, 4, 4, 4, 4, 4, 4, 4, 4, 4, 4, 4, 4, 4, 4...........]这里注意一下, 因为程序中数组的下标是从1 开始设置的, 所以第零个节点元素为默认值0。这里数字代表层级, 同时也代表了当前层级的节点, 相同的数字个数就是这一层级的节点数。其中0 为2 个(因为这里分配时下标是从1 开始的, 所以第0 个位置是默认值0, 实际上第零层元素只有一个, 就是头结点), 1 为2 个, 2 为4 个, 3 为8 个, 4 为16 个, n 为2 的n 次方个, 直到11, 也就是11 有2 的11 次方个。我们再回到PoolArena 的allocateNormal()方法继续来看 long handle = c.allocate(normCapacity) 这步,跟到allocate(normCapacity)中,具体源码如下:
/*** PoolChunk.java 204行起
*/
longallocate(int normCapacity){
if ((normCapacity & subpageOverflowMask) != 0) { // >= pageSize
return allocateRun(normCapacity);
} else {
return allocateSubpage(normCapacity);
}
}
这里是以page作为分配单位, 则走到allocateRun(normCapacity)方法中, 继续跟进去,具体源码如下:
/*** PoolChunk.java 293行起
*/
privatelongallocateRun(int normCapacity){
int d = maxOrder - (log2(normCapacity) - pageShifts);
int id = allocateNode(d);
if (id < 0) {
return id;
}
freeBytes -= runLength(id);
return id;
}
这里第一步是计算出一个d,这个d表示我们上面提到的二叉树的层级。然后将d作为参数传入allocateNode()方法中,我们跟进这个方法,源码如下:
/*** PoolChunk.java 264行起
*/
privateintallocateNode(int d){
int id = 1;
int initial = - (1 << d); // has last d bits = 0 and rest all = 1
byte val = value(id);
if (val > d) { // unusable
return -1;
}
while (val < d || (id & initial) == 0) { // id & initial == 1 << d for all ids at depth d, for < d it is 0
id <<= 1;
val = value(id);
if (val > d) {
id ^= 1;
val = value(id);
}
}
byte value = value(id);
assert value == d && (id & initial) == 1 << d : String.format("val = %d, id & initial = %d, d = %d",
value, id & initial, d);
setValue(id, unusable); // mark as unusable
updateParentsAlloc(id);
return id;
}
这里的逻辑实际上是从第一个节点往下找, 找到层级为d 未被使用的节点。找到相关节点后通过setValue 将当前节点设置为不可用, 其中id 是当前节点的下标,unusable代表一个不可用的值, 这里是12, 因为我们的层级只有12层, 所以设置为12之后就相当于标记不可用。设置成不可用之后, 通过updateParentsAlloc(id)逐层设置为被使用。
通过以上逻辑我们知道,c.allocate(normCapacity) 这一步, 其实返回的就是memoryMap的一个下标,通过这个下标, 我们能唯一的定位一块内存。继续往下跟, 通过initBuf() 初始化ByteBuf之后,通过qInit.add(c)将新创建的chunk添加到chunkList中,这里我们跟到initBuf方法中去,具体源码如下:
/*** PoolChunk.java 368行起
*/
voidinitBuf(PooledByteBuf<T> buf, long handle, int reqCapacity){
int memoryMapIdx = memoryMapIdx(handle);
int bitmapIdx = bitmapIdx(handle);
if (bitmapIdx == 0) {
byte val = value(memoryMapIdx);
assert val == unusable : String.valueOf(val);
buf.init(this, handle, runOffset(memoryMapIdx), reqCapacity, runLength(memoryMapIdx),
arena.parent.threadCache());
} else {
initBufWithSubpage(buf, handle, bitmapIdx, reqCapacity);
}
}
在这里首先通过调用memoryMapIdx() 方法找到memoryMap的下标, 其实就是handle的值。bitmapIdx() 是有关subPage中使用到的逻辑, 如果是page级别的分配, 这里只返回0, 所以进入到if块中。if中首先断言当前节点是不是不可用状态, 然后通过init方法进行初始化。其中runOffset() 表示偏移量, 偏移量相当于分配给缓冲区的这块内存相对于chunk中申请的内存的首地址偏移了多少。参数memoryMapIdx, 表示根据下标获取可分配的最大长度。我们跟到init()方法中, 这里会走到PooledByteBuf 的init()方法,这个方法就是对buf变量的一些初始化。
2.6 subPage级别的内存分配
subPage级别的内存分配前面的逻辑和上一小节差不多,只是在allocate 这里这里开始分开。具体的源码位置如下:
/*** PoolChunk.java 204行起
*/
longallocate(int normCapacity){
if ((normCapacity & subpageOverflowMask) != 0) { // >= pageSize
return allocateRun(normCapacity);
} else {
return allocateSubpage(normCapacity);
}
}
这里开始就是走的下面的逻辑allocateSubpage这个方法,我们跟进这个源码,如下:
privatelongallocateSubpage(int normCapacity){// Obtain the head of the PoolSubPage pool that is owned by the PoolArena and synchronize on it.
// This is need as we may add it back and so alter the linked-list structure.
PoolSubpage<T> head = arena.findSubpagePoolHead(normCapacity);
synchronized (head) {
int d = maxOrder; // subpages are only be allocated from pages i.e., leaves
int id = allocateNode(d);
if (id < 0) {
return id;
}
final PoolSubpage<T>[] subpages = this.subpages;
finalint pageSize = this.pageSize;
freeBytes -= pageSize;
int subpageIdx = subpageIdx(id);
PoolSubpage<T> subpage = subpages[subpageIdx];
if (subpage == null) {
subpage = new PoolSubpage<T>(head, this, id, runOffset(id), pageSize, normCapacity);
subpages[subpageIdx] = subpage;
} else {
subpage.init(head, normCapacity);
}
return subpage.allocate();
}
}
这里面首先, 通过调用findSubpagePoolHead() 这种方式找到head节点, 实际上这里head, 就是我们刚才分析的tinySubpagePools属性的第一个节点, 也就是对应16B的那个节点。int d =maxOrder 是将11赋值给d, 也就是在内存树的第11 层取节点, 这部分在Page分配时剖析过了。int id = allocateNode(d) 这里获取的是分析过的, 字节数组memoryMap 的下标, 这里指向一个page, 如果第一次分配, 指向的是0-8k 的那个page, 上一小节对此进行详细的剖析这里不再赘述。final PoolSubpage[] subpages = this.subpages这一步, 是拿到PoolChunk 中成员变量subpages 的值, 也是个PoolSubpage 的数组, 在PoolChunk 进行初始化的时候, 也会初始化该数组, 长度为2048。也就是说每个chunk 都维护着一个subpage 的列表, 如果每一个page 级别的内存都需要被切分成子page, 则会将这个这个page 放入该列表中, 专门用于分配子page, 所以这个列表中的subpage, 其实就是一个用于切分的page。这里面具体更细致的逻辑我就不详细分解了,这一小节可以看《Netty之SubPage级别的内存分配》这篇文章,我这一小节的内容很多都是借鉴的他的文章。
2.7 ByteBUf的回收
ByteBUf的回收就是调用release() 方法,不管是哪种类型的ByteBuf都会调用到release0这个方法,我们跟进这个方法的源码,如下:
/*** AbstractReferenceCountedByteBuf.java 106行起
*/
privatebooleanrelease0(int decrement){
for (;;) {
int refCnt = this.refCnt;
if (refCnt < decrement) {
thrownew IllegalReferenceCountException(refCnt, -decrement);
}
if (refCntUpdater.compareAndSet(this, refCnt, refCnt - decrement)) {
if (refCnt == decrement) {
deallocate();
returntrue;
}
returnfalse;
}
}
}
如果当前的ByteBuf最终没有引用了,就会调用deallocate() 这个方法。我们跟进这个方法,具体源码如下:
/*** PoolByteBuf.java 165行起
*/
@Override
protectedfinalvoiddeallocate(){
if (handle >= 0) {
finallong handle = this.handle;
this.handle = -1;
memory = null;
chunk.arena.free(chunk, handle, maxLength, cache);
recycle();
}
}
这个方法首先会将当前的buf置为不指向任何内存,然后会调用free()方法进行内存的释放,之后调用recycle() 方法回收这个buf对象。这里在调用**free()**方法的时候,将连续的内存区段加到缓存,如果添加不成功,标记连续的内存区段为未使用,这里我们跟进这个方法,具体源码如下:
/*** PoolArean.java 252行起
*/
voidfree(PoolChunk<T> chunk, long handle, int normCapacity, PoolThreadCache cache){
if (chunk.unpooled) {
int size = chunk.chunkSize();
destroyChunk(chunk);
activeBytesHuge.add(-size);
deallocationsHuge.increment();
} else {
SizeClass sizeClass = sizeClass(normCapacity);
if (cache != null && cache.add(this, chunk, handle, normCapacity, sizeClass)) {
// cached so not free it.
return;
}
freeChunk(chunk, handle, sizeClass);
}
}
这里的逻辑就是,首先判断当前的chunk是否是unpooled,如果是就直接释放,反之走下面的逻辑。首先获取当前内存大小对应的内存规格。然后尝试添加到缓存中。如果添加失败则标记连续的内存为未使用,也就是调用freeChunk() 方法,这个方法的具体逻辑这里就不分析了,注意的是在这个方法里面也去分了page和subpage。
最后考虑到这个ByteBuf可能经常被使用,就直接调用recycle() 方法,将ByteBuf加到对象池中。
三 总结
本章节在Netty的架构中非常重要,这节的知识点也非常的难,我是觉得我没有分析好。Netty为了优化内存分配的性能,使用到了对象池,缓存,二叉树,位图的技术当然还有各种各样的设计思想和设计模式,所以本章节的内容非常的多,我下来还要好好的过一遍这篇文章的内容。
参考资料
- 《Netty实战》
- 《Netty权威指南》
- 《Netty深入剖析》
- www.cnblogs.com/wuzhenzhao/…
注:这里使用的是Netty4.1.6的源码进行分析
原文地址(我得个人博客):Neety学习系列(五)-内存分配
以上是 Neety学习系列(五)-内存分配 的全部内容, 来源链接: utcz.com/a/33092.html