揭秘pagehelper背后的秘密
本文源代码来源于mybatis-spring-boot-starter的2.1.2版本
PageHelper是国内非常优秀的一款开源的mybatis分页插件,它基本支持主流与常用的数据库。本文我们通过对pagehelper的探究了解Mybatis强大的插件机制。本文主要介绍Mybatis插件机制,PageHelper的细节使用细节不做探讨。
Mybais插件机制
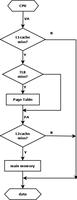
在探究PageHelper工作原理不妨先来看一下Mybatis插件的扩展机制。
前面介绍Executor、StatementHandler、ParameterHandler与ResultSetHandler的时候,留了一小尾巴——pluginAll。我们回到第一次刚见它的地方。
public Executor newExecutor(Transaction transaction, ExecutorType executorType){executorType = executorType == null ? defaultExecutorType : executorType;
executorType = executorType == null ? ExecutorType.SIMPLE : executorType;
Executor executor;
if (ExecutorType.BATCH == executorType) {
executor = new BatchExecutor(this, transaction);
} elseif (ExecutorType.REUSE == executorType) {
executor = new ReuseExecutor(this, transaction);
} else {
executor = new SimpleExecutor(this, transaction);
}
if (cacheEnabled) {
executor = new CachingExecutor(executor);
}
executor = (Executor) interceptorChain.pluginAll(executor);
return executor;
}
2.1 InterceptorChain
我们回到上面的pluginAll方法:
public Object pluginAll(Object target){for (Interceptor interceptor : interceptors) {
//遍历InterceptorChain的拦截器链,分别调用Intercpetor对象的Plugin进行拦截
target = interceptor.plugin(target);
}
return target;
}
那么interceptors是什么时候初始化的呢?
在调用 interceptorChain.pluginAll 之前在Configuration 中有如下方法:
publicvoidaddInterceptor(Interceptor interceptor){interceptorChain.addInterceptor(interceptor);
}
addInterceptor会按照拦截器配置的顺序依次添加到 interceptorChain 中,其内部就是 List<Interceptor> interceptors。
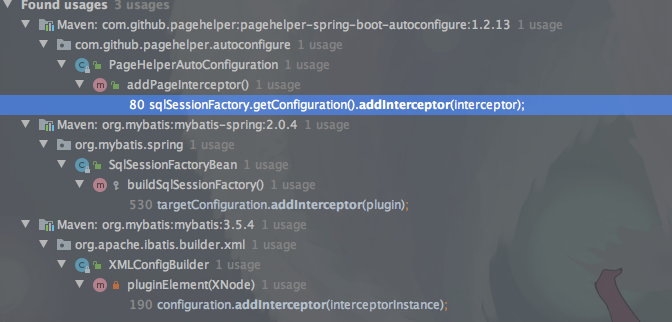
我们来看下它的调用关系。不难发现在初始化SqlSessionFactory时,通过解析plugin标签得到。如果是Springboot下,以pagehelper-spring-boot-starter为例子,他是在初始化PageHelperAutoConfiguration调用的。
我们继续来看interceptor.plugin,看他对代理对象做了什么事情。
default Object plugin(Object target){return Plugin.wrap(target, this);
}
2.2 Plugin
publicstatic Object wrap(Object target, Interceptor interceptor){//获取待包装的Interceptor的方法签名映射表
Map<Class<?>, Set<Method>> signatureMap = getSignatureMap(interceptor);
Class<?> type = target.getClass();
//获取需要代理的对象的Class上声明的所有接口
Class<?>[] interfaces = getAllInterfaces(type, signatureMap);
if (interfaces.length > 0) {
//使用JDK内置的Proxy创建代理对象
return Proxy.newProxyInstance(
type.getClassLoader(),
interfaces,
new Plugin(target, interceptor, signatureMap));
}
return target;
}
wrap是Plugin的核心方法,包含三步我们一个一个来看。
2.2.1 getSignatureMap
privatestatic Map<Class<?>, Set<Method>> getSignatureMap(Interceptor interceptor) {// 获取Intercepts注解
Intercepts interceptsAnnotation = interceptor.getClass().getAnnotation(Intercepts.class);
// issue #251
//如果Interceptor的类上没有定义Intercepts注解,则抛出异常,说明我们在自定义插件时,必须要有Intercepts注解
if (interceptsAnnotation == null) {
thrownew PluginException("No @Intercepts annotation was found in interceptor " + interceptor.getClass().getName());
}
//解析Interceptor的values属性(Signature[])数组,然后存入HashMap, Set< Method>>容器内。
Signature[] sigs = interceptsAnnotation.value();
Map<Class<?>, Set<Method>> signatureMap = new HashMap<>();
for (Signature sig : sigs) {
Set<Method> methods = signatureMap.computeIfAbsent(sig.type(), k -> new HashSet<>());
try {
Method method = sig.type().getMethod(sig.method(), sig.args());
methods.add(method);
} catch (NoSuchMethodException e) {
thrownew PluginException("Could not find method on " + sig.type() + " named " + sig.method() + ". Cause: " + e, e);
}
}
return signatureMap;
}
2.2.2 getAllInterfaces
privatestatic Class<?>[] getAllInterfaces(Class<?> type, Map<Class<?>, Set<Method>> signatureMap) {Set<Class<?>> interfaces = new HashSet<>();
while (type != null) {
for (Class<?> c : type.getInterfaces()) {
if (signatureMap.containsKey(c)) {
interfaces.add(c);
}
}
type = type.getSuperclass();
}
return interfaces.toArray(new Class<?>[interfaces.size()]);
}
这里会返回拦截方法包含的所有接口.
2.2.3 invoke
上面在Proxy.newProxyInstance实现动态代理的时候,Plugin作为事件处理器,那么必然会调用invoke方法。
@Overridepublic Object invoke(Object proxy, Method method, Object[] args)throws Throwable {
try {
Set<Method> methods = signatureMap.get(method.getDeclaringClass());
//这是一个被拦截器拦截的方法
if (methods != null && methods.contains(method)) {
return interceptor.intercept(new Invocation(target, method, args));
}
//执行目标方法的invoke方法
return method.invoke(target, args);
} catch (Exception e) {
throw ExceptionUtil.unwrapThrowable(e);
}
}
我们来看interceptor.intercept:
Object intercept(Invocation invocation)throws Throwable;intercept就是拦截其自身要实现的逻辑。

总结
我们在回过头来看pluginAll方法,该方法会遍历用户定义的插件实现类(Interceptor),并调用Interceptor的plugin方法,对当前对象进行拦截扩展处理,即我们在实现自定义的Interceptor的intercept方法时,在Plugin中需要根据自己的逻辑,对目标对象进行包装(代理),使用Plugin的wrap来创建代理类。
通俗的来说,Mybatis插件机制实际上是对Executor、StatementHandler、ParameterHandler与ResultSetHandler 目标对象进行一些扩展。你只需按照要求要实Interceptor的intercept方法就可以了。
有了这些知识做铺垫,我们来看下PageHelper是怎么玩的。
PageHelper的使用
Springboot集成PageHelper非常简单,只需引入starter即可。PageHelperAutoConfiguration和PageHelperProperties会帮我自动注入PageHelper相关的配置。
<!-- mybatis pageHelper --><dependency>
<groupId>com.github.pagehelper</groupId>
<artifactId>pagehelper-spring-boot-starter</artifactId>
<version>1.2.13</version>
</dependency>
我们写一个单元测试来使用一下:
@Testpublicvoidquery(){
List<Role> roles = roleMapper.selectALl(new RowBounds(0, 10));
}
@Test
publicvoidquery2(){
//开启分页插件,下面第一个查询语句会自动分页
PageHelper.startPage(1, 10);
List<Role> roles = roleMapper.selectALl();
PageInfo<Role> pageInfo = new PageInfo(roles);
}
开启分页插件有两种方式:
- 第一种、直接通过RowBounds参数完成分页查询 。
- 第二种、PageHelper.startPage()静态方法.
原理:使用ThreadLocal来传递和保存Page对象,每次查询,都需要单独设置PageHelper.startPage()方法。
我们来看下执行结果:

可以看到在开启分页后,实际上执行了两条sql语句。一个是查询总数的,一个是分页查询。
PageHelper工作原理
1. 初始化
PageHelperAutoConfiguration在构造的时候会将PageInterceptor加载到InterceptorChain.interceptors中。
@PostConstructpublicvoidaddPageInterceptor(){
PageInterceptor interceptor = new PageInterceptor();
Properties properties = new Properties();
//先把一般方式配置的属性放进去
properties.putAll(pageHelperProperties());
//在把特殊配置放进去,由于close-conn 利用上面方式时,属性名就是 close-conn 而不是 closeConn,所以需要额外的一步
properties.putAll(this.properties.getProperties());
interceptor.setProperties(properties);
for (SqlSessionFactory sqlSessionFactory : sqlSessionFactoryList) {
sqlSessionFactory.getConfiguration().addInterceptor(interceptor);
}
}
PageHelper.startPage()会将分页参数page对象放入ThreadLocal中
protectedstaticfinal ThreadLocal<Page> LOCAL_PAGE = new ThreadLocal<Page>();2. 拦截query方法
在执行mapper方法时,创建Executor,执行pluginAll方法,然后会进入Interceptor的实现类PageInterceptor的plugin方法。我们来看下PageInterceptor:
@Intercepts({
@Signature(type = Executor.class, method = "query", args = {MappedStatement.class, Object.class, RowBounds.class, ResultHandler.class}),
@Signature(type = Executor.class, method = "query", args = {MappedStatement.class, Object.class, RowBounds.class, ResultHandler.class, CacheKey.class, BoundSql.class}),
}
)
publicclassPageInterceptorimplementsInterceptor{
这里@Signature标记两个query方法,可以发现一个四个参数,一个是六个参数。为什么这样做,可以去看下作者写的
Executor 拦截器高级教程 - QueryInterceptor 规范一文,我就不班门弄斧了。
我们回到Plugin.wrap方法:
publicstatic Object wrap(Object target, Interceptor interceptor){Map<Class<?>, Set<Method>> signatureMap = getSignatureMap(interceptor);
//type就是cachingExecutor
Class<?> type = target.getClass();
// interface就是Executor接口
Class<?>[] interfaces = getAllInterfaces(type, signatureMap);
if (interfaces.length > 0) {
return Proxy.newProxyInstance(
type.getClassLoader(),
interfaces,
new Plugin(target, interceptor, signatureMap));
}
return target;
}
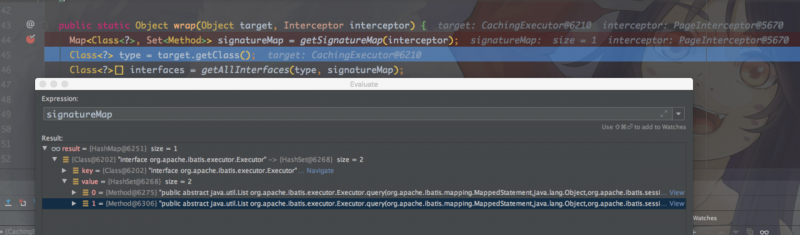
signatureMap需要拦截的就是两个query方法。然后会执行Plugin的invoke方法,进入PageInterceptor.intercept,这里的invocation=new Invocation(target, method, args),而target就是cachingExecutor,我们来看下intercept对cachingExecutor的query方法拦截后,做了哪些事情。
@Overridepublic Object intercept(Invocation invocation)throws Throwable {
try {
Object[] args = invocation.getArgs();
MappedStatement ms = (MappedStatement) args[0];
Object parameter = args[1];
RowBounds rowBounds = (RowBounds) args[2];
ResultHandler resultHandler = (ResultHandler) args[3];
Executor executor = (Executor) invocation.getTarget();
CacheKey cacheKey;
BoundSql boundSql;
//由于逻辑关系,只会进入一次
if (args.length == 4) {
//4 个参数时
boundSql = ms.getBoundSql(parameter);
cacheKey = executor.createCacheKey(ms, parameter, rowBounds, boundSql);
} else {
//6 个参数时
cacheKey = (CacheKey) args[4];
boundSql = (BoundSql) args[5];
}
checkDialectExists();
List resultList;
//调用方法判断是否需要进行分页,如果不需要,直接返回结果
if (!dialect.skip(ms, parameter, rowBounds)) {
//判断是否需要进行 count 查询
if (dialect.beforeCount(ms, parameter, rowBounds)) {
//查询总数
Long count = count(executor, ms, parameter, rowBounds, resultHandler, boundSql);
//处理查询总数,返回 true 时继续分页查询,false 时直接返回
if (!dialect.afterCount(count, parameter, rowBounds)) {
//当查询总数为 0 时,直接返回空的结果
return dialect.afterPage(new ArrayList(), parameter, rowBounds);
}
}
resultList = ExecutorUtil.pageQuery(dialect, executor,
ms, parameter, rowBounds, resultHandler, boundSql, cacheKey);
} else {
//rowBounds用参数值,不使用分页插件处理时,仍然支持默认的内存分页
resultList = executor.query(ms, parameter, rowBounds, resultHandler, cacheKey, boundSql);
}
return dialect.afterPage(resultList, parameter, rowBounds);
} finally {
if(dialect != null){
dialect.afterAll();
}
}
}
关于两个query方法我们通过代码可以看到:
@Overridepublic <E> List<E> query(MappedStatement ms, Object parameterObject, RowBounds rowBounds, ResultHandler resultHandler)throws SQLException {
BoundSql boundSql = ms.getBoundSql(parameterObject);
CacheKey key = createCacheKey(ms, parameterObject, rowBounds, boundSql);
return query(ms, parameterObject, rowBounds, resultHandler, key, boundSql);
}
6个参数的是在4个参数的方法里面执行的。所以这里拦截的先进入的也是4个参数的query方法。
在intercept中 if (args.length == 4) 中获取了BoundSql和CacheKey。然后回去判断是否需要进行分页处理。
3. count
count(executor, ms, parameter, rowBounds, resultHandler, boundSql)会判断是否有我们手写的count 语句,如果没有就调用com.github.pagehelper.util.ExecutorUtil#executeAutoCount 自动创建一个count的sql语句并查询结果。
publicstatic Long executeAutoCount(Dialect dialect, Executor executor, MappedStatement countMs,Object parameter, BoundSql boundSql,
RowBounds rowBounds, ResultHandler resultHandler)
throws SQLException {Map<String, Object> additionalParameters = getAdditionalParameter(boundSql);
//创建 count 查询的缓存 key
CacheKey countKey = executor.createCacheKey(countMs, parameter, RowBounds.DEFAULT, boundSql);
//调用方言获取 count sql
String countSql = dialect.getCountSql(countMs, boundSql, parameter, rowBounds, countKey);
//countKey.update(countSql);
BoundSql countBoundSql = new BoundSql(countMs.getConfiguration(), countSql, boundSql.getParameterMappings(), parameter);
//当使用动态 SQL 时,可能会产生临时的参数,这些参数需要手动设置到新的 BoundSql 中
for (String key : additionalParameters.keySet()) {
countBoundSql.setAdditionalParameter(key, additionalParameters.get(key));
}
//执行 count 查询
Object countResultList = executor.query(countMs, parameter, RowBounds.DEFAULT, resultHandler, countKey, countBoundSql);
Long count = (Long) ((List) countResultList).get(0);
return count;
注意看,这里的executor.query直接调用的query的6个参数的方法。
executeAutoCount 可以理解为pageHelper拦截到我了CachingExecutor的query4参查询方法时,在我们自己没有count语句的情况下,帮我们自动创建一个查询数量的sql,并直接执行query6参方法去获得查询结果。
4. pageQuery
count查询后,继续来看ExecutorUtil.pageQuery方法。
publicstatic <E> List<E> pageQuery(Dialect dialect, Executor executor, MappedStatement ms, Object parameter,RowBounds rowBounds, ResultHandler resultHandler,
BoundSql boundSql, CacheKey cacheKey)
throws SQLException {//判断是否需要进行分页查询
if (dialect.beforePage(ms, parameter, rowBounds)) {
//生成分页的缓存 key
CacheKey pageKey = cacheKey;
//处理参数对象
parameter = dialect.processParameterObject(ms, parameter, boundSql, pageKey);
//调用方言获取分页 sql
String pageSql = dialect.getPageSql(ms, boundSql, parameter, rowBounds, pageKey);
BoundSql pageBoundSql = new BoundSql(ms.getConfiguration(), pageSql, boundSql.getParameterMappings(), parameter);
Map<String, Object> additionalParameters = getAdditionalParameter(boundSql);
//设置动态参数
for (String key : additionalParameters.keySet()) {
pageBoundSql.setAdditionalParameter(key, additionalParameters.get(key));
}
//执行分页查询
return executor.query(ms, parameter, RowBounds.DEFAULT, resultHandler, pageKey, pageBoundSql);
} else {
//不执行分页的情况下,也不执行内存分页
return executor.query(ms, parameter, RowBounds.DEFAULT, resultHandler, cacheKey, boundSql);
}
}
getPageSql方法会根据数据库的类型帮我们拼接limit语句。比如我用的mysql就会调用com.github.pagehelper.dialect.helper.MySqlDialect#getPageSql:
@Overridepublic String getPageSql(String sql, Page page, CacheKey pageKey){
StringBuilder sqlBuilder = new StringBuilder(sql.length() + 14);
sqlBuilder.append(sql);
if (page.getStartRow() == 0) {
sqlBuilder.append(" LIMIT ? ");
} else {
sqlBuilder.append(" LIMIT ?, ? ");
}
return sqlBuilder.toString();
}
然后就调用query的6参方法执行sql,拿到结果并返回了。
也就是说引入pageHelper后,分页查询所执行的sql操作都是在intercept中处理的。
以上是 揭秘pagehelper背后的秘密 的全部内容, 来源链接: utcz.com/a/28944.html