iOS事件传递和响应机制
开场白
iOS开发这么多年,其实重来就没关心过时间传递和响应机制这么个事。当我看到这篇文章史上最详细的iOS之事件的传递和响应机制-原理篇后,发现其中有很多东西可以细细品味一下的。
1.简述事件流程
整个事件传递和处理流程,简单概括为:
事件-事件传递到指定界面-找到可响应的界面-响应
我开始的理解误区就是‘传递到指定界面’和‘可响应界面’理解成同一个界面了,造成我在看上面的文章的时候,有些混乱。其实这两个可以是两个界面。
例如:我在touchBegin一个view的时候,需求是view不响应,而superview响应。而事件传递是传递到view中。这种情况两个view就是不相同的界面。
2.事件传递
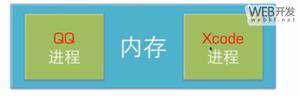
- 当有用户触摸屏幕的时候产生事件,系统硬件进程获取到这个事件,并处理封装保存在系统中,由于系统硬件进程和app进程是两个不同的进程,所以使用进程间的端口通信。
- 系统会将这个事件加入到UIApplication的事件管理队列中,事件从队列中出队后通常会发送给app的keywindow处理。
- keywindow会找到一个最适合的视图去处理事件。也就是从super控件到子控件中。
- 简单总结:UIApplication->window->寻找处理事件最合适的view
2.1 找到适合视图的过程
- 首先keywindow是可以接受事件的
- 判断是否事件发生在自己的可视范围内,例如:触摸点击在自己的bound中。
- 子控件数组按照从后往前的顺序查找适合的子控件,重复步骤1和步骤2。(从后往前的意思就是subviews中从最后一个元素开始向前找,这种方式可以减少遍历次数,提高效率)
- 找到子控件后再继续找它的子控件。
- 如果没有找到合适的子控件,那么当前的控件就是最适合的。
2.2 UIView不能接收触摸事件的三种情况
- 不允许交互:userInteractionEnabled = NO,例如UIImageView中addSubview一个button,button的点击是没有反应的。
- 隐藏:如果把父控件隐藏,那么子控件也会隐藏,隐藏的控件不能接受事件
- 透明度:如果设置一个控件的透明度<0.01,会直接影响子控件的透明度。
如果不想让view处理事件,而是想让superview处理,就可以吧view的userInteractionEnabled设置为no。
2.3 最适合的子控件
系统api中提供了两个方法,
- (nullable UIView *)hitTest:(CGPoint)point withEvent:(nullable UIEvent *)event; // recursively calls -pointInside:withEvent:. point is in the receiver's coordinate system- (BOOL)pointInside:(CGPoint)point withEvent:(nullable UIEvent *)event; // default returns YES if point is in bounds
为了方便:hitTest:withEvent:方法在文章后续用hitTest代替,pointInside:withEvent:用pointInside代替
通过注释了解到hitTest方法是递归的调用pointInside方法。point是在接受控件坐标系内的。
底层的事件传递实现就是:
产生触摸事件->UIApplication事件队列->[UIWindow hitTest:withEvent:]->返回更合适的view->[子控件 hitTest:withEvent:]->返回最合适的view->...->返回最合适的view
2.4 拦截事件传递
我们可以重写hitTest方法,来拦截系统的时间传递,让指定的view处理事件。例如自定义view中,想让view中的一个subview处理事件,就可以在自定义view中重写该方法:
- (UIView *)hitTest:(CGPoint)point withEvent:(UIEvent *)event {if ([self pointInside:point withEvent:event]) {
return self;
}
return nil;
}
示例代码我返回的是self,这里可以改成指定的subview,或者遍历subview中的一个。
3. 响应链
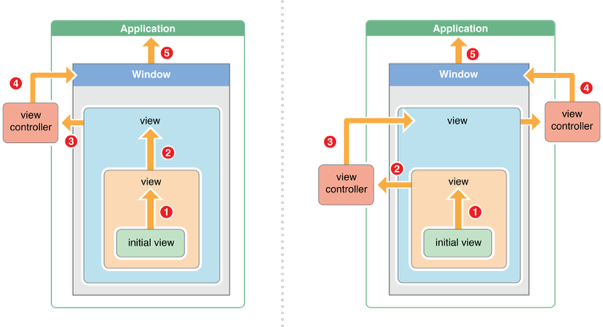
在很多文章中都看到了这张图,不清楚是不是官方,但图片中的逻辑是没有问题的,ios控件间的摆放都是有层级关系的,这张图表示的很清晰。响应者对象就是继承与UIResponder的子类们。
3.1 UIResponder的子类
UIResponder的子类有一下几个:
- AppDelegate
- UIApplication
- UIViewController
- UIView
p.s. UIWindow的父类是UIView
3.2 nextResponder
UIResponder的子类是通过nextResponder进行连接的。
响应链创建方式,本人个人理解,应该是链表的头插法形式:
- AppDelegate作为整个链的根基,是第一个被创建出来的,在main函数中被调用。它的nextResponder为nil。当前链表的状态:AppDelegate->nil
- 系统提供给我们的UIApplication单例,响应链变为:UIApplication->AppDelegate->nil
- UIApplication会创建keyWindow,是UIWindow类型,父类是UIView,也是UIResponder的子类,所以响应链变为:keyWindow->UIApplication->AppDelegate->nil
- keyWindow中会设置一个rootViewController,是UIViewController类型,是UIResponder子类,rootViewController->keyWindow->UIApplication->AppDelegate->nil
- rootViewController中有view,我们在开发中把自定义的view加载vc的view中,最终响应链为:自定义view->superview->rootViewController->keyWindow->UIApplication->AppDelegate->nil
这里只是简单举个例子,其实项目中会有更复杂的层级关系。
3.3 官方文档可以证明
很多人会问如何证明呢,我们来看看官方文档中的解释:
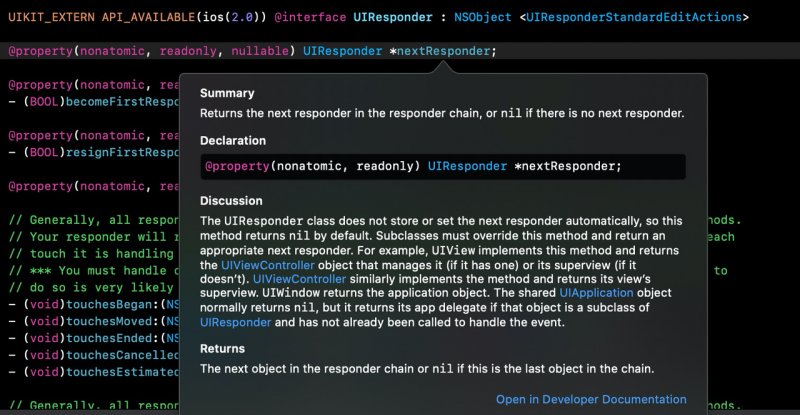
Summary
Returns the next responder in the responder chain, or nil if there is no next responder.
返回响应者链中的下一个响应者,如没有下一个响应者返回nil。
Disussion
The UIResponder class does not store or set the next responder automatically, so this method returns nil by default. Subclasses must override this method and return an appropriate next responder. For example, UIView implements this method and returns the UIViewController object that manages it (if it has one) or its superview (if it doesn’t). UIViewController similarly implements the method and returns its view’s superview. UIWindow returns the application object. The shared UIApplication object normally returns nil, but it returns its app delegate if that object is a subclass of UIResponder and has not already been called to handle the event.
UIResponder类不会自动存储和设置下一个响应者(next responder),这个方法默认返回nil。子类必须复写这个方法并且返回一个合适的下一个响应者。例如,UIView实现这个方法,如果是被UIViewController对象管理的下一个响应者就是UIViewController;如不哦不是被UIViewController对象管理的,下一个响应者就是superview。UIViewController同样实现这个方法,并且返回它自己view的superview。UIWindow返回application对象。shared UIApplication对象通常返回nil,但是如果该对象是一个UIRespnder的子类并且还没有被调用去处理事件,它返回的是app的delegate。
3.4 事件响应链中的传递
通过上面例子中的响应链自定义view->superview->rootViewController->keyWindow->UIApplication->AppDelegate->nil的顺序,逐层向后查找可做响应的响应者(UIResponder子类)。
如果多层有实现了UIResponder的相关方法,例如touchesBegan,这多层都可以响应。
举个例子:
vc中init一个自定义的TestView,并且在vc和TestView中都实现了touchesBegan方法
vc部分代码:
@implementation ViewController- (void)viewDidLoad {
[super viewDidLoad];
// Do any additional setup after loading the view.
self.view.backgroundColor = UIColor.lightGrayColor;
TestView *view1 = [[TestView alloc] initWithFrame:CGRectMake(100, 100, 200, 100)];
view1.tag = 1;
view1.backgroundColor = [UIColor redColor];
[self.view addSubview:view1];
}
- (void)touchesBegan:(NSSet<UITouch *> *)touches withEvent:(UIEvent *)event {
NSLog(@"%s", __func__);
[super touchesBegan:touches withEvent:event];
}
TestView部分代码:
@implementation TestView- (void)touchesBegan:(NSSet<UITouch *> *)touches withEvent:(UIEvent *)event {
NSLog(@"%s", __func__);
[super touchesBegan:touches withEvent:event];
}
运行后的效果:
点击红色区域后查看控制台:

TestView和VC的touchesBegan方法都调用了。
注意:TestView中的touchesBegan要调用super touchesBegan,如果不调用,vc中无法打印。因为不调用就不会继续查找响应链中后续的响应者了。vc中touchesBegan中调用了super也是同理目的。
4. 简单总结
事件的传递和响应的区别:
事件的传递是从上到下(父控件到子控件),事件的响应是从下到上(顺着响应者链条向上传递:子控件到父控件)。
5. 应用场景
参考这篇文章:iOS事件响应链中hitTest的应用示例
其中包括:
- 扩大UIButton的响应热区
- 子view超出了父view的bounds响应事件
- 使部分区域失去响应.
- 让非scrollView区域响应scrollView拖拽事件
以上是 iOS事件传递和响应机制 的全部内容, 来源链接: utcz.com/a/28564.html