linux rsync安装 配置 实例详解
Redhat中安装rsync
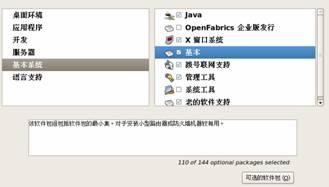
1、 首先在服务端和客户端都安装rsync,我的RHEL5默认已经安装好了。在安装RedHat5的时候,可以在软件定制中的“基本系统”——》“基本”的“可选的软件包”中看见:rsync-2.6.8是默认选择安装的
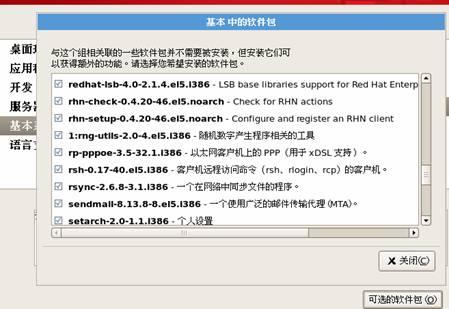
2、 也可以通过命令行检查是否安装:

或者:rpm –q rsync
3、 如果在开始安装RedHat的时候,使用默认选择的rysnc软件,但现在想用更高版本的rsync,可以卸载掉rysnc,再安装更高版本的软件:

4、 卸载完2.6.8版本的rysnc,下面来安装更高版本的rsync(3.0.9):

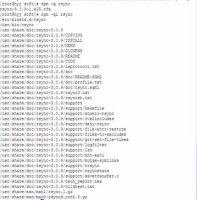
配置rsync服务器端
5、 修改rsync的配置文件

可以看到rysnc服务是关闭的(disable = yes),这里把它开启,把disable的值改为no
6、 创建rsync服务器配置文件/etc/rsyncd.conf
[root@hyj etc]# vim /etc/rsyncd.conf
uid = root
gid = root
port = 873 # 指定运行端口,默认是873,您可以自己指定
hosts allow = 192.168.0.204, 192.168.1.205 # 允许访问的客户机
#hosts deny = 0.0.0.0/32 #拒绝访问的
use chroot =
max connections =
timeout=
## 下面这些绿色文件是安装完RSYNC服务后自动生成的文件,当然也可以手动配置到指定路径
pid file = /var/run/rsyncd.pid ##pid文件的存放
lock file = /var/run/rsync.lock ##锁文件的存放位置
log file = /var/log/rsyncd.log ##日志记录文件的存放
#motd file = /etc/rsyncd.motd #欢迎
## 上面这段是全局配置,下面的模块可以有
[test] ## 模块名字,自己命名
path = /home/hyj/workspace/test #指定文件目录所在位置,这是必须指定
comment = rsync files ## 注释
ignore errors ##忽略IO
read only = yes
list = no ## 是否把rsync 服务器上提供同步数据的目录显示
## 下面这一行,同步验证时用的账号,如果没有这项就是匿名同步,client同步时不用用户名也能同步。
auth users = rsync
secrets file = /etc/rsync.passwd ## 指定认证文件
7、 然后创建认证文件:
[root@hyj etc]# vim /etc/rsync.passwd
rsync:hyl ## 用户名:密码。注意这个不是系统用户,只是rsync用户。
所以不用useradd。
(名字随便写,只要和上边配置文件里的“auth users”参数一致即可),格式(一行一个用户)
账号:密码
(2)、把密码文件的权限改成600
[root@hyj etc]# chmod 600 /etc/rsync.passwd ## 只能所有者可读,否则报错
8、 如果在配置文件中指定了欢迎信息,在/etc下创建rsyncd.motd,设置欢迎信息:
[root@hyj etc]# vim /etc/rsyncd.motd
Welcome the rsync services!
启动rsyn
9、 在启动之前,可以先看一下rsync是否已经启动运行:用lsof或者nestat都可以

根据输出显示state为LISTEN,表示为等待接受链接的状态,说明rsync已经启动。
现在先kill掉rsync进程,kill之前为上图,kill之后,再次执行netstat –anp|grep 873或者lsof –i:873,结果为空:

10、 防火墙设置:
如果服务器上装有防火墙,需在服务器中设置iptables将837端口开放。
[root@hyj ~]# iptables -A INPUT -p tcp --dport 873 -j ACCEPT
11、 如果rsync进程没有运行,在server端将rsync启动:
(1)、启动rsync服务端(以守护进程形式,独立启动)
#/usr/bin/rsync –daemon

说明启动成功。
(切记:命令行启动的最后是daemon,而不是deamon,否则回报如下错误:
rsync: --deamon: unknown option
rsync error: syntax or usage error (code 1) at main.c(1231) [client=2.6.8])
(2)、启动rsync服务端 (以xinetd超级进程启动)
# /etc/rc.d/init.d/xinetd reload(reload是网上的说法,但是我试了一下报错,start可以)
或者:/etc/rc.d/init.d/xinetd reload(reload是网上的说法,但是我试了一下报错,start可以)
演示:
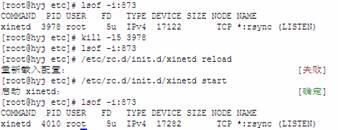
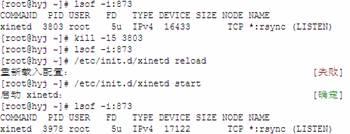
12、 设置自动启动:
本机安装的Redhat中rsync已经是开机自动启动的,网上说的那两种方法,配置文件中都没有找到相应的配置,通过用chkconfig 命令查看和修改开机启动服务.
[root@hyj ~]# chkconfig
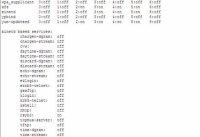
(结果部分省略),可以看出rsync处于on的状态。
配置rsync客户端
13、用安装服务器端的方式安装rsync。
14、启动rsync,如果报如下错误,是因为在etc下没有rsyncd.conf配置文件:

15、[root@hyj etc]# vi /etc/rsyncd.conf
文件内容为空就行。然后启动rsync,可以启动:

命令和实例
16、Rsync的命令格式可以为以下六种:
rsync [OPTION]... SRC DEST
rsync [OPTION]... SRC [USER@]HOST:DEST
rsync [OPTION]... [USER@]HOST:SRC DEST
rsync [OPTION]... [USER@]HOST::SRC DEST
rsync [OPTION]... SRC [USER@]HOST::DEST
rsync [OPTION]... rsync://[USER@]HOST[:PORT]/SRC [DEST]
17、常用为以下两种:
(4)、rsync [OPTION]... [USER@]HOST::SRC DEST
从远程rsync服务器中拷贝文件到本地机。当SRC路径信息包含"::"分隔符时启动该模式。
如:rsync -av root@172.16.78.192::www /databack
(5)、rsync [OPTION]... SRC [USER@]HOST::DEST
从本地机器拷贝文件到远程rsync服务器中。当DST路径信息包含"::"分隔符时启动该模式。
如:rsync -av /databack root@172.16.78.192::www
18、下面为实例:
服务器ip为192.168.8.126,客户端ip为192.168.8.122
19、 (1)、把服务器上的/home/hyj/workspace/test文件夹中的内容备份到客户端的/usr/local/share/rsync_backup中:
[root@hyj ~]# /usr/bin/rsync -vzrtopg --delete --progress rsync@192.168.8.126::test /usr/local/share/rsync_backup
/etc/rsyncd.conf中模块的内容:
path = /home/hyj/workspace/test
comment = rsync files
ignore errors
read only = yes
list = no
auth users = rsync
secrets file = /etc/rsync.passwd
上面这个命令行中-vzrtopg里的v是verbose,z是压缩,r是recursive,topg都是保持文件原有属性如属主、时间的参数(也可以用直接用a来代替rtopg, a为 --archive 归档模式,表示以递归方式传输文件,并保持所有文件属性,等于-rlptgoD)。--progress是指显示出详细的进度情况,--delete是指如果服务器端删除了这一文件,那么客户端也相应把文件删除,保持真正的一致。
(2)、上面的命令需要在备份的时候需要输入密码,可以在客户端建立一个密码文件,在命令中把密码文件作为参数带入:
[root@hyj rsync_backup]# vim /etc/rsync.pass
密码文件中不用输入用户名,只需输入密码即可:

这份密码文件权限属性要设得只有root可读,不然会报错,修改属性:
[root@hyj rsync_backup]# chmod 600 /etc/rsync.pass,
用下面这条命令,可以不输入密码:
/usr/bin/rsync -vzrtopg --delete --progress rsync@192.168.8.126::test /usr/local/share/rsync_backup --password-file=/etc/rsync.pass
20、 带exclude 参数:
把服务器上的/home/hyj/workspace/test文件夹中的内容备份到客户端的/usr/local/share/rsync_backup中,但不包括:res目录和default.properties文件:
/usr/bin/rsync -vzrtopg --delete --exclude "res/" --exclude "default.properties" --progress rsync@192.168.8.126::test /usr/local/share/rsync_backup --password-file=/etc/rsync.pass
exclude/include规则实例
Here are some exclude/include examples:
--exclude "*.o" would exclude all filenames matching *.o
--exclude "/foo" would exclude a file in the base directory called foo
--exclude "foo/" would exclude any directory called foo.
--exclude "/foobar" would exclude any file called bar two or more levels below a base directory called foo.
--include "*/" --include "*.c" --exclude "*" would include all directories and C source files
--include "foo/" --include "foo/bar.c" --exclude "*" would include only foo/bar.c
(the foo/ directory must be explicitly included or it would be excluded by the "*")
21、 把客户端上的/home/hyj/vitest文件夹中的内容备份到服务器的/usr/local/share/rsync_backup中,在客户端执行如下命令:
/usr/bin/rsync -vzrtopg --delete --progress /home/hyj/vitest rsync@192.168.8.126::clientdata --password-file=/etc/rsync.pass
此时服务器的配置文件/etc/rsyncd.conf内容为:
uid = root
gid = root
hosts allow = 192.168.8.122, 192.168.8.123
#hosts deny = 0.0.0.0/32
use chroot = no
max connections = 10
pid file = /var/run/rsyncd.pid
lock file = /var/run/rsync.lock
log file = /var/log/rsyncd.log
timeout=600
[test]
path = /home/hyj/workspace/test
comment = rsync files
ignore errors
read only = yes
list = no
auth users = rsync
secrets file = /etc/rsync.passwd
# 上面的命令中,客户端的数据备份到clientdata模块中,备份到/usr/local/share/rsync_backup文件夹下,read only改为no,# # 否则会报ERROR: module is read only的错误
[clientdata]
path = /usr/local/share/rsync_backup
comment = rsync files
ignore errors
read only = no
list = no
auth users = rsync
secrets file = /etc/rsync.passwd
定时计划备份
22、 如果执行crontab命令提示:
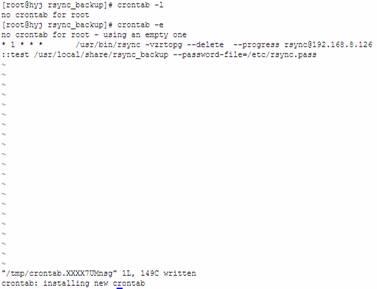
说明还没有为root这个账号提供crontab。执行crontab –e 创建一个crontab:
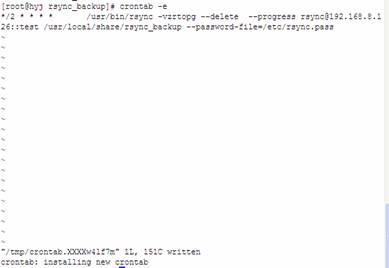
23、 编辑crontab,每两分钟备份一次:

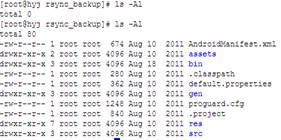
24、 两分钟后,查看,数据已经备份:
25、 每天上午9点20执行rysnc备份任务:
20 9 * * * /usr/bin/rsync -vzrtopg --delete --progress rsync@192.168.8.126::test /usr/local/share/rsync_backup --password-file=/etc/rsync.pass

26、附时间设置:
(1)、查看当前时区 : date -R
(2)、查看时间和日期:date
(3)、设置时间和日期:
将系统日期设定成2012年8月4日的命令:date -s 08/04/2012
将系统时间设定成下午9点20分0秒的命令:date -s 09:20:00
(4)、将当前时间和日期写入BIOS,避免重启后失效:hwclock -w
FAQ
27、我需要在防火墙上开放哪些端口以适应rsync?
A:视情况而定
rsync可以直接通过873端口的tcp连接传文件,也可以通过22端口的ssh来进行文件传递,但你也可以通过下列命令改变它的端口:
rsync --port 8730 otherhost::
或者
rsync -e 'ssh -p 2002' otherhost:
28、 我如何通过rsync只复制目录结构,忽略掉文件呢?
A:rsync -av --include '*/' --exclude '*' source-dir dest-dir
常见错误
29、rsync: failed to connect to 218.107.243.2: No route to host (113)
rsync error: error in socket IO (code 10) at clientserver.c(104) [receiver=2.6.9]
解决:对方没开机、防火墙阻挡、通过的网络上有防火墙阻挡,都有可能。关闭防火墙,其实就是把tcp udp 的873端口打开:
解决办法:打开服务器873端口(RH-Firewall-1-INPUT为REHL 5自带的链名,10为最后一条默认规则(拒绝所以),根据实际情况修改这两个参数。另外“-m state --state NEW -m tcp”参数不加也行)
#iptables -I RH-Firewall-1-INPUT 10 -p tcp -m state --state NEW -m tcp --dport 873 -j ACCEPT
#iptables -I RH-Firewall-1-INPUT 10 -p udp -m state --state NEW -m udp --dport 873 -j ACCEPT
打开端口之前的iptables配置:
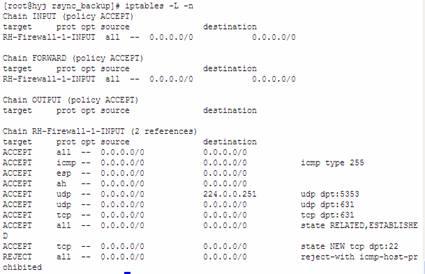
注:最后一条规则(REJECT all -- anywhere anywhere reject-with icmp-host-prohibited)表示拒绝所有的数据包,并向对方回应icmp-host- prohibited数据包。
本机测试通过的方法,打开服务器873端口:
(1)、[root@duoduo ~]# iptables -I INPUT -p tcp --dport 873 -j
[root@duoduo ~]# iptables -I INPUT -p udp --dport 873 -j ACCEPT
(注意要用-I,而不能用-A,用A的话会添加这条规则到iptables链的最后,但是没有到这条规则就被原来的最后一条REJECT了,客户端还是无法执行rysnc备份,用I的话会插入到链的最前面,经过测试可以正常执行rysnc备份。另外“-m state --state NEW -m tcp”参数可以加上)。
(2)、上面提到的,插入规则到最后一条的前面:
#iptables -I RH-Firewall-1-INPUT 10 -p tcp -m state --state NEW -m tcp --dport 873 -j ACCEPT
#iptables -I RH-Firewall-1-INPUT 10 -p udp -m state --state NEW -m udp --dport 873 -j ACCEPT
插入之前:
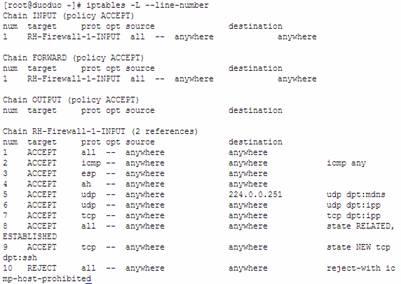
插入规则:


插入规则后:
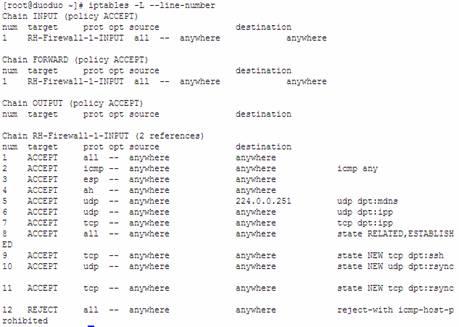
再在客户端执行,可以正常执行。
(3)、或者关闭服务器的iptables:service iptables stop
30、password file must not be other-accessible
continuing without password file
Password:
解决:这是因为rsyncd.pwd rsyncd.sec的权限不对,应该设置为600。如:chmod 600 rsyncd.pwd
31、@ERROR: auth failed on module xxxxx
rsync: connection unexpectedly closed (90 bytes read so far)
rsync error: error in rsync protocol data stream (code 12) at io.c(150)
解决:这是因为密码设置错了,无法登入成功,检查一下rsync.pwd,看客服是否匹配。还有服务器端没启动rsync 服务也会出现这种情况。
32、@ERROR: chroot failed
rsync: connection unexpectedly closed (75 bytes read so far)
rsync error: error in rsync protocol data stream (code 12) at io.c(150)
解决:这是因为你在 rsync.conf 中设置的 path 路径不存在,要新建目录才能开启同步。
33、[root@hyj rsync_backup]# /usr/bin/rsync -vzrtopg --delete --exclude "res/" --exclude "default.properties" --progress rsync@192.168.8.126::test /usr/local/share/rsync_backup --password-file=/etc/rsync.pass
@ERROR: chdir failed
rsync error: error starting client-server protocol (code 5) at main.c(1516) [Receiver=3.0.9]
原因及解决办法:
SELinux;(下面这条命令在服务器端执行)
setsebool -P rsync_disable_trans on
34、ERROR: module is read only
rsync: read error: Software caused connection abort (113)
rsync error: error in rsync protocol data stream (code 12) at io.c(769) [sender=3.0.8]
解决:这是因为服务器端配置文件rsyncd.conf中read only = yes,为只读,即不允许客户端上传文件,改成no就可以了。
以上是 linux rsync安装 配置 实例详解 的全部内容, 来源链接: utcz.com/a/255794.html


