Nginx反向代理实现支持长连接详解
前言
Nginx upstream与后端的连接默认为短连接,通过HTTP/1.0向后端发起连接,并把请求的"Connection" header设为"close"。Nginx与前端的连接默认为长连接,一个用户跟Nginx建立连接之后,通过这个长连接发送多个请求。如果Nginx只是作为reverse proxy的话,可能一个用户连接就需要多个向后端的短连接。如果后端的服务器(源站或是缓存服务器)处理并发连接能力不强的话,就可能导致瓶颈的出现。
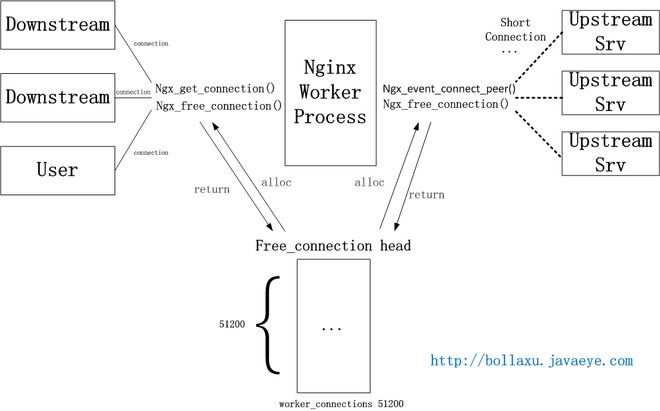
Nginx目前的upstream连接建立和获取的机制如下图。Nginx会在一开始创建connection pool(进程间不共享,可以避免锁),提供给所有向前/后的连接。
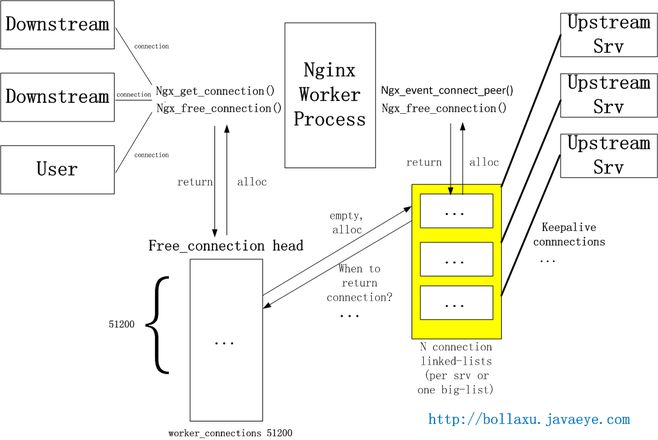
如果要实现upstream长连接,则每个进程需要另外一个connection pool,里面都是长连接。一旦与后端服务器建立连接,则在当前请求连接结束之后不会立即关闭连接,而是把用完的连接保存在一个keepalive connection pool里面,以后每次需要建立向后连接的时候,只需要从这个连接池里面找,如果找到合适的连接的话,就可以直接来用这个连接,不需要重新创建socket或者发起connect()。这样既省下建立连接时三次握手的时间消耗,又可以避免TCP连接的slow start。如果在keepalive连接池找不到合适的连接,那就按照原来的步骤重新建立连接。假设连接查找时间可以忽略不计,那么这种方法肯定是有益而无害的(当然,需要少量额外的内存)。
具体如何来设计这个keepalive connection pool,不同人有不同的选择。比如Nginx目前的第三方模块upstream keepalive(作者Maxim Dounin)使用了一个queue来做。因为upstream的服务器很可能是多个,所以可能当保持的连接数多的时候,查找的时间可能会较长。可以给每个upstream服务器都分配一个pool(queue),缩短查找时间。但是总体来说内存操作很快,影响不会很大。upstream keepalive模块目前只支持memcached,但是可以重用其代码来达到对http upstream的长连接。由于Nginx作者之前没有考虑upstream的长连接,所以在设计上要把http upstream keepalive模块化可能比较难,只能通过手动修改代码来做到。
一个完整的让upstream支持长连接的配置示例如下:
#user nobody;
worker_processes 1;
#error_log logs/error.log;
#error_log logs/error.log notice;
#error_log logs/error.log info;
#pid logs/nginx.pid;
events {
worker_connections 1024;
}
http {
include mime.types;
default_type application/octet-stream;
#log_format main '$remote_addr - $remote_user [$time_local] "$request" '
# '$status $body_bytes_sent "$http_referer" '
# '"$http_user_agent" "$http_x_forwarded_for"';
#access_log logs/access.log main;
client_max_body_size 20M;
client_header_buffer_size 32k;
large_client_header_buffers 4 32k;
sendfile on;
#tcp_nopush on;
#keepalive_timeout 0;
keepalive_timeout 65;
#gzip on;
proxy_buffer_size 64k;
proxy_buffers 32 32k;
proxy_busy_buffers_size 128k;
upstream aauCfg_backend {
server 127.0.0.1:97;
keepalive 16;
}
upstream HFC_backend {
server 127.0.0.1:8090;
keepalive 16;
}
upstream manager_backend {
server 127.0.0.1:8095;
keepalive 16;
}
server {
listen 80;
server_name localhost;
#charset koi8-r;
#access_log logs/host.access.log main;
root html/tools;
index index.html index.htm index.php;
proxy_http_version 1.1;
proxy_set_header Connection "";
proxy_set_header Host $host;
proxy_set_header X-Real_IP $remote_addr;
proxy_set_header X-Forwarded-For $proxy_add_x_forwarded_for;
location / {
if (!-e $request_filename) {
#rewrite ^/(.*)$ /index.php/$1 last;
#break;
rewrite ^/(.*)$ /index.php/$1;
}
}
location ~* \.(ico|css|js|gif|jpe?g|png)(\?[0-9]+)?$ {
expires max;
log_not_found off;
}
location ^~ /aauCfg/ {
#proxy_pass http://$remote_addr:97$request_uri;
proxy_pass http://aauCfg_backend;
}
location ^~ /HFC/ {
#proxy_pass http://$remote_addr:8090$request_uri;
proxy_pass http://HFC_backend;
}
location ^~ /manager/ {
#proxy_pass http://$remote_addr:8095$request_uri;
proxy_pass http://manager_backend;
}
#error_page 404 /404.html;
# redirect server error pages to the static page /50x.html
#
error_page 500 502 503 504 /50x.html;
location = /50x.html {
root html;
}
# proxy the PHP scripts to Apache listening on 127.0.0.1:80
#
#location ~ \.php$ {
# proxy_pass http://127.0.0.1;
#}
# pass the PHP scripts to FastCGI server listening on 127.0.0.1:9000
#
#location ~ \.php$ {
# fastcgi_pass 127.0.0.1:9000;
# fastcgi_index index.php;
# fastcgi_param SCRIPT_FILENAME $document_root$fastcgi_script_name;
# include fastcgi_params;
#}
location ~ .php
{
fastcgi_pass 127.0.0.1:9000;
fastcgi_index index.php;
fastcgi_param SCRIPT_FILENAME $document_root$fastcgi_script_name;
include fastcgi.conf;
include fastcgi_params;
#定义变量 $path_info ,用于存放pathinfo信息
set $path_info "";
#定义变量 $real_script_name,用于存放真实地址
set $real_script_name $fastcgi_script_name;
#如果地址与引号内的正则表达式匹配
if ($fastcgi_script_name ~ "^(.+?\.php)(/.+)$") {
#将文件地址赋值给变量 $real_script_name
set $real_script_name $1;
#将文件地址后的参数赋值给变量 $path_info
set $path_info $2;
}
#配置fastcgi的一些参数
fastcgi_param SCRIPT_FILENAME $document_root$real_script_name;
fastcgi_param SCRIPT_NAME $real_script_name;
fastcgi_param PATH_INFO $path_info;
}
# deny access to .htaccess files, if Apache's document root
# concurs with nginx's one
#
#location ~ /\.ht {
# deny all;
#}
}
# another virtual host using mix of IP-, name-, and port-based configuration
#
#server {
# listen 8000;
# listen somename:8080;
# server_name somename alias another.alias;
# location / {
# root html;
# index index.html index.htm;
# }
#}
# HTTPS server
#
#server {
# listen 443 ssl;
# server_name localhost;
# ssl_certificate cert.pem;
# ssl_certificate_key cert.key;
# ssl_session_cache shared:SSL:1m;
# ssl_session_timeout 5m;
# ssl_ciphers HIGH:!aNULL:!MD5;
# ssl_prefer_server_ciphers on;
# location / {
# root html;
# index index.html index.htm;
# }
#}
}
总结
以上就是这篇文章的全部内容了,希望本文的内容对大家的学习或者工作能带来一定的帮助,如果有疑问大家可以留言交流,谢谢大家对的支持。
参考:
http://nginx.org/en/docs/http/ngx_http_proxy_module.html#proxy_http_version
http://nginx.org/en/docs/http/ngx_http_upstream_module.html#keepalive
以上是 Nginx反向代理实现支持长连接详解 的全部内容, 来源链接: utcz.com/a/252674.html