源码分析之Koa和XHR

对于前端开发者来说,koa和xhr都再熟悉不过了。Koa 是Node.js 的 Web 框架。由 Express 团队设计。旨在提供一个更小型、更富有表现力、更可靠的 Web 应用和API的开发基础。XHR是用来向服务器发送请求的。但我们在使用它们的时候都是直接使用它们的API,似乎忘记了它们原生的底层实现。这篇文章我就来和大家聊聊它们的源码分析。
Koa源码实现
- 使用koa
const Koa = require("koa");const app = new Koa();
app.use((ctx) => {
ctx.body = 'Hello World!'
})
app.listen(3000)
这就是我们koa的使用了。其中ctx是koa的一大发明,它是koa的上下文。ctx包含了req和res。以上代码其实就是一个http服务,源码实现其实也就是要考虑在Node里的哪个模块的哪个方法可以实现在端口上实现服务监听。
- 手写koa
// index.js文件const MyKoa = require("./lib/application");
const app = new MyKoa();
app.use((req, res) => {
res.end('Hello World!')
})
app.listen(3000, () => {
console.log('你的应用在3000端口启动');
});
// application.js文件// 在index.js同级目录下创建lib文件,再创建子文件application.js文件
const http = require('http');
class MyKoa {
constructor() {
console.log('手写koa!')
// 初始化定义属性
this.fn = undefined;
}
// ...args动态接收参数
listen(...args) {
// 启动server传入异步的回调函数给用户反馈
let server = http.createServer(this.fn);
server.listen(...args);
}
use(fn) {
// 利用对象属性保存
this.fn = fn;
}
}
module.exports = MyKoa


在这里请区分一下两个listen: app.listen和server.listen。第一个listen是koa的api,第二个listen是使用node原生代码来实现这个api。
XHR底层实现
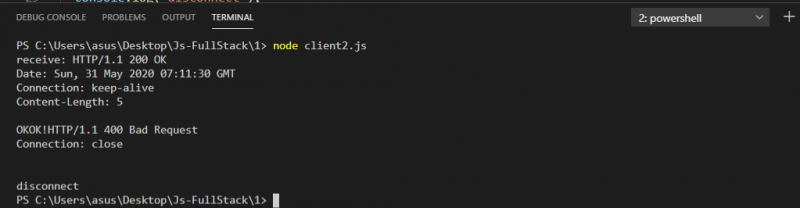
- "石器时代"收发报文
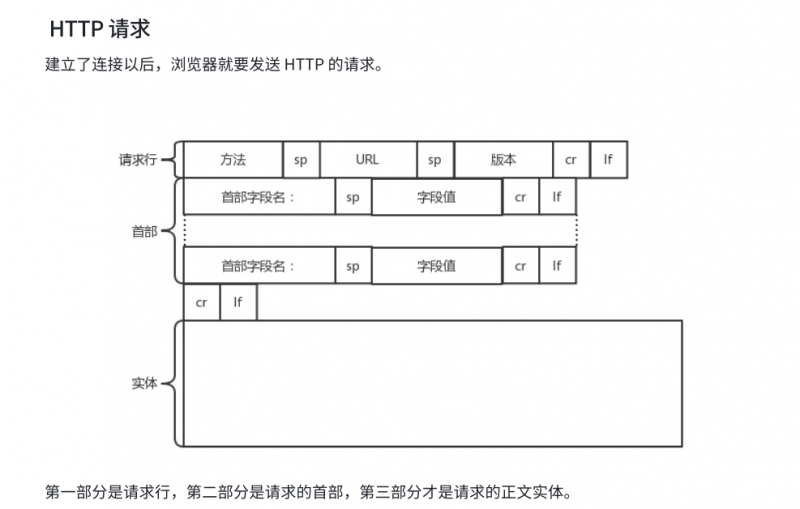
先请熟悉一下HTTP报文的格式,再来看代码会更清楚。
// server.jsconst http = require('http');
http.createServer((req, res) => {
// 向前端返回的内容
res.end('OKOK!');
})
.listen(8088, ()=> {
console.log(8088);
})
// 引入net模块(封装了传输层)const net = require('net');
// 传输层 源端口号 目的地端口号
// 创建请求
// 创建一个到端口port和主机host的TCP连接(去到目的地址发起请求)
const client = net.createConnection({ port: 8088, host: '127.0.0.1' }, () => {
let json = JSON.stringify({a: 1});
// 一行一行拼接报文,空格也不能省
// 不区分URL,使用'/'
// CR LF为行结束符,用rn表示
client.write('POST / HTTP/1.1rn');
client.write('HOST: 127.0.0.1rn');
client.write('Content-Type: application/jsonrn');
// 首部和实体的分隔符
client.write('rn');
client.write(json);
// 报文拼接结束
client.write('rn');
})
// 服务器返回的数据
client.on('data', (data) => {
// 原始数据为Buffer,将其转换为字符串
console.log('receive:', data.toString());
})
// 接收完数据后断开
client.on('end', () => {
console.log('disconnect');
})

- "近现代"收发报文
const net = require('net');class Xmlhttprequest {
constructor() {
// 放入属性保存
// 请求部分
this.method = null;
this.url = null;
this.headers = null;
this.body = null;
// 响应部分
this.resStatusLine = null;
this.resHeaders = null;
this.response = null;
}
// 设置操作
open(method, url) {
this.method = method;
this.url = url;
}
setHeader(headers) {
this.headers = headers;
}
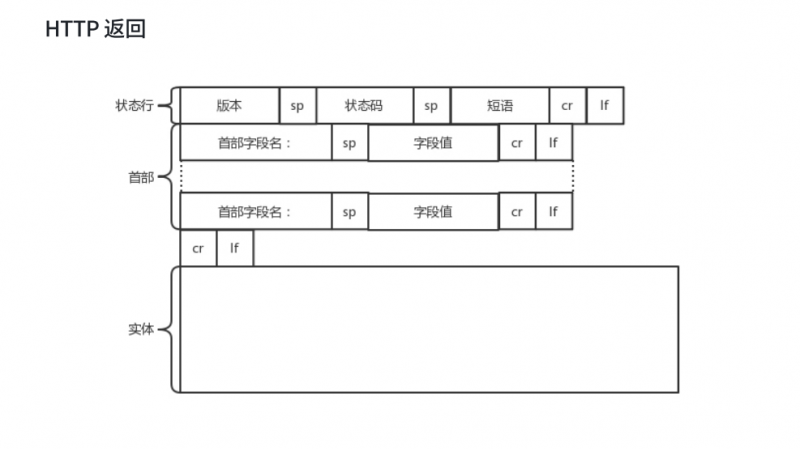
// 切割报文
parse(string) {
const lines = string.split('rn');
console.log(lines);
this.resStatusLine = lines[0];
this.statusCode = this.resStatusLine.split(' ')[1];
this.resHeaders = lines.slice(1, lines.length - 2);
this.response = lines[lines.length - 1];
}
send(body) {
// 浏览器发出http请求后开始拼接http报文
this.body = body;
// 建立连接
const client = net.createConnection({ port: 8088, host: '127.0.0.1' }, () => {
// 拼接报文
client.write(`${this.method}${this.url} HTTP/1.1rnHOST: 127.0.0.1rnContent-Type: application/jsonrnContent-Length: ${this.body.length}rnrn${this.body}rn`)
// 发送完毕
client.end();
})
// 收到后端返回的数据
client.on('data', (chunk) => {
// 服务端返回给浏览器的也是一个原始的http报文
// 解析报文
console.log('receive:', JSON.stringify(chunk.toString()));
// 调用专用的解析函数parse解析报文
this.parse(chunk.toString());
// 接受完数据后调用onload
this.onload();
})
client.on('end', () => {
console.log('disconnect');
})
}
}
// ajax
const xhr = new Xmlhttprequest();
xhr.open("POST", "/");
// 定义请求头
xhr.setHeader({
'Content-Type': 'application/json'
})
// 回调数据加载回来才会调用
xhr.onload = function() {
//
console.log('响应数据:');
// 拿到响应的状态码
console.log(xhr.statusCode)
// 拿到响应的内容
console.log(xhr.response)
// 拿到响应头
console.log(xhr.resHeaders)
}
// 发出请求
xhr.send(JSON.stringify({a: 1}))
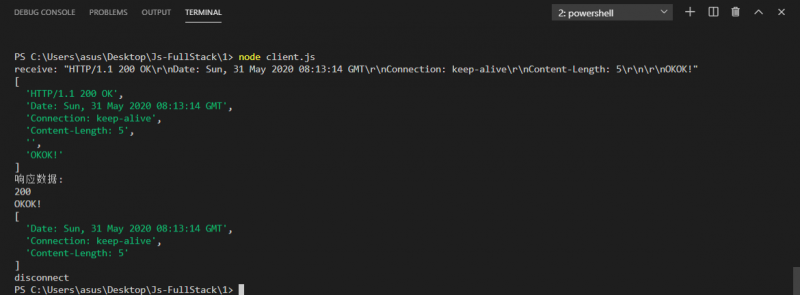
以上解析报文的方法并不是最通用和最"优雅"的方法,它是一种比较古老的方法。但对我们理解底层实现还是有一点帮助的。
总结
在前端学习中,我们会遇到各种各样的框架和API。我们不能只停留在会用的阶段,而是要尽可能地掌握底层实现的原理。毕竟,框架和API会一直更新换代,掌握底层最基本的原理才能以不变应万变。
以上是 源码分析之Koa和XHR 的全部内容, 来源链接: utcz.com/a/19371.html