Springboot 项目集成 Nacos 实现服务注册发现与配置管理
Hello 大家好,我是阿粉,前面的文章给大家介绍了一下如何在本地搭建微服务环境下的服务注册中心和配置管理中心 Nacos,今天通过
我们通过使用 SpringBoot 项目集成 Nacos 来给大家演示一下是如何使用 Nacos 来实现服务发现和配置管理的。
启动 Nacos 服务
启动完本地搭建的 Nacos 服务后,我们可以看到,目前的服务管理下面的服务列表里面在三个命名空间下都没有服务,这是正常的,因为目前我们还没有服务接入 Nacos。

Nacos 服务启动成功后,我们再创建两个 SpringBoot 项目,一个用于接入 Nacos 服务注册与发现和配置中心作为服务提供者 Producer,另一个只接入 Nacos的服务注册与发现,调用 Producer 获取配置中心的参数,我们叫做 Consumer。
服务提供者 Producer
- 我们首先创建一个
SpringBoot的项目,bootstrap.properties文件内容如下:1
2
3
4
5
6
7
8
9
10
11
12
13
14
15
16
17
18
19
20
21
22
23
24spring.application.name=producer#######################配置中心配置#################################
# 指定的命名空间,只会在对应的命名空间下查找对应的配置文件
spring.cloud.nacos.config.namespace=caeser-adsys-naming
spring.cloud.nacos.config.file-extension=properties
# 配置的分组名称
spring.cloud.nacos.config.group=TEST1
# 配置文件,数组形式,可以多个,依次递增
spring.cloud.nacos.config.ext-config[0].data-id=com.example.properties
spring.cloud.nacos.config.ext-config[0].group=TEST1
# 配置中心的地址
spring.cloud.nacos.config.server-addr=127.0.0.1:8848
#启用自动刷新对应的配置文件
spring.cloud.nacos.config.ext-config[0].refresh=true
######################服务注册发现配置##################################
# 服务集群名称
spring.cloud.nacos.discovery.cluster-name=TEST1_GROUP
# 服务注册中心的地址
spring.cloud.nacos.discovery.server-addr=127.0.0.1:8848
# 服务的命名空间
spring.cloud.nacos.discovery.namespace=caeser-adsys-naming
application.properties的文件内容如下,主要就是一个端口,其他配置根据情况自行添加或删除就好:1
2
3
4
5
6
7
8
9
10
11
12
13# 服务启动的端口server.port=8080spring.main.allow-bean-definition-overriding=true
# tomcat 配置
server.tomcat.max-threads=500
spring.mvc.servlet.load-on-startup=1
spring.servlet.multipart.max-file-size=40MB
spring.servlet.multipart.max-request-size=100MB
# 日志配置
logging.level.root=info
logging.level.com.alibaba=error
logging.pattern.console=%clr{[%level]}{green} [%d{yyyy-MM-dd HH:mm:ss}] %clr{[${PID:-}]}{faint} %clr{[%thread]}{magenta} %clr{[%-40.40logger{80}:%line]}{cyan} %msg%n
在启动类上面增加如下注解
1
2
3
4
5
6
7
8
9
10
11
12
13
14
15
16packagecom.ziyou.nacos.demo.producer;importorg.springframework.boot.SpringApplication;
importorg.springframework.boot.autoconfigure.SpringBootApplication;
importorg.springframework.cache.annotation.EnableCaching;
importorg.springframework.cloud.client.discovery.EnableDiscoveryClient;
@SpringBootApplication(scanBasePackages="com.ziyou.nacos")
@EnableDiscoveryClient
@EnableCaching
publicclassProducerApplication{
publicstaticvoidmain(String[]args){
SpringApplication.run(ProducerApplication.class,args);
}
}
pom.xml文件内容如下:1
2
3
4
5
6
7
8
9
10
11
12
13
14
15
16
17
18
19
20
21
22
23
24
25
26
27
28
29
30
31
32
33
34
35
36
37
38
39
40
41
42
43
44
45
46
47
48
49
50
51
52
53
54
55
56
57
58
59
60
61
62
63
64
65
66
67
68
69
70
71
72
73
74
75
76
77
78
79
80
81
82
83
84
85
86
87
88<?xml version="1.0" encoding="UTF-8"?><projectxmlns="http://maven.apache.org/POM/4.0.0"xmlns:xsi="http://www.w3.org/2001/XMLSchema-instance"
xsi:schemaLocation="http://maven.apache.org/POM/4.0.0 http://maven.apache.org/xsd/maven-4.0.0.xsd">
<modelVersion>4.0.0</modelVersion>
<parent>
<groupId>org.example</groupId>
<artifactId>nacos-demo</artifactId>
<version>1.0-SNAPSHOT</version>
</parent>
<artifactId>producer</artifactId>
<version>1.0-SNAPSHOT</version>
<name>producer Maven Webapp</name>
<!-- FIXME change it to the project's website -->
<url>http://www.example.com</url>
<properties>
<project.build.sourceEncoding>UTF-8</project.build.sourceEncoding>
<maven.compiler.source>1.7</maven.compiler.source>
<maven.compiler.target>1.7</maven.compiler.target>
<spring.maven.plugin.version>2.2.2.RELEASE</spring.maven.plugin.version>
</properties>
<dependencies>
<!-- Spring Boot -->
<groupId>org.springframework.boot</groupId>
<artifactId>spring-boot-starter</artifactId>
<exclusions>
<exclusion>
<groupId>org.springframework.boot</groupId>
<artifactId>spring-boot-starter-logging</artifactId>
</exclusion>
</exclusions>
</dependency>
<dependency>
<groupId>org.springframework.boot</groupId>
<artifactId>spring-boot-starter-log4j2</artifactId>
</dependency>
<dependency>
<groupId>org.springframework.boot</groupId>
<artifactId>spring-boot-starter-web</artifactId>
</dependency>
<!-- nacos 配置中心 -->
<dependency>
<groupId>com.alibaba.cloud</groupId>
<artifactId>spring-cloud-starter-alibaba-nacos-config</artifactId>
</dependency>
<!-- nacos 注册发现 -->
<dependency>
<groupId>com.alibaba.cloud</groupId>
<artifactId>spring-cloud-starter-alibaba-nacos-discovery</artifactId>
</dependency>
</dependencies>
<build>
<!--指定下面的目录为资源文件-->
<resources>
<!--设置自动替换-->
<resource>
<directory>src/main/resources</directory>
<filtering>true</filtering>
<includes>
<include>**/**</include>
</includes>
</resource>
</resources>
<finalName>producer</finalName>
<plugins>
<plugin>
<groupId>org.springframework.boot</groupId>
<artifactId>spring-boot-maven-plugin</artifactId>
<version>${spring.maven.plugin.version}</version>
<executions>
<execution>
<goals>
<goal>repackage</goal>
</goals>
</execution>
</executions>
</plugin>
</plugins>
</build>
</project>
在
Producer侧提供一个获取配置里面内容的接口,代码如下:1
2
3
4
5
6
7
8
9
10
11
12
13
14
15
16
17
18
19
20
21
22
23
24
25
26
27
28
29
30
31
32
33packagecom.ziyou.nacos.demo.producer.controller;importcom.ziyou.nacos.demo.producer.config.UserConfig;
importorg.springframework.beans.factory.annotation.Autowired;
importorg.springframework.web.bind.annotation.GetMapping;
importorg.springframework.web.bind.annotation.RequestMapping;
importorg.springframework.web.bind.annotation.RestController;
/**
* <br>
* <b>Function:</b><br>
* <b>Author:</b>@author ziyou<br>
* <b>Date:</b>2021-04-11 19:59<br>
* <b>Desc:</b>无<br>
*/
@RestController
@RequestMapping(value="producer")
publicclassProducerController{
privateUserConfiguserConfig;
@GetMapping("/getUsername")
privateStringgetUsername(){
Stringresult=userConfig.getUsername()+"-"+userConfig.getPassword();
System.out.println(result);
returnresult;
}
@Autowired
publicvoidsetUserConfig(UserConfiguserConfig){
this.userConfig=userConfig;
}
}
1
2
3
4
5
6
7
8
9
10
11
12
13
14
15
16
17
18
19
20
21
22
23
24
25
26
27
28
29
30
31
32
33
34
35
36
37
38packagecom.ziyou.nacos.demo.producer.config;importorg.springframework.beans.factory.annotation.Value;
importorg.springframework.cloud.context.config.annotation.RefreshScope;
importorg.springframework.stereotype.Component;
/**
* <br>
* <b>Function:</b><br>
* <b>Author:</b>@author ziyou<br>
* <b>Date:</b>2021-04-11 20:39<br>
* <b>Desc:</b>无<br>
*/
@RefreshScope
@Component
publicclassUserConfig{
@Value("${username}")
privateStringusername;
@Value("${password}")
privateStringpassword;
publicStringgetUsername(){
returnusername;
}
publicvoidsetUsername(Stringusername){
this.username=username;
}
publicStringgetPassword(){
returnpassword;
}
publicvoidsetPassword(Stringpassword){
this.password=password;
}
}
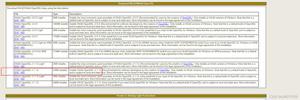
启动
Producer,并且手动调用接口,启动Producer过后,我们在Nacos的服务注册列表可以看如下所示的内容,在test1的命名空间下,已经有了我们创建的Producer服务。
通过手动调用
Producer的接口http://127.0.0.1:8080/producer/getUsername显示如下内容 并且我们看下此时
 Nacos的配置中心里面配置文件com.example.properties里面的内容正是这个,这个时候我们手动把配置里面password参数的值改成JavaGeek666,再次访问接口,我们会发现接口的输出也自动改变了。
修改配置内容如下:

再次访问结果如下:

服务调用者 Consumer
前面我们已经完成了 Producer 的服务注册与配置动态生效的功能,这个时候基本已经可以使用了,不过我们还需要更进一步通过 Nacos 来实现服务发现,接下来我们创建 Consumer 的 SpringBoot 的项目,配置文件和pom.xml 文件基本一致,只要修改端口以及对应地方,下面贴一下不一样的地方
boostrap.properties内容如下,因为这里我们只调用Producer的接口,不需要接入Nacos的配置中心,所以这里只配置发服务注册与发现1
2
3
4
5
6spring.application.name=consumer######################服务注册发现配置##################################
spring.cloud.nacos.discovery.cluster-name=TEST1_GROUP
spring.cloud.nacos.discovery.server-addr=127.0.0.1:8848
spring.cloud.nacos.discovery.namespace=caeser-adsys-naming
启动类,配置上
feignClient需要扫描的包路径1
2
3
4
5
6
7
8
9
10
11
12
13
14
15
16
17
18
19
20
21
22
23packagecom.ziyou.nacos.demo.consumer;importorg.springframework.boot.SpringApplication;
importorg.springframework.boot.autoconfigure.SpringBootApplication;
importorg.springframework.cache.annotation.EnableCaching;
importorg.springframework.cloud.openfeign.EnableFeignClients;
/**
* <br>
* <b>Function:</b><br>
* <b>Author:</b>@author ziyou<br>
* <b>Date:</b>2021-04-11 17:07<br>
* <b>Desc:</b>无<br>
*/
@SpringBootApplication(scanBasePackages="com.ziyou.nacos")
@EnableFeignClients(basePackages={"com.ziyou.nacos.demo.consumer.rpc"})
@EnableCaching
publicclassConsumerApplication{
publicstaticvoidmain(String[]args){
SpringApplication.run(ConsumerApplication.class,args);
}
}
编写调用
Producer的接口,FeignClient里面的value就是Producer的应用名称1
2
3
4
5
6
7
8
9
10
11
12
13
14
15
16
17
18
19
20
21
22
23
24
25
26packagecom.ziyou.nacos.demo.consumer.rpc;importorg.springframework.cloud.openfeign.FeignClient;
importorg.springframework.stereotype.Component;
importorg.springframework.web.bind.annotation.GetMapping;
/**
* <br>
* <b>Function:</b><br>
* <b>Author:</b>@author ziyou<br>
* <b>Date:</b>2021-04-11 20:01<br>
* <b>Desc:</b>无<br>
*/
@FeignClient(value="producer")
@Component
publicinterfaceIProducerFeign{
/**
* 获取生产者名称接口
*
* @return
*/
@GetMapping("/producer/getUsername")
StringgetUsername();
}
1
2
3
4
5
6
7
8
9
10
11
12
13
14
15
16
17
18
19
20
21
22
23
24
25
26
27
28
29
30
31
32packagecom.ziyou.nacos.demo.consumer.controller;importcom.ziyou.nacos.demo.consumer.rpc.IProducerFeign;
importorg.springframework.beans.factory.annotation.Autowired;
importorg.springframework.web.bind.annotation.GetMapping;
importorg.springframework.web.bind.annotation.RequestMapping;
importorg.springframework.web.bind.annotation.RestController;
/**
* <br>
* <b>Function:</b><br>
* <b>Author:</b>@author ziyou<br>
* <b>Date:</b>2021-04-11 19:59<br>
* <b>Desc:</b>无<br>
*/
@RestController
@RequestMapping(value="consumer")
publicclassTestNacosController{
privateIProducerFeigniProducerFeign;
@GetMapping("/testNacos")
privateStringtestNacos(){
returniProducerFeign.getUsername();
}
@Autowired
publicvoidsetiProducerFeign(IProducerFeigniProducerFeign){
this.iProducerFeign=iProducerFeign;
}
}
启动
Consumer,我们可以看到在Nacos如下图所示
调用
Consumer的接口consumer/testNacos,结果如下图所示,同样的如果此时更改了Nacos配置文件中的内容,Consumer这边也是可以实时更新的,感兴趣的小伙伴可以自己试试。
今天主要给大家介绍了一下如何通过 SpringBoot 项目来接入 Naocs 实现服务注册与发现,以及配置管理和动态刷新,相关的代码已经上传到 GitHub 了,公众号回复【源码】获取地址。
以上是 Springboot 项目集成 Nacos 实现服务注册发现与配置管理 的全部内容, 来源链接: utcz.com/a/130414.html