RabbitMQ安装、基本特性API使用教程
一、初识RabbitMQ
AMQP协议Advanced Message Queuing Protocol(高级消息队列协议)
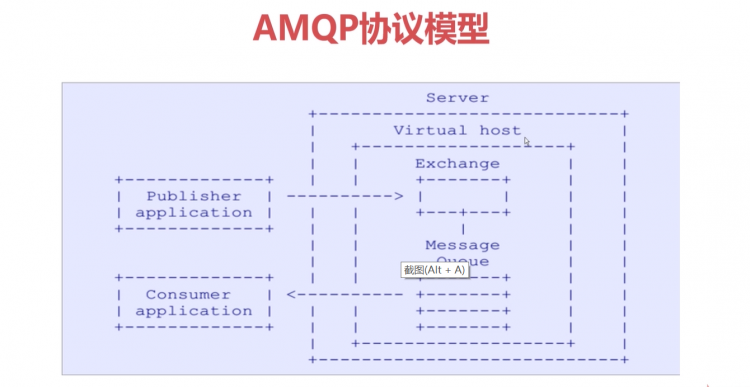
AMQP专业术语:
- Server:又称broker,接受客户端的链接,实现AMQP实体服务
- Connection:连接,应用程序与broker的网络连接
- Channel:网络信道,几乎所有的操作都在channel中进行,Channel是进行消息读写的通道。客户端可以建立多个channel,每个channel代表一个会话任务。
- Message:消息,服务器与应用程序之间传送的数据,由Properties和Body组成.Properties可以对消息进行修饰,必须消息的优先级、延迟等高级特性;Body则是消息体内容。
- virtualhost: 虚拟地址,用于进行逻辑隔离,最上层的消息路由。一个virtual host里面可以有若干个Exchange和Queue,同一个Virtual Host 里面不能有相同名称的Exchange 或 Queue。
- Exchange:交换机,接收消息,根据路由键转单消息到绑定队列
- Binding: Exchange和Queue之间的虚拟链接,binding中可以包换routing key
- Routing key: 一个路由规则,虚拟机可用它来确定如何路由一个特定消息。(如负载均衡)
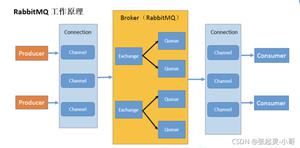
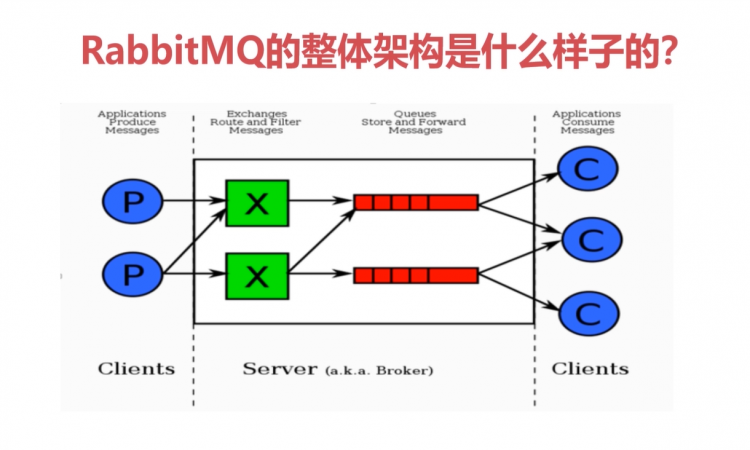
RabbitMQ整体架构
二、单机版快速安装
- 1、首先在Linux上进行一些软件的准备工作
yum install build-essential openssl openssl-devel unixODBC unixODBC-devel make gcc gcc-c++ kernel-devel m4 ncurses-devel tk tc xz
- 2、下载安装必要的软件
- 备用地址:
- https://www.rabbitmq.com/install-rpm.html#downloads
- https://dl.bintray.com/rabbitmq-erlang/rpm/erlang/
wget https://github.com/rabbitmq/erlang-rpm/releases/download/v23.0.4/erlang-23.0.4-1.el7.x86_64.rpmwget http://repo.iotti.biz/CentOS/7/x86_64/socat-1.7.3.2-5.el7.lux.x86_64.rpm
wget https://github.com/rabbitmq/rabbitmq-server/releases/download/v3.8.5/rabbitmq-server-3.8.5-1.el7.noarch.rpm
- 3、安装服务命令
rpm -ivh erlang-23.0.4-1.el7.x86_64.rpmrpm -ivh socat-1.7.3.2-5.el7.lux.x86_64.rpm
rpm -ivh rabbitmq-server-3.8.5-1.el7.noarch.rpm
- 4、启动
启动服务systemctl start rabbitmq-server
查看是否启动
lsof -i:5672
- 5、启动、安装web管理插件(管控台)
rabbitmq-plugins enable rabbitmq_management
- 6、查看管理端口有没有启动
lsof -i:15672或者:
netstat -tnlp | grep 15672
- 7、添加用户
#添加用户 用户名 admin 密码 admin web管理工具可用此用户登录sudo rabbitmqctl add_user admin admin
#设置用户角色 管理员
sudo rabbitmqctl set_user_tags admin administrator
#设置用户权限(接受来自所有Host的所有操作)
sudo rabbitmqctl set_permissions -p / admin "." "." ".*"
#查看用户权限
sudo rabbitmqctl list_user_permissions admin
- 重新启动
systemctl start rabbitmq-serverrabbitmq-plugins enable rabbitmq_management
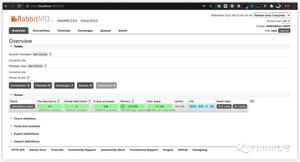
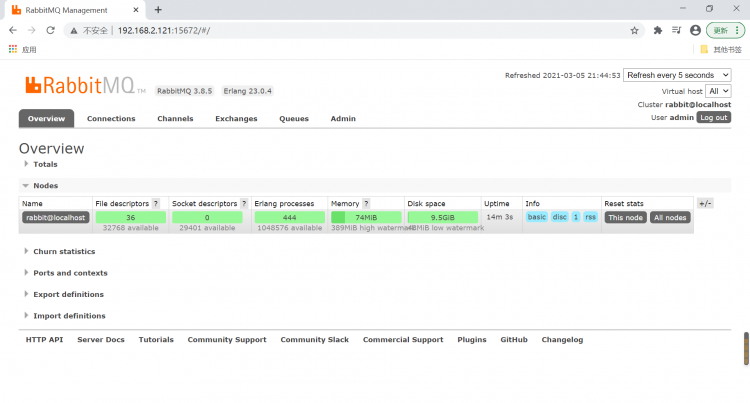
- 访问:http://192.168.2.121:15672/ 使用 admin 登录
- 代码测试
- 引入依赖
<dependency><groupId>com.rabbitmq</groupId>
<artifactId>amqp-client</artifactId>
<version>3.6.5</version>
</dependency>
2.发送端:
package com.zhouhong.rabbitmq.api.helloworld;import java.util.HashMap;
import java.util.Map;
import com.rabbitmq.client.AMQP;
import com.rabbitmq.client.Channel;
import com.rabbitmq.client.Connection;
import com.rabbitmq.client.ConnectionFactory;
public class Sender {
public static void main(String[] args) throws Exception {
// 1 创建ConnectionFactory
ConnectionFactory connectionFactory = new ConnectionFactory();
connectionFactory.setHost("192.168.2.121");
connectionFactory.setPort(5672);
connectionFactory.setUsername("admin");
connectionFactory.setPassword("admin");
connectionFactory.setVirtualHost("/");
// 2 创建Connection
Connection connection = connectionFactory.newConnection();
// 3 创建Channel
Channel channel = connection.createChannel();
// 4 声明
String queueName = "test001";
// 参数: queue名字,是否持久化,独占的queue(仅供此连接),不使用时是否自动删除, 其他参数
channel.queueDeclare(queueName, false, false, false, null);
Map<String, Object> headers = new HashMap<String, Object>();
AMQP.BasicProperties props = new AMQP.BasicProperties.Builder()
.deliveryMode(2)
.contentEncoding("UTF-8")
.headers(headers).build();
for(int i = 0; i < 5;i++) {
String msg = "Hello World RabbitMQ " + i;
channel.basicPublish("", queueName , props , msg.getBytes());
}
}
}
3.接收端
package com.zhouhong.rabbitmq.api.helloworld;import com.rabbitmq.client.Channel;
import com.rabbitmq.client.Connection;
import com.rabbitmq.client.ConnectionFactory;
import com.rabbitmq.client.QueueingConsumer;
import com.rabbitmq.client.QueueingConsumer.Delivery;
public class Receiver {
public static void main(String[] args) throws Exception {
ConnectionFactory connectionFactory = new ConnectionFactory() ;
connectionFactory.setHost("192.168.2.121");
connectionFactory.setPort(5672);
connectionFactory.setPassword("admin");
connectionFactory.setUsername("admin");
connectionFactory.setVirtualHost("/");
connectionFactory.setAutomaticRecoveryEnabled(true);
connectionFactory.setNetworkRecoveryInterval(3000);
Connection connection = connectionFactory.newConnection();
Channel channel = connection.createChannel();
String queueName = "test001";
// durable 是否持久化消息
channel.queueDeclare(queueName, false, false, false, null);
QueueingConsumer consumer = new QueueingConsumer(channel);
// 参数:队列名称、是否自动ACK、Consumer
channel.basicConsume(queueName, true, consumer);
// 循环获取消息
while(true){
// 获取消息,如果没有消息,这一步将会一直阻塞
Delivery delivery = consumer.nextDelivery();
String msg = new String(delivery.getBody());
System.out.println("收到消息:" + msg);
}
}
}
4.结果(先启动接收端进行监控,再启动发送端)
收到消息:Hello World RabbitMQ 0收到消息:Hello World RabbitMQ 1
收到消息:Hello World RabbitMQ 2
收到消息:Hello World RabbitMQ 3
收到消息:Hello World RabbitMQ 4
三、RabbitMQ----交换机
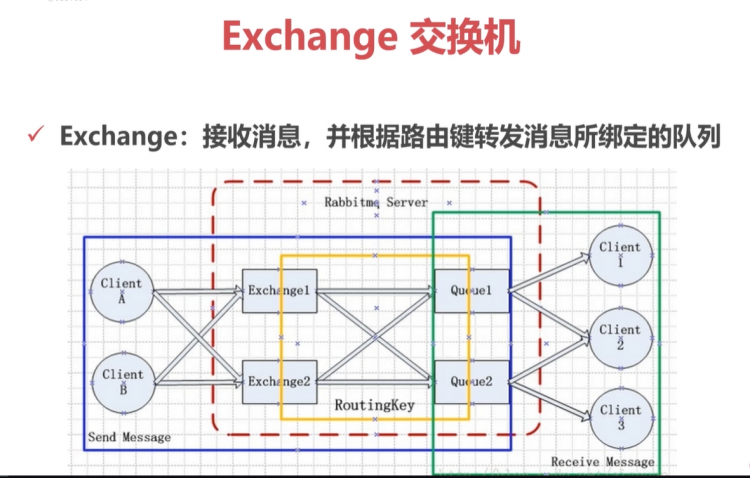
- Name:交换机名称。
- Type:交换机类型 direct、topic、fanout、headers。
- Durability:是否持久化,ture为持久化。
- Auto Delete :当最后一个绑定道Exchange上的队列删除后,自动删除该Exchange。
- Internal:当前Exchange是否用于RabbitMQ内部使用,默认为False。
- Arguments:扩展参数,用于扩展AMQP协议自制定化使用。
- DirectExchange的消息被转发道RouteKey中指定的Queue。
交换机-----Direct exchange
代码:
- 发送端
package com.zhouhong.rabbitmq.api.exchange.direct;import com.rabbitmq.client.Channel;
import com.rabbitmq.client.Connection;
import com.rabbitmq.client.ConnectionFactory;
public class Sender4DirectExchange {
public static void main(String[] args) throws Exception {
//1 创建ConnectionFactory
ConnectionFactory connectionFactory = new ConnectionFactory();
connectionFactory.setHost("192.168.2.121");
connectionFactory.setPort(5672);
connectionFactory.setPassword("admin");
connectionFactory.setUsername("admin");
connectionFactory.setVirtualHost("/");
//2 创建Connection
Connection connection = connectionFactory.newConnection();
//3 创建Channel
Channel channel = connection.createChannel();
//4 声明
String exchangeName = "test_direct_exchange";
//必须要和接收端 routingKey 一一对应
String routingKey = "test_direct_routingKey";
//5 发送
String msg = "Hello World RabbitMQ 4 Direct Exchange Message ... ";
channel.basicPublish(exchangeName, routingKey , null , msg.getBytes());
}
}
- 接收端
package com.zhouhong.rabbitmq.api.exchange.direct;import com.rabbitmq.client.Channel;
import com.rabbitmq.client.Connection;
import com.rabbitmq.client.ConnectionFactory;
import com.rabbitmq.client.QueueingConsumer;
import com.rabbitmq.client.QueueingConsumer.Delivery;
public class Receiver4DirectExchange {
public static void main(String[] args) throws Exception {
ConnectionFactory connectionFactory = new ConnectionFactory() ;
connectionFactory.setHost("192.168.2.121");
connectionFactory.setPort(5672);
connectionFactory.setPassword("admin");
connectionFactory.setUsername("admin");
connectionFactory.setVirtualHost("/");
connectionFactory.setAutomaticRecoveryEnabled(true);
connectionFactory.setNetworkRecoveryInterval(3000);
Connection connection = connectionFactory.newConnection();
Channel channel = connection.createChannel();
//4 声明
String exchangeName = "test_direct_exchange";
String exchangeType = "direct";
String queueName = "test_direct_queue";
String routingKey = "test_direct_routingKey";
channel.exchangeDeclare(exchangeName, exchangeType, true, false, false, null);
channel.queueDeclare(queueName, false, false, false, null);
channel.queueBind(queueName, exchangeName, routingKey);
//durable 是否持久化消息
QueueingConsumer consumer = new QueueingConsumer(channel);
//参数:队列名称、是否自动ACK、Consumer
channel.basicConsume(queueName, true, consumer);
//循环获取消息
while(true){
//获取消息,如果没有消息,这一步将会一直阻塞
Delivery delivery = consumer.nextDelivery();
String msg = new String(delivery.getBody());
System.out.println("收到消息:" + msg);
}
}
}
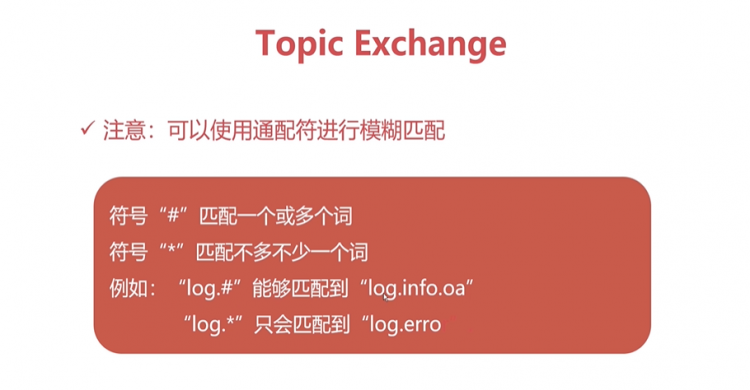
交换机-----topic exchange

代码:
- 接收端
package com.zhouhong.rabbitmq.api.exchange.topic;import com.rabbitmq.client.Channel;
import com.rabbitmq.client.Connection;
import com.rabbitmq.client.ConnectionFactory;
import com.rabbitmq.client.QueueingConsumer;
import com.rabbitmq.client.QueueingConsumer.Delivery;
public class Receiver4TopicExchange1 {
public static void main(String[] args) throws Exception {
ConnectionFactory connectionFactory = new ConnectionFactory() ;
connectionFactory.setHost("192.168.2.121");
connectionFactory.setPort(5672);
connectionFactory.setPassword("admin");
connectionFactory.setUsername("admin");
connectionFactory.setVirtualHost("/");
connectionFactory.setAutomaticRecoveryEnabled(true);
connectionFactory.setNetworkRecoveryInterval(3000);
Connection connection = connectionFactory.newConnection();
Channel channel = connection.createChannel();
//4 声明
String exchangeName = "test_topic_exchange";
String exchangeType = "topic";
String queueName = "test_topic_queue";
// 只能匹配一个 例如:user.txt、user.py都可以,但是user.txt.py 不行
//String routingKey = "user.*";
// user.txt、user.py 、user.txt.py 都可以匹配到
String routingKey = "user.#";
channel.exchangeDeclare(exchangeName, exchangeType, true, false, false, null);
channel.queueDeclare(queueName, false, false, false, null);
channel.queueBind(queueName, exchangeName, routingKey);
//durable 是否持久化消息
QueueingConsumer consumer = new QueueingConsumer(channel);
// 参数:队列名称、是否自动ACK、Consumer
channel.basicConsume(queueName, true, consumer);
System.err.println("consumer1 start.. ");
// 循环获取消息
while(true){
// 获取消息,如果没有消息,这一步将会一直阻塞
Delivery delivery = consumer.nextDelivery();
String msg = new String(delivery.getBody());
System.out.println("收到消息:" + msg + ", RoutingKey: " + delivery.getEnvelope().getRoutingKey());
}
}
}
- 发送端
package com.zhouhong.rabbitmq.api.exchange.topic;import com.rabbitmq.client.Channel;
import com.rabbitmq.client.Connection;
import com.rabbitmq.client.ConnectionFactory;
public class Sender4TopicExchange {
public static void main(String[] args) throws Exception {
//1 创建ConnectionFactory
ConnectionFactory connectionFactory = new ConnectionFactory();
connectionFactory.setHost("192.168.2.121");
connectionFactory.setPort(5672);
connectionFactory.setPassword("admin");
connectionFactory.setUsername("admin");
connectionFactory.setVirtualHost("/");
//2 创建Connection
Connection connection = connectionFactory.newConnection();
//3 创建Channel
Channel channel = connection.createChannel();
//4 声明
String exchangeName = "test_topic_exchange";
String routingKey1 = "user.save";
String routingKey2 = "user.update";
String routingKey3 = "user.delete.abc";
//5 发送
String msg = "Hello World RabbitMQ 4 Topic Exchange Message ...";
channel.basicPublish(exchangeName, routingKey1 , null , msg.getBytes());
channel.basicPublish(exchangeName, routingKey2 , null , msg.getBytes());
channel.basicPublish(exchangeName, routingKey3 , null , msg.getBytes());
channel.close();
connection.close();
}
}
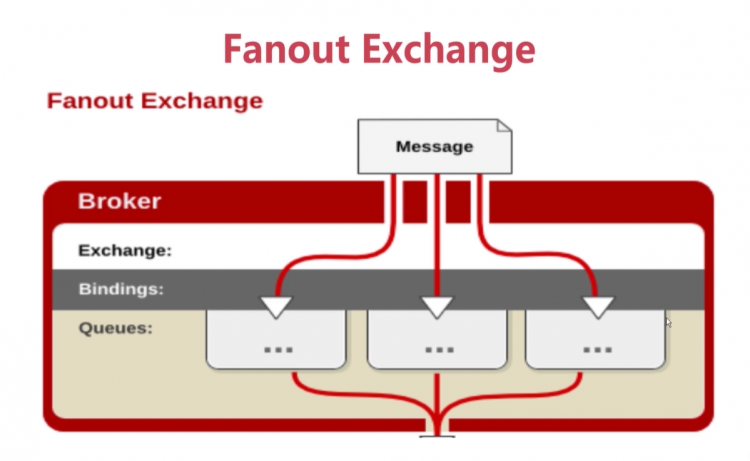
交换机-----Fanout exchange 广播模式
代码:见示例文章开始GitHub地址
四、RabbitMQ高级特性
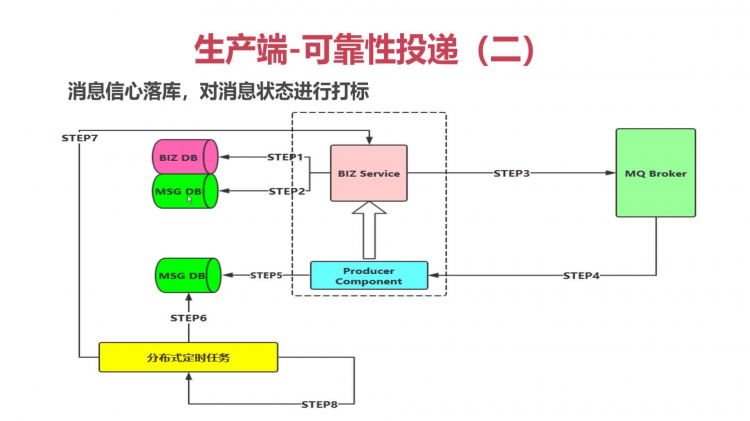
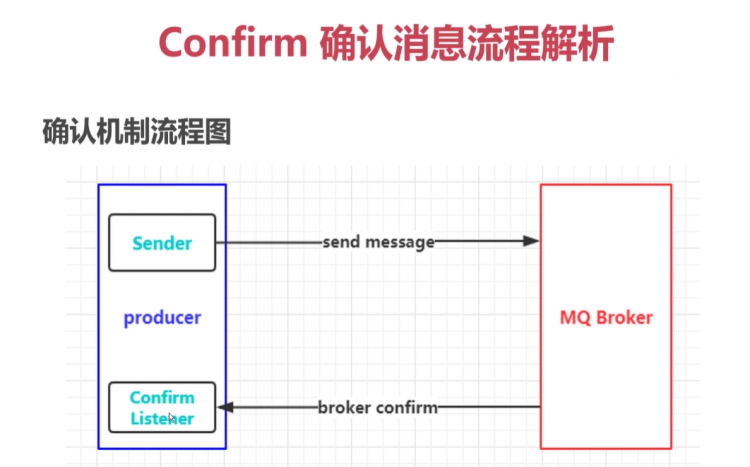
1、消息如何保障 100% 的投递成功
生产端的可靠性投递的标志:
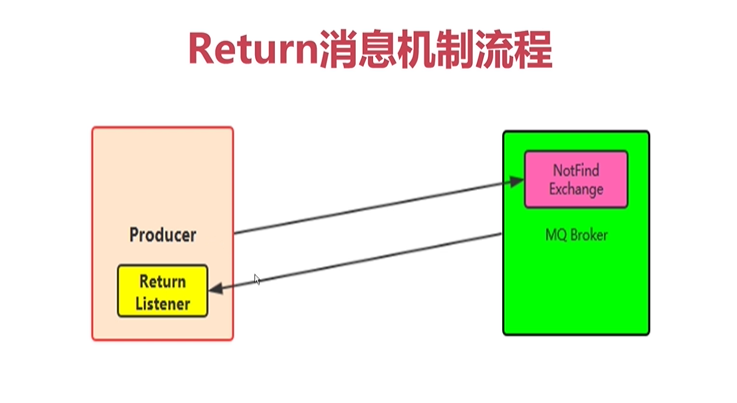
3、return消息机制
4、消费端ACK与重回队列
消费端ACK:
- 在工作的时候一般不会选择自动ack
- 消费端的手工ack分为两种ACK和NACK
- 消费端进行消费的时候,如果由于业务异常我们可以进行日志的记录,然后进行补偿。这种建议回复NACK,不要重回队列
- 如果由于服务器宕机等严重问题,那我们就需要手工进行ACK保障消费端消费成功
消费端的重回队列
- 是为了对没有处理成功的消息,把消息重新会投递给broker。
- 重回队列,会回到队列的尾部
- 也会造成一条消息一直重复投递,死循环了
- 在实际应用中,都会关闭重回队列,也就是设置为false
5、TTL队列和消息
TTL: time to live的缩写,也就是生存时间。
- RabbitMQ 支持消息过期时间,在消息发送时可以进行指定
- RabbitMQ支持队列过期时间,从消息入队列开始计算,只要超过了队列的超时间时间配置,那么消息会自动的清除
死队列: DLX,Dead-Letter-Exchange
- 利用DLX,当消息在一个队列中变成死信(dead message)之后,它能被重新publish到另一个Exchange,这个Exchange就是DLX.
消息变成死信的几种情况
- 消息被拒绝 并且requeue = false
- 消息TTL过期
- 队列达到最大长度
DLX也是一个正常的Exchange,实际上是一个属性控制
- 当队列中有死信时,RabbitMQ就会自动的将这个消息重新发布到设置的Exchange上,进而被路由到另一个队列.
- 可以监听这个队列中消息做相应的处理,这个特性可以弥补rabbitMQ3.0以前的immediate参数功能。
- 在正常队列上添加参数:arguments.put("x-dead-letter-exchange","dlx.exchange");这样消息过期、requeue、队列达到最大长度时,就可以直接路由到死信队列。
以上是 RabbitMQ安装、基本特性API使用教程 的全部内容, 来源链接: utcz.com/a/120037.html


