【Python】基于pytest的自动化测试实践
基于pytest的自动化测试实践
[TOC]
1. 什么是pytest?
一款强大python的测试框架.
具有如下特点:
适用范围广: 可以用于所有级别和类型的软件测试.
开发工程师: 用于单元测试(UnitTest)
QA: 代码质量检测
测试工程师: 接口测试, 功能测试, UI测试
TDD: 测试驱动开发
- 开发测试平台
- 简单
# test_*.pydef test_plus():
assert (1 + 1) == 2
强大: 可编写插件进行功能扩展,并内置了很多优秀插件.
- pytest-bdd, 行为驱动测试
- pytest-html,测试结果生成html的报告
- pytest-xdist,并行执行测试
- pytest-cov,测试覆盖率检查
- ...
2. 编写第一个pytest脚本: Hello, world
1. 项目初始化:
//Python3.8> mkdir bn-test // 创建项目
> cd bn-test // 进入项目根目录
> python3 -m venv venv // 创建python虚拟环境
> source venv/bin/activate // 激活虚拟环境
> pip install pytest // 安装pytest框架
2. 创建测试脚本: test_hello_world.py
# test_hello_world.pydef func(x):
return x + 1
def test_answer():
assert func(3) == 5
3. 运行pytest命令
> pytest============================= test session starts ==============================
platform darwin -- Python 3.8.6, pytest-6.2.1, py-1.10.0, pluggy-0.13.1
rootdir: /Users/anna/projects/bn-test
collected 1 item
test_hello_world.py F [100%]
=================================== FAILURES ===================================
_________________________________ test_answer __________________________________
def test_answer():
> assert func(3) == 5
E assert 4 == 5
E + where 4 = func(3)
test_hello_world.py:8: AssertionError
=========================== short test summary info ============================
FAILED test_hello_world.py::test_answer - assert 4 == 5
============================== 1 failed in 0.06s ===============================
3. 案例一: 算法的自动化测试
3.1 案例描述
某公司对历史客户数据进行分析, 发现客户的消费力基于某因素具有明显规律性特征. 现开发了一套能预测新客户消费潜力的算法, 需要对算法的有效性进行测试.
3.2 项目准备
安装依赖:
> pip install numpy> pip install matplotlib
> pip install sklearn
目录结构:
|--perdict_alg|--__init__.py
|--conftest.py
|--alg.py
|--data.py
|--test_alg.py
3.3 历史数据
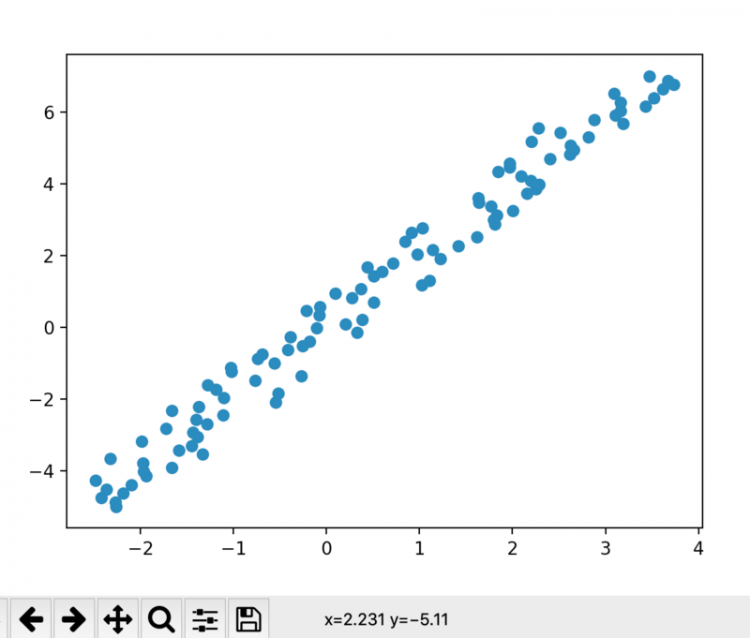
模拟产生历史数据. y表示消费力, x表示影响消费力高低的因素.
# data.pyimport numpy as np
def get_history_data():
x = np.linspace(-3, 3, 100)
y = 2 * x + 1
x = x + np.random.rand(100)
return x, y
history_data = get_history_data()
查看上面的数据到底是什么样子的?
# data.pydef show():
import matplotlib.pyplot as plt
plt.scatter(history_data[0], history_data[1])
plt.show()
if __name__ == '__main__':
show()
3.4 预测算法
# alg.pyfrom sklearn import linear_model
from predict_alg.data import history_data
model = linear_model.LinearRegression() # 使用线性回归模型
model.fit(history_data[0].reshape(-1, 1), history_data[1]) # 训练模型
def predict(x_):
y_ = model.predict([[x_], ]) # 预测
return y_[0]
3.5 测试脚本
新建pytest的配置脚本
# conftest.pyfrom predict_alg.data import history_data
def pytest_generate_tests(metafunc):
ids, test_data = [], []
if "parameters" in metafunc.fixturenames:
for i, x_ in enumerate(history_data[0]):
ids.append(i)
test_data.append({'id': i, 'x': x_, 'y': history_data[1][i]})
metafunc.parametrize("parameters", test_data, ids=ids, scope="function")
编写测试用例
# test_alg.pyfrom predict_alg.alg import predict
def test_predict(parameters):
y_ = predict(parameters['x'])
y = parameters['y']
assert abs(y_ - y) < 1
3.6 测试结果
(venv) [email protected] predict_alg % pytest=================================== test session starts ====================================
platform darwin -- Python 3.8.6, pytest-6.2.1, py-1.10.0, pluggy-0.13.1
rootdir: /Users/anna/projects/bn-test/predict_alg
collected 100 items
test_alg.py ..........F.................................................F........... [ 72%]
...........................F [100%]
========================================= FAILURES =========================================
_____________________________________ test_predict[10] _____________________________________
parameters = {'id': 10, 'x': -1.4091625376598214, 'y': -3.787878787878788}
def test_predict(parameters):
y_ = predict(parameters['x'])
y = parameters['y']
> assert abs(y_ - y) < 1
E assert 1.008378271252539 < 1
E + where 1.008378271252539 = abs((-2.779500516626249 - -3.787878787878788))
test_alg.py:10: AssertionError
_____________________________________ test_predict[60] _____________________________________
parameters = {'id': 60, 'x': 0.641274440559893, 'y': 2.2727272727272734}
def test_predict(parameters):
y_ = predict(parameters['x'])
y = parameters['y']
> assert abs(y_ - y) < 1
E assert 1.0356455432403757 < 1
E + where 1.0356455432403757 = abs((1.2370817294868977 - 2.2727272727272734))
test_alg.py:10: AssertionError
_____________________________________ test_predict[99] _____________________________________
parameters = {'id': 99, 'x': 3.0154483831587497, 'y': 7.0}
def test_predict(parameters):
y_ = predict(parameters['x'])
y = parameters['y']
> assert abs(y_ - y) < 1
E assert 1.1121706453377698 < 1
E + where 1.1121706453377698 = abs((5.88782935466223 - 7.0))
test_alg.py:10: AssertionError
================================= short test summary info ==================================
FAILED test_alg.py::test_predict[10] - assert 1.008378271252539 < 1
FAILED test_alg.py::test_predict[60] - assert 1.0356455432403757 < 1
FAILED test_alg.py::test_predict[99] - assert 1.1121706453377698 < 1
=============================== 3 failed, 97 passed in 1.89s ===============================
结果分析
4. 案例二: 接口的自动化测试
4.1 案例描述
测试豆瓣电影列表的API

- URL: https://movie.douban.com/j/se...
- Method: get
Params:
- type: 类型
- tag:标签
- page_limit:每页记录数
- page_start: 第几页
Example:
https://movie.douban.com/j/search_subjects?type=movie&tag=热门&page_limit=50&page_start=0Response:
{"subjects":[{"rate":"8.9","cover_x":6611,"title":"心灵奇旅","url":"https:\/\/movie.douban.com\/subject\/24733428\/","playable":false,"cover":"https://img9.doubanio.com\/view\/photo\/s_ratio_poster\/public\/p2626308994.webp","id":"24733428","cover_y":9435,"is_new":false},{"rate":"6.3","cover_x":2764,"title":"神奇女侠1984","url":"https:\/\/movie.douban.com\/subject\/27073752\/","playable":false,"cover":"https://img1.doubanio.com\/view\/photo\/s_ratio_poster\/public\/p2626959989.webp","id":"27073752","cover_y":4096,"is_new":false}]}
4.2 项目准备
安装依赖:
> pip install pytest-html> pip install requests
目录结构:
|--douban_api|--__init__.py
|--test_movie_api.py
4.3 测试用例
- 测试每页记录数参数是否有效: 输入page_limit=2, 预期结果记录数等于2
- 测试每页参数是否有效: 输入page_start=1的结果和page_start=2的结果 是否一样
- 测试标签等于豆瓣高分时,结果是否按高分排序
4.4 测试脚本
# test_movie_api.pyimport requests
class TestMovieApi(object):
url = 'https://movie.douban.com/j/search_subjects'
headers = {
'Accept': 'text/html,application/xhtml+xml,application/xml;q=0.9,image/avif,image/webp,image/apng,*/*;q=0.8,application/signed-exchange;v=b3;q=0.9',
'User-Agent': 'Mozilla/5.0 (Macintosh; Intel Mac OS X 10_14_5) AppleWebKit/537.36 (KHTML, like Gecko) Chrome/80.0.3987.149 Safari/537.36',
}
def test_page_limit_valid(self):
result = requests.get(self.url, params={
'type': 'movie',
'tag': '热门',
'page_limit': 2,
'page_start': 0,
}, headers=self.headers).json()
assert len(result['subjects']) == 2
def test_page_start_valid(self):
result = requests.get(self.url, params={
'type': 'movie',
'tag': '热门',
'page_limit': 1,
'page_start': 0,
}, headers=self.headers).json()
result2 = requests.get(self.url, params={
'type': 'movie',
'tag': '热门',
'page_limit': 1,
'page_start': 1,
}, headers=self.headers).json()
assert result['subjects'][0]['title'] != result2['subjects'][0]['title']
def test_score_sort(self):
result = requests.get(self.url, headers=self.headers, params={
'type': 'movie',
'tag': '豆瓣高分',
'page_limit': 3,
'page_start': 0,
})
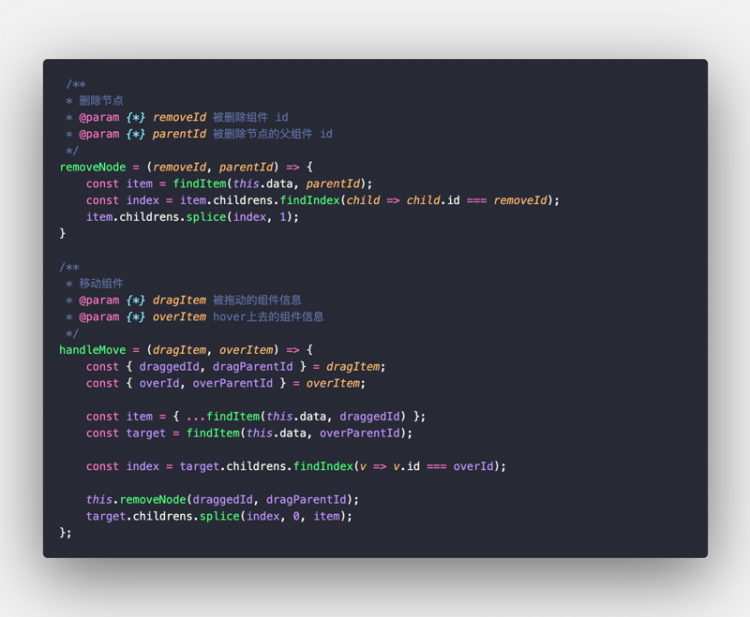
assert result['subjects'][0]['rate'] >= result['subjects'][1]['rate']
assert result['subjects'][1]['rate'] >= result['subjects'][2]['rate']
4.5 测试结果
> pytest --html=report.html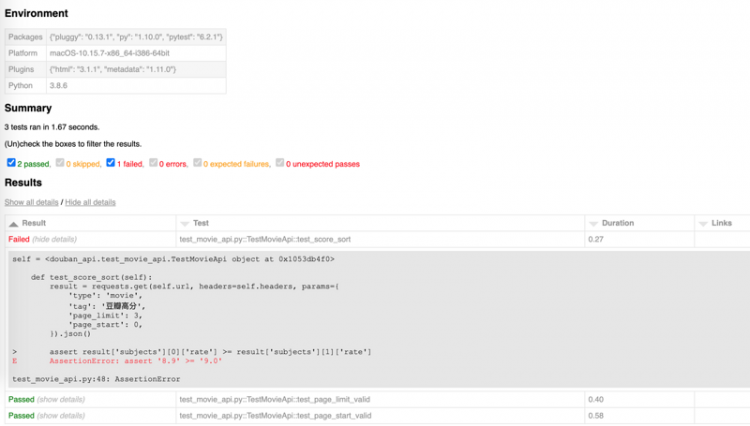
5. 案例三: UI的自动化测试
5.1 案例描述
测试CSDN的登陆功能
- 进入csdn首页

- 点击网页头部的“登陆/注册”链接, 进入登陆页面

- 点击“账号密码登录”,进入输入用户名密码界面

- 输入账号( )和密码( ** ),点击“登陆”按钮
验证登陆是否成功
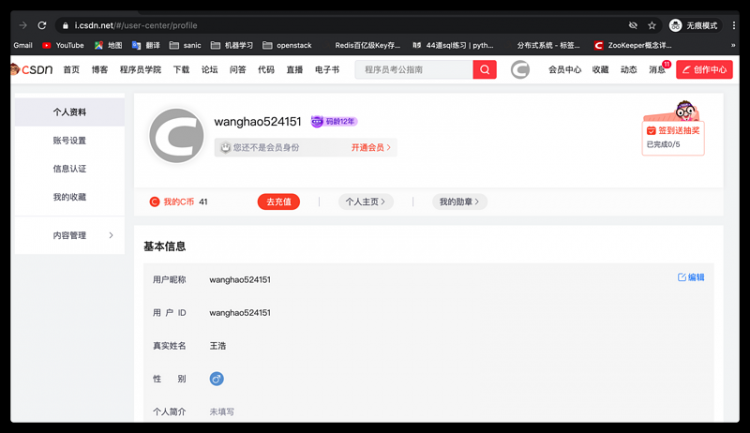
登陆后, 进入https://i.csdn.net/#/user-cen... 验证dom( div.person-name )元素的text内容是否时用户名
<div data-v-df75d7f8="" class="person-name">wanghao524151</div>
5.2 项目准备
安装依赖:
> brew install allure> pip install allure-pytest
> pip install playwright
> python -m playwright install
目录结构:
|--csdn_ui|-- img
|--__init__.py
|--test_login.py
5.3 测试脚本
# test_login.pyimport allure
from playwright import sync_playwright
@allure.feature('测试登陆功能')
class TestLogin(object):
browser = None
def setup_method(self, method):
print('测试登陆开始')
pw = sync_playwright().start()
self.pw = pw
self.browser = pw.chromium.launch(headless=False, slowMo=100)
def teardown_method(self, method):
self.browser.close()
self.pw.stop()
print('测试登陆结束')
@allure.step('1、进入csdn首页')
def step_1(self, page):
page.goto('https://www.csdn.net/')
page.waitForLoadState()
page.screenshot(path='img/step_1.png')
allure.attach.file('img/step_1.png', '步骤1截图', attachment_type=allure.attachment_type.PNG)
@allure.step('2、点击登陆链接')
def step_2(self, page):
page.click('text="登录/注册"')
page.waitForLoadState()
page.screenshot(path='img/step_2.png')
allure.attach.file('img/step_2.png', '步骤2截图', attachment_type=allure.attachment_type.PNG)
@allure.step('3、点击账号密码登陆')
def step_3(self, page):
page.click('text="账号密码登录"')
page.screenshot(path='img/step_3.png')
allure.attach.file('img/step_3.png', '步骤3截图', attachment_type=allure.attachment_type.PNG)
@allure.step('4、输入账号密码,点击登陆按钮')
def step_4(self, page):
page.type("input[name=all]", "******")
page.type("input[name=pwd]", "******")
page.screenshot(path='img/step_4.png')
allure.attach.file('img/step_4.png', '步骤4截图', attachment_type=allure.attachment_type.PNG)
page.click("button.btn.btn-primary")
page.waitForNavigation()
@allure.step('5、验证登陆是否成功')
def step_5(self, page):
page.goto('https://i.csdn.net/#/user-center/profile')
page.waitForLoadState('networkidle')
page.screenshot(path='img/step_5.png')
allure.attach.file('img/step_5.png', '步骤5截图', attachment_type=allure.attachment_type.PNG)
username = page.innerText('div.person-name')
assert username == 'wanghao524151'
@allure.story('测试账号密码登陆')
@allure.title('用例#1')
def test_login(self):
page = self.browser.newPage()
self.step_1(page)
self.step_2(page)
self.step_3(page)
self.step_4(page)
self.step_5(page)
执行测试脚本:
> pytest --alluredir=/tmp/my_allure_results启动allure:
> allure serve /tmp/my_allure_results5.4 测试结果

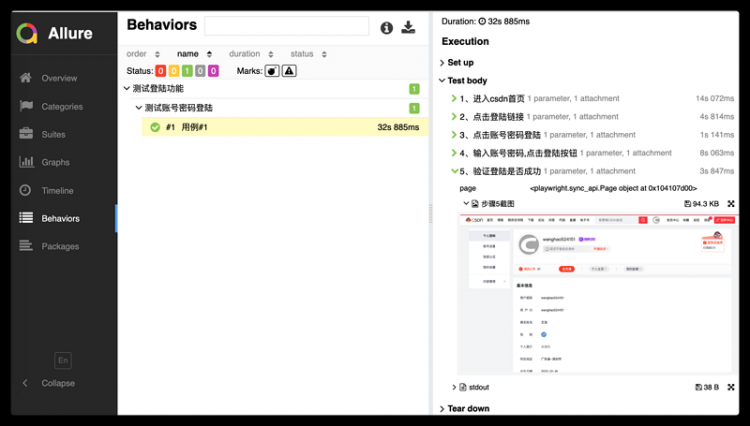
转载请注明来源: https://www.jianshu.com/p/1ad...
作者: Anna2Tim
以上是 【Python】基于pytest的自动化测试实践 的全部内容, 来源链接: utcz.com/a/101653.html


