【小程序】商城微信小程序(一)——开发环境搭建、小程序结构、首页完成
这个系列文章记录本人学习微信小程序的过程,教程来源黑马程序员,我只是用文字记录下,以备忘。
准备工作:
安装微信小程序开发工具
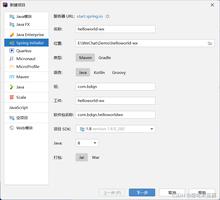
安装VScode,并安装如下插件:——开发环境搭建、小程序结构、首页完成")
各个插件的作用都有说明,这里说下Easy LESS,由于微信小程序不支持less语法,
为了方便开发,我们不直接编写微信的样式文件,而是使用该插件将less语法自动生成wxss样式,插件添加如下设置:
"less.compile": {"outExt": ".wxss",
},
小程序目录:
——开发环境搭建、小程序结构、首页完成")
components--存放自定义组件
icons--存放小程序用到的图标(主要是底部tabs图标)
lib--存放用到的第三方库
pages--小程序的页面
request--封装request请求
styles--存放公共的样式
utils--存放一些工具类
pages结构
"pages/index/index","pages/category/index",
"pages/goods_list/index",
"pages/goods_detail/index",
"pages/cart/index",
"pages/collect/index",
"pages/order/index",
"pages/search/index",
"pages/user/index",
"pages/feedback/index",
"pages/login/index",
"pages/auth/index",
"pages/pay/index"
分别是首页、分类页、商品列表页、商品详情页、购物车、收藏页、订单页、搜索页、用户中心、反馈、登录、验证、支付页。
使用微信小程序开发工具在app.json中快速搭建各个页面和底部导航tabs:
{"pages":[
"pages/index/index",
"pages/category/index",
"pages/goods_list/index",
"pages/goods_detail/index",
"pages/cart/index",
"pages/collect/index",
"pages/order/index",
"pages/search/index",
"pages/user/index",
"pages/feedback/index",
"pages/login/index",
"pages/auth/index",
"pages/pay/index"
],
"window":{
"backgroundTextStyle":"light",
"navigationBarBackgroundColor": "#eb4450",
"navigationBarTitleText": "黑马优购",
"navigationBarTextStyle":"white"
},
"style": "v2",
"sitemapLocation": "sitemap.json",
"tabBar": {
"color":"#999",
"selectedColor": "#ff2d4a",
"backgroundColor": "$fafafa",
"position": "bottom",
"borderStyle": "black",
"list": [{
"pagePath": "pages/index/index",
"text": "首页",
"iconPath": "./icons/home.png",
"selectedIconPath": "./icons/home-o.png"
},
{
"pagePath": "pages/category/index",
"text": "分类",
"iconPath": "./icons/category.png",
"selectedIconPath": "./icons/category-o.png"
},
{
"pagePath": "pages/cart/index",
"text": "购物车",
"iconPath": "./icons/cart.png",
"selectedIconPath": "./icons/cart-o.png"
},
{
"pagePath": "pages/user/index",
"text": "我的",
"iconPath": "./icons/my.png",
"selectedIconPath": "./icons/my-o.png"
}
]
}
}
首页主要有四部分组成:搜索框、幻灯片、分类导航、楼层导航,如下图:——开发环境搭建、小程序结构、首页完成")
新建搜索组件
新建如下目录componentsSearchInput,并创建名为SearchInput的component,
——开发环境搭建、小程序结构、首页完成")
关键代码如下:
SearchInput.less
.search_input{height: 90rpx;
padding: 10rpx;
background-color: var(--themeColor);
navigator{
height: 100%;
display: flex;
justify-content: center;
align-items: center;
background-color: #ffffff;
border-radius: 15rpx;
columns: #666;
}
}
SearchInput.wxml
<view class="search_input"><navigator url="/pages/search/index" open-type="navigate">搜索</navigator>
</view>
使用组件
在首页index中使用组件
index.json
{"usingComponents": {
"SearchInput":"../../components/SearchInput/SearchInput"
},
"navigationBarTitleText": "优购首页"
}
index.wxml
<SearchInput></SearchInput>封装request请求:
在reques目录下新建index.js:
export const request = (params) => {return new Promise((resolve,reject)=>{
wx.request({
...params,
success:(result)=>{
resolve(result);
},
fail:(err)=>{
reject(err);
},
});
})
}
使用封装的request
参考首页的index.js中的引入和使用方法
幻灯片、分类导航、楼层列表关键代码如下:
index.js
import { request } from "../../request/index.js"Page({
/**
* 页面的初始数据
*/
data: {
//轮播图数组
swiperList: [],
//导航数组
catesList: [],
//楼层数据
floorList:[],
},
/**
* 生命周期函数--监听页面加载
*/
onLoad: function (options) {
// wx.request({
// url: 'https://api-hmugo-web.itheima.net/api/public/v1/home/swiperdata',
// success: (result) => {
// this.setData(
// {
// swiperList: result.data.message
// }
// )
// },
// fail: (res) => { },
// complete: (res) => { },
// });
this.getSwiperList();
this.getCatesList();
this.getFloorList();
},
// 获取轮播图数据
getSwiperList() {
request({ url: "https://api-hmugo-web.itheima.net/api/public/v1/home/swiperdata" })
.then(result => {
this.setData(
{
swiperList: result.data.message
}
)
}
);
},
// 获取分类数据
getCatesList() {
request({ url: "https://api-hmugo-web.itheima.net/api/public/v1/home/catitems" })
.then(result => {
this.setData(
{
catesList: result.data.message
}
)
}
);
},
// 获取楼层数据
getFloorList() {
request({ url: "https://api-hmugo-web.itheima.net/api/public/v1/home/floordata" })
.then(result => {
this.setData(
{
floorList: result.data.message
}
)
}
);
},
/**
* 生命周期函数--监听页面初次渲染完成
*/
onReady: function () {
},
/**
* 生命周期函数--监听页面显示
*/
onShow: function () {
},
/**
* 生命周期函数--监听页面隐藏
*/
onHide: function () {
},
/**
* 生命周期函数--监听页面卸载
*/
onUnload: function () {
},
/**
* 页面相关事件处理函数--监听用户下拉动作
*/
onPullDownRefresh: function () {
},
/**
* 页面上拉触底事件的处理函数
*/
onReachBottom: function () {
},
/**
* 用户点击右上角分享
*/
onShareAppMessage: function () {
}
})
index.wxml
<view class="pyg_index"><SearchInput></SearchInput>
<view class="index_swiper">
<!-- 1 swiper标签存在默认的宽度和高度
100% * 150px
2 image标签也存在默认的宽度和高度
320px * 240px
3 设计图片和轮播图
1 先看一下原图的宽高 750 * 340
2 让图片的高度自适应 宽度 等于100%
3 让swiper标签的高度 变成和图片的高一样即可
4 图片标签
mode属性 渲染模式
widthFix 让图片的标签宽高 和 图片标签的内容的宽高都等比例的发生变化 -->
<swiper autoplay indicator-dots circular>
<swiper-item wx:for="{{swiperList}}" wx:key="goods_id">
<navigator url="{{item.navigator_url}}">
<image mode="widthFix"></image>
</navigator>
</swiper-item>
</swiper>
</view>
<!-- 分类开始 -->
<view class="index_cate">
<navigator class="" target="" url="" hover-class="navigator-hover" open-type="navigate" wx:for="{{catesList}}" wx:key="name">
<image class="" mode="widthFix" lazy-load="false" binderror="" bindload="" />
</navigator>
</view>
<!-- 楼层开始 -->
<view class="index_floor">
<view class="floor_group" wx:for="{{floorList}}" wx:for-item='item1' wx:for-index='index1' wx:key="floor_title">
<view class="floor_title">
<image class="" mode="widthFix" lazy-load="false" binderror="" bindload="" />
</view>
<view class="floor_list">
<navigator class="" target="" url="" hover-class="navigator-hover" open-type="navigate" wx:for="{{item1.product_list}}" wx:for-item='item2' wx:for-index='index2' wx:key="name">
<image class="" mode="{{index2===0?'widthFix':'scaleToFill'}}" lazy-load="false" binderror="" bindload="" />
</navigator>
</view>
</view>
</view>
</view>
index.less
.index_swiper {display: flex;
swiper {
width: 750rpx;
height: 340rpx;
image {
width: 100%;
}
}
}
.index_cate {
display: flex;
navigator {
padding: 20rpx;
flex: 1;
image {
width: 100%;
}
}
}
.index_floor {
.floor_group {
.floor_title {
padding: 10rpx 0;
image {
width: 100%;
}
}
.floor_list {
overflow: hidden;
navigator {
float: left;
width: 33.33%;
// 后四个超链接
&:nth-last-child(-n+4) {
height: 33.33vw*386/232/2;
border-left: 10rpx solid #ffffff;
}
//第二 第三两张图
&:nth-child(2),
&:nth-child(2) {
border-left: 10rpx solid #ffffff;
}
image {
width: 100%;
height: 100%;
}
}
}
}
}
总结:
1,ES6中的Promise异步请求
2,less语法布局,特别是楼层图片布局
以上是 【小程序】商城微信小程序(一)——开发环境搭建、小程序结构、首页完成 的全部内容, 来源链接: utcz.com/a/101481.html