springboot注册到nacos

springboot 版本
2.0.8.RELEASE
<groupId>org.springframework.boot</groupId>
<artifactId>spring-boot-dependencies</artifactId>
<version>2.0.8.RELEASE</version>
<type>pom</type>
<scope>import</scope>
</dependency>
参考文章:https://nacos.io/zh-cn/docs/quick-start-spring-cloud.html
是使用Nacos Spring Cloud方式配置的,为什么是不使用springboot ,因为springboot加代码,自己手动注册。
服务端用的是1.1.4,因为1.2.0要用户认证
1、配置
1.1添加依赖包
<dependency>
<groupId>org.springframework.cloud</groupId>
<artifactId>spring-cloud-starter-alibaba-nacos-config</artifactId>
<version>0.2.1.RELEASE</version>
</dependency>
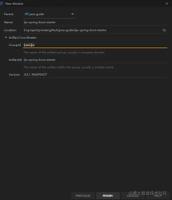
1.2添加文件bootstrap.properties,内容
spring.cloud.nacos.config.server-addr=192.168.3.114:8848
spring.cloud.nacos.config.namespace=3d13bfd1-a7ba-455a-8fa6-8e3229116ce8
不知道为什么配置到application.yml里不起作用,可能引入的pom有问题。
1.3在nacos新增dataId TOP-QUICK-CONSUMER.properties的配置
useLocalCache=
true
1.4 写controller
主要是两个注解,
@Value,@RefreshScope
package com.topnet.quick.controller;import org.springframework.beans.factory.annotation.Value;
import org.springframework.cloud.context.config.annotation.RefreshScope;
import org.springframework.web.bind.annotation.RequestMapping;
import org.springframework.web.bind.annotation.RequestMethod;
import org.springframework.web.bind.annotation.RestController;
import com.topnet.quick.frame.Result;
import io.swagger.annotations.Api;
import io.swagger.annotations.ApiImplicitParam;
import io.swagger.annotations.ApiImplicitParams;
import io.swagger.annotations.ApiOperation;
/**
*/
@Api(value = "代码自动生成")
@RestController
@RequestMapping("/back/test")
@RefreshScope
public class TestController {
@Value("${useLocalCache:false}")
private boolean useLocalCache;
@ApiOperation(value = "根据Id查询", notes = "查询页面")
@ApiImplicitParams({@ApiImplicitParam(name = "id", value = "主键标识", required = true,
dataType = "String", example = "123")})
@RequestMapping(value = "/get", method = RequestMethod.GET)
public Result findById() {
return Result.success(useLocalCache);
}
}
1.5启动&验证
发现http://localhost:9003/quick/back/test/get
{ "code":0, "data":true, "msg":"成功" }
通过修改
useLocalCache=
false
发布验证配置是否成功。
2、注册发现
2.1引入pom.xml
<dependency>
<groupId>org.springframework.cloud</groupId>
<artifactId>spring-cloud-starter-alibaba-nacos-discovery</artifactId>
<version>0.2.2.RELEASE</version>
</dependency>
2.2 添加注解
@EnableDiscoveryClient
2.3修改application.yml
spring:
cloud:
nacos:
discovery:
namespace: 3d13bfd1-a7ba-455a-8fa6-8e3229116ce8
server-addr: 192.168.3.114:8848
以上是 springboot注册到nacos 的全部内容, 来源链接: utcz.com/z/517391.html