Apollo——环境搭建

摘要
本文是基于Apollo源码构建,搭建Apollo运行环境的。Apollo的官方文档很详细,这里纯属记录一下,备忘。
资源
Apollo
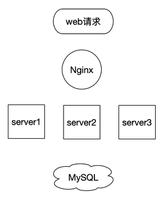
Apollo的架构
简单来理解,可以把Apollo看成三个部分:
- Apollo-Portal 这个就是一个web应用,有自己的数据库,ApolloPortalDB,这里主要记录一下页面操作相关的,像操作记录、权限、角色之类的数据。
- Admin-Service 这个是提供http接口给Apollo-Portal 使用,用来操作真正的配置库 ApolloConfigDB。
- Config-Service 这个是提供http接口给客户端应用使用,用来读取ApolloConfigDB中的配置。
这里portal可以只有一份,同时操作各个环境的ApolloConfigDB,但是每一个环境的ApolloConfigDB都有一套对应的Admin-Service 和 Config-Service。
知道了这个关系,接下来部署这个应用。
部署步骤
数据库安装
数据库脚本见:apolloconfigdb.sql、apolloportaldb.sql 脚本
这里需要注意,Mysql版本需要 5.6.5+ ,否则timestamp类型的字段都会有问题(Apollo分布式部署指南)。如果Mysql版本低于 5.6.5+ ,就把脚本里面的 timestamp字段多有的default声明去掉。
配置Config-Service
配置 application.yml
spring: application:
name: apollo-configservice
profiles:
active: ${apollo_profile}
datasource:
url: jdbc:mysql://ip:3306/ApolloConfigDB?useUnicode=true&characterEncoding=utf8&autoReconnect=true&allowMultiQueries=true&serverTimezone=Asia/Shanghai&zeroDateTimeBehavior=convertToNull
username: root
password: ***
jpa:
database-platform: org.hibernate.dialect.MySQLDialect
ctrip:
appid: 100003171
server:
port: 8080
logging:
file: /opt/logs/100003171/apollo-configservice.log
启动应用
执行main方法
com.ctrip.framework.apollo.configservice.ConfigServiceApplication.main(String[])启动正常,默认的是8080端口
配置 Admin-Service
配置 application.yml
spring: application:
name: apollo-adminservice
profiles:
active: ${apollo_profile}
datasource:
url: jdbc:mysql://IP:3306/ApolloConfigDB?useUnicode=true&characterEncoding=utf8&autoReconnect=true&allowMultiQueries=true&serverTimezone=Asia/Shanghai&zeroDateTimeBehavior=convertToNull
username: root
password: ***
jpa:
database-platform: org.hibernate.dialect.MySQLDialect
ctrip:
appid: 100003172
server:
port: 8090
logging:
file: /opt/logs/100003172/apollo-adminservice.log
启用应用
执行main方法
com.ctrip.framework.apollo.adminservice.AdminServiceApplication.main(String[])默认启动的是8090端口,这些端口都是可以配置。
配置Apollo-Portal
配置 application.yml
spring: application:
name: apollo-portal
profiles:
active: ${apollo_profile}
jpa:
properties:
hibernate:
query:
plan_cache_max_size: 192 # limit query plan cache max size
datasource:
url: jdbc:mysql://IP:3306/ApolloPortalDB?useUnicode=true&characterEncoding=utf8&autoReconnect=true&allowMultiQueries=true&serverTimezone=Asia/Shanghai&zeroDateTimeBehavior=convertToNull
username: root
password: ***
server:
port: 8070
compression:
enabled: true
tomcat:
use-relative-redirects: true
logging:
file: /opt/logs/100003173/apollo-portal.log
management:
health:
status:
order: DOWN, OUT_OF_SERVICE, UNKNOWN, UP
这里配置的portal端口是8070,到时候页面访问就是这个端口。
配置apollo-env.properties
local.meta=http://localhost:8080dev.meta=http://localhost:8080
fat.meta=${fat_meta}
uat.meta=${uat_meta}
lpt.meta=${lpt_meta}
pro.meta=${pro_meta}
启动应用
执行main方法
com.ctrip.framework.apollo.portal.PortalApplication.main(String[])登录账号密码都是 apollo
http://localhost:8070/
客户端使用apollo
Apollo 新建应用
建好之后是这样的
再新建一个demo.properties文件,点“添加Namespace”->"创建Namespace"(默认是“关联公共Namespace”),输入“demo”,点“提交”就好了。
客户端应用接入
引入 apollo 客户端
<!-- apollo --> <dependency>
<groupId>com.ctrip.framework.apollo</groupId>
<artifactId>apollo-client</artifactId>
<version>1.6.0-SNAPSHOT</version>
</dependency>
配置apollo 参数
# apollo 应用id,可以跟sentinel的project name 同名。app.id=sentinel-demo-client
# metaServer 地址(实际上也是 config-service的地址,metaServer 跟 config-service 在同一个应用上)
apollo.meta=http://localhost:8080
# 开启apollo配置
apollo.bootstrap.enabled = true
# 配置需要从apollo 上 下载那些文件,并把这些文件注入到spring properties里面。 .properties 文件只需要一个文件名即可。
apollo.bootstrap.namespaces = application,demo
# 下载的文件临时存放路径
apollo.cacheDir=/Users/michaelfeng/apollo
自动之后,apollo客户端会从apollo平台拉取 application.properties,demo.properties 这两个文件。
更多使用参考官方文档。
以上是 Apollo——环境搭建 的全部内容, 来源链接: utcz.com/z/514753.html