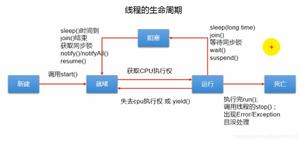
java线程和锁使用笔记

1)继承Thread类创建线程
/** * 继承Thread类创建线程
*/
public class CreateThreadByThread extends Thread {
@Override
public void run() {
//重写run方法
}
}
2)实现Runnable接口创建线程
/** * 实现Runnable接口创建线程
* @author liu.nh
*/
public class CreateThreadByRunnable implements Runnable {
@Override
public void run() {
//重写run方法
}
}
3)使用Callable和Future创建线程
import java.util.concurrent.Callable;import java.util.concurrent.FutureTask;/**
* 使用Callable和Future创建线程
* @author liu.nh
*/
public class CreateThreadByCallable implements Callable<Integer> {
@Override
public Integer call() {
int i = 0;
for (; i < 10; i++) {
System.out.println(Thread.currentThread().getName() + " " + i);
}
return i;
}
public static void main(String[] args) {
CreateThreadByCallable myThread = new CreateThreadByCallable();
FutureTask<Integer> futureTask = new FutureTask<>(myThread);
for (int i = 0; i < 10; i++) {
System.out.println(Thread.currentThread().getName() + " 的循环变量i的值" + i);
if (i == 6) {
new Thread(futureTask, "有返回值的线程").start();
}
}
try {
System.out.println("子线程的返回值:" + futureTask.get());
} catch (Exception e) {
e.printStackTrace();
}
}
}
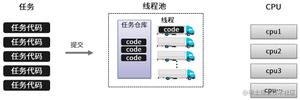
2、线程池
1)Executors创建线程池
int threadCount = 3;ExecutorService service = Executors.newFixedThreadPool(threadCount);
ExecutorService service = Executors.newScheduledThreadPool(threadCount);
ExecutorService service = Executors.newCachedThreadPool();
ExecutorService service = Executors.newSingleThreadExecutor();
使用示例
public static void main(String[] args) { int threadCount = 2;
ExecutorService service = Executors.newFixedThreadPool(threadCount);
for (int i = 0; i < 4; i++) {
Runnable run = new Runnable() {
@Override
public void run() {
System.out.println("thread start");
}
};
service.execute(run);
}
service.shutdown();
//service.awaitTermination(Long.MAX_VALUE, TimeUnit.DAYS);
System.out.println("all thread complete");
}
2)ThreadPoolExecutor创建线程池
int threadCount = 3;ThreadPoolExecutor executor = new ThreadPoolExecutor(threadCount, 6, 1, TimeUnit.DAYS, new LinkedBlockingQueue<Runnable>());
使用示例
public static void main(String[] args) { int threadCount = 3;
ThreadPoolExecutor executor = new ThreadPoolExecutor(threadCount, 6, 1, TimeUnit.DAYS, new LinkedBlockingQueue<Runnable>());
for (int i = 0; i < 20; i++) {
final int index = i;
executor.execute(new Runnable() {
public void run() {
try {
Thread.sleep(4000);
} catch (InterruptedException e) {
e.printStackTrace();
}
System.out.println(String.format("thread %d finished", index));
}
});
}
executor.shutdown();
}
3)配置公共线程池
application.properties配置
spring.task.scheduling.thread-name-prefix=thread_name_prefix_spring.task.scheduling.pool.size=10
spring.task.execution.thread-name-prefix=thread_name_prefix_
spring.task.execution.pool.core-size=6
spring.task.execution.pool.max-size=200
spring.task.execution.pool.queue-capacity=10
spring.task.execution.pool.allow-core-thread-timeout=true
spring.task.execution.pool.keep-alive=60
定义公共线程池
import org.springframework.aop.interceptor.AsyncUncaughtExceptionHandler;import org.springframework.beans.factory.annotation.Value;
import org.springframework.context.annotation.Bean;
import org.springframework.context.annotation.Configuration;
import org.springframework.scheduling.annotation.AsyncConfigurer;
import org.springframework.scheduling.annotation.EnableAsync;
import org.springframework.scheduling.concurrent.ThreadPoolTaskExecutor;
import java.util.concurrent.Executor;
import java.util.concurrent.ThreadPoolExecutor;
/**
* 公共线程池配置
* @author liu.nh
*/
@Configuration
@EnableAsync
public class ThreadAsyncConfigurer implements AsyncConfigurer {
@Value("${spring.task.execution.thread-name-prefix:thread_name_prefix_}")
private String threadNamePrefix;
@Value("${spring.task.scheduling.pool.size:10}")
private int corePoolSize;
@Value("${spring.task.execution.pool.max-size:100}")
private int maxPoolSize;
@Value("${spring.task.execution.pool.queue-capacity:10}")
private int queueCapacity;
@Value("${spring.task.execution.pool.keep-alive:60}")
private int keepAliveSeconds;
@Bean
public Executor taskExecutor() {
ThreadPoolTaskExecutor threadPool = new ThreadPoolTaskExecutor();
//设置核心线程数
threadPool.setCorePoolSize(corePoolSize);
//设置最大线程数
threadPool.setMaxPoolSize(maxPoolSize);
//线程池所使用的缓冲队列
threadPool.setQueueCapacity(queueCapacity);
//等待任务在关机时完成--表明等待所有线程执行完
threadPool.setWaitForTasksToCompleteOnShutdown(true);
//等待时间 (默认为0,此时立即停止),并没等待xx秒后强制停止
threadPool.setAwaitTerminationSeconds(60);
//线程空闲后的最大存活时间
threadPool.setKeepAliveSeconds(keepAliveSeconds);
//线程名称前缀
threadPool.setThreadNamePrefix(threadNamePrefix);
//rejection-policy:当pool已经达到max size的时候,如何处理新任务
//CALLER_RUNS:不在新线程中执行任务,而是有调用者所在的线程来执行
threadPool.setRejectedExecutionHandler(new ThreadPoolExecutor.CallerRunsPolicy());
//初始化线程
threadPool.initialize();
return threadPool;
}
@Override
public AsyncUncaughtExceptionHandler getAsyncUncaughtExceptionHandler() {
return null;
}
}
使用示例
@Testpublic void test1() {
ExecutorService taskExecutor = SpringUtils.getBean("taskExecutor");
for (int x = 0; x < 100; x++) {
taskExecutor.execute(new Thread(new Runnable() {
@Override
public void run() {
System.out.println("线程" + Thread.currentThread().getName());
}
}));
}
taskExecutor.shutdown();
}
3、synchronized jvm内部锁
synchronized线程类编写示例
/** * synchronized使用实例
* @author liu.nh
*/
public class SynchronizedDemo implements Runnable {
private static String threadName;
private static volatile Object objLock = "objLock";
private static volatile int count = 10;
public SynchronizedDemo(String threadName){
this.threadName = threadName;
}
/**
* 会出现线程安全问题
*/
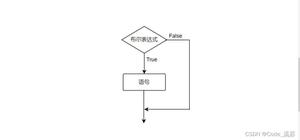
private synchronized void subCountA() {
System.out.println(threadName + ": " + count--);
}
/**
* 不会出现线程安全问题
* 相当与 synchronized(SynchronizedDemo.class){}
*/
private static synchronized void subCountB() {
System.out.println(threadName + ": " + count--);
}
/**
* 会出现线程安全问题
*/
private void subCountC() {
synchronized(this) {
System.out.println(threadName + ": " + count--);
}
}
/**
* 不会出现线程安全问题
*/
private void subCountD() {
synchronized(SynchronizedDemo.class) {
System.out.println(threadName + ": " + count--);
}
}
/**
* 不会出现线程安全问题
*/
private void subCountE() {
synchronized(objLock) {
System.out.println(threadName + ": " + count--);
}
}
@Override
public void run() {
//subCountA();
//subCountB();
//subCountC();
//subCountD();
subCountE();
}
}
synchronized线程类使用示例
import org.junit.Test;import org.junit.runner.RunWith;
import org.springframework.boot.test.context.SpringBootTest;
import org.springframework.test.context.junit4.SpringRunner;
import java.util.concurrent.ExecutorService;
import java.util.concurrent.Executors;
/**
* @author liu.nh
*/
@RunWith(SpringRunner.class)
@SpringBootTest
public class SynchronizedTest {
public static volatile int count = 10;
class SynchronizedDemo implements Runnable {
private String threadName;
public SynchronizedDemo(String threadName){
this.threadName = threadName;
}
/**
* 不会出现线程安全问题
*/
private void subCount() {
synchronized(SynchronizedDemo.class) {
System.out.println(threadName + ": " + count--);
}
}
@Override
public void run() {
subCount();
}
}
@Test
public void test(){
ExecutorService executorService = Executors.newFixedThreadPool(6);
for (int i = 0; i < 10; i++) {
SynchronizedDemo threadDemo = new SynchronizedDemo(">>>线程" + i);
executorService.execute(threadDemo);
}
executorService.shutdown();
}
}
4、CountDownLatch是一个倒数计数的锁,当倒数到0时触发事件,也就是开锁,其他线程就可以进入了
CountDownLatch编程示例
/** * 从名字可以看出,CountDownLatch是一个倒数计数的锁,当倒数到0时触发事件,也就是开锁,其他线程就可以进入了。
* 在一些应用场合中,需要等待某个条件达到要求后才能做后面的事情;同时当线程都完成后也会触发事件,以便进行后面的操作。
* CountDownLatch最重要的方法是countDown()和await(),前者主要是倒数一次,后者是等待倒数到0,如果没有到达0,就只有阻塞等待了。
* 一个CountDouwnLatch实例是不能重复使用的,也就是说它是一次性的,锁一经被打开就不能再关闭使用了,如果想重复使用,请考虑使用CyclicBarrier。
* 下面的例子简单的说明了CountDownLatch的使用方法,模拟了100米赛跑,10名选手已经准备就绪,只等裁判一声令下。当所有人都到达终点时,比赛结束。
* @author liu.nh
*/
public class CountDownLatchTest {
public static void main(String[] args) throws InterruptedException {
int playerCount = 10;
// 开始的倒数锁
final CountDownLatch begin = new CountDownLatch(1);
// 结束的倒数锁
final CountDownLatch end = new CountDownLatch(playerCount);
final ExecutorService exec = Executors.newCachedThreadPool();
for (int index = 0; index < playerCount; index++) {
final int NO = index + 1;
Runnable run = new Runnable() {
public void run() {
try {
begin.await();
Thread.sleep((long) (Math.random() * 10000));
System.out.println("No." + NO + " arrived");
} catch (InterruptedException e) {
} finally {
end.countDown();
}
}
};
exec.submit(run);
}
System.out.println(">>>>>>>>>>> Race Start >>>>>>>>>>>>");
begin.countDown();
end.await();
System.out.println(">>>>>>>>>>> Race Over >>>>>>>>>>>>");
exec.shutdown();
}
}
5、CyclicBarrier所有的线程必须同时到达栅栏位置,才能继续执行
CyclicBarrier编程示例
/** * 所有的线程必须同时到达栅栏位置,才能继续执行。
* CountDownLatch允许一个或多个线程等待一组事件的产生,而CyclicBarrier用于等待其他线程运行到栅栏位置。
* @author liu.nh
*/
public class CyclicBarrierTest {
static class cyclicBarrierDemo implements Runnable {
private CyclicBarrier cyclicBarrier;
public cyclicBarrierDemo(CyclicBarrier cyclicBarrier) {
this.cyclicBarrier = cyclicBarrier;
}
@Override
public void run() {
try {
System.out.println(Thread.currentThread().getName() + ">>>开始等待其他线程");
cyclicBarrier.await();
System.out.println(Thread.currentThread().getName() + ">>>开始执行");
// 工作线程开始处理,这里用Thread.sleep()来模拟业务处理
Thread.sleep(2000);
System.out.println(Thread.currentThread().getName() + ">>>执行完毕");
} catch (Exception e) {
e.printStackTrace();
}
}
}
public static void main(String[] args) {
int threadCount = 10;
CyclicBarrier cyclicBarrier = new CyclicBarrier(threadCount);
ExecutorService executorService = Executors.newCachedThreadPool();
for (int i = 0; i < threadCount; i++) {
System.out.println(">>>创建工作线程" + i);
cyclicBarrierDemo worker = new cyclicBarrierDemo(cyclicBarrier);
executorService.execute(worker);
}
executorService.shutdown();
}
}
6、Semaphore拿到信号量的线程可以进入代码,否则就等待
Semaphore编程示例
import java.util.concurrent.ExecutorService;import java.util.concurrent.Executors;
import java.util.concurrent.Semaphore;
/**
* 拿到信号量的线程可以进入代码,否则就等待。通过acquire()和release()获取和释放访问许可。
* 下面的例子只允许6个线程同时进入执行acquire()和release()之间的代码
* @author liu.nh
*/
public class SemaphoreTest {
public static void main(String[] args) {
ExecutorService exec = Executors.newCachedThreadPool();
// 只能5个线程同时访问
final Semaphore semp = new Semaphore(6);
// 模拟20个客户端访问
for (int index = 0; index < 20; index++) {
final int NO = index;
Runnable run = new Runnable() {
public void run() {
try {
// 获取许可
semp.acquire();
System.out.println("Accessing: " + NO);
Thread.sleep((long) (Math.random() * 10000));
// 访问完后,释放
semp.release();
} catch (InterruptedException e) {
}
}
};
exec.execute(run);
}
// 退出线程池
exec.shutdown();
}
}
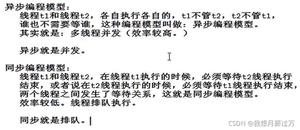
7、CallableFuture主线程等待子线程执行结束后才执行
CallableFuture编程示例
import java.util.concurrent.Callable;import java.util.concurrent.ExecutionException;
import java.util.concurrent.ExecutorService;
import java.util.concurrent.Executors;
import java.util.concurrent.Future;
import java.util.concurrent.TimeUnit;
/**
* 假设在main线程启动一个线程,然后main线程需要等待子线程结束后,再继续下面的操作,
* 我们会通过join方法阻塞main线程
* @author liu.nh
*/
public class CallableFutureTest {
public static void main(String[] args) throws InterruptedException, ExecutionException {
System.out.println("start main thread");
ExecutorService exec = Executors.newFixedThreadPool(5);
Callable<String> call = new Callable<String>() {
public String call() throws Exception {
System.out.println(" start new thread.");
Thread.sleep(1000 * 5);
System.out.println(" end new thread.");
return "some value.";
}
};
Future<String> task = exec.submit(call);
Thread.sleep(1000 * 2);
task.get(); // 阻塞,并待子线程结束,
exec.shutdown();
exec.awaitTermination(Long.MAX_VALUE, TimeUnit.DAYS);
System.out.println("end main thread");
}
}
8、ThreadLocal每个线程都有自己的实例
ThreadLocal编程示例
import java.util.concurrent.ExecutorService;import java.util.concurrent.Executors;
/**
* @author liu.nh
*/
public class ThreadLocalTest {
static class MyThread implements Runnable {
private static ThreadLocal<Integer> threadLocal = new ThreadLocal<>();
private String threadName;
public MyThread(String threadName) {
this.threadName = threadName;
}
@Override
public void run() {
for (int i = 0; i < 3; i++) {
threadLocal.set(i);
System.out.println(threadName + " threadLocal.get() = " + threadLocal.get());
}
}
}
public static void main(String[] args) {
ExecutorService executorService = Executors.newCachedThreadPool();
for (int i = 0; i < 12; i++) {
MyThread myThread = new MyThread(">>>线程" + i);
executorService.execute(myThread);
}
executorService.shutdown();
System.out.println(">>>每个线程中都有自己的实例数据");
}
}
以上是 java线程和锁使用笔记 的全部内容, 来源链接: utcz.com/z/513143.html