微服务(springcloud配置中心)

1:理解bootstrap.yaml
它会在application之前加载,如果和application有同名属性,先启动的会被覆盖。
2:配置中心与我们的注册中心,必须要有一个先启动
3:spring的配置与环境化
在spring3.0-》
<beans profile =”test”> <bean id=””>
</beans>
4:搭建一个配置中心
Git svn 本地文件
读取本地文件:理解 ${user.dir}的作用
1 在配置中心/resources下新建文件夹configs
创建三个文件 eurekaserver-dev.yml eurekaserver-prod.yml eurekaserver-prod.yml
2 引入jar
<dependencies> <dependency>
<groupId>org.springframework.boot</groupId>
<artifactId>spring-boot-starter-actuator</artifactId>
</dependency>
<dependency>
<groupId>org.springframework.boot</groupId>
<artifactId>spring-boot-starter-web</artifactId>
</dependency>
<!--引入核心jar-->
<dependency>
<groupId>org.springframework.cloud</groupId>
<artifactId>spring-cloud-config-server</artifactId>
</dependency>
<dependency>
<groupId>org.springframework.boot</groupId>
<artifactId>spring-boot-starter-test</artifactId>
<scope>test</scope>
</dependency>
</dependencies>
<dependencyManagement>
<dependencies>
<dependency>
<groupId>org.springframework.cloud</groupId>
<artifactId>spring-cloud-dependencies</artifactId>
<version>${spring-cloud.version}</version>
<type>pom</type>
<scope>import</scope>
</dependency>
</dependencies>
3 配置文件:
server: port: 5000
spring:
application:
name: config-server
cloud:
config:
server:
git:
##定义去拉取配置的地址
uri: D:\lesson-1\config-server\src\main\resources\configs
management:
endpoints:
web:
exposure:
include: "*"
4 打开git初始化:
git init git add .
git commit -m “frist commit”
5 在启动类上加上注解@EnableConfigServer
6 配置中心完成。
客户端连接:
1 新建文件---bootstrap.yml 配置如下:
spring: application:
name: eurekaserver
cloud:
config:
name: eurekaserver
uri : http://localhost:5000/
profiles:
active: dev
server:
port: 10000
2 引入jar包
<dependency> <groupId>org.springframework.cloud</groupId>
<artifactId>spring-cloud-config-client</artifactId>
</dependency>
在启动类上加入@EnableDiscoveryClient
客户端完成,启动就可以访问
根据在线地址向git去拉取配置:
1:配置文件如下:
##定义一个名字spring:
application:
name: dnconfig
##配置服务器的文件地址git仓库
cloud:
config:
server:
git:
#这是老师的git地址,可以自己去定义一个git地址去获取
uri: https://github.com/yaojin156/tmp.git
#${user.dir}srcmainesourcesconfigs
#定义为强制向git去拉取配置
force-pull: true
##定义当前这个端口
server:
port: 9090
##定义env 和 health的开放 2.0中这个方式已经被取消
#management:
# security:
# enabled: true
##定义env 和health的开放 2.X版本应该这么写
management:
endpoints:
web:
exposure:
include: env
2:在计算机中新建三个配置文件(我的文件放在D:download mp)
orderserver-prod.properties表示生产服务配置
orderserver-test.properties表示测试配置
orderserver-dev.properties表示开发配置
指定配置路径为:
cloud: config:
server:
git:
#这是老师的git地址,可以自己去定义一个git地址去获取
uri: https://github.com/yaojin156/tmp.git
3:将自己的配置文件提交到在线的git中
git clone https://github.com/yaojin156/tmp.git
git add orderserver-*.properties
git commit -m "fritst commit"
git push
4:配置强制拉取git文件
cloud: config:
server:
git:
uri: https://github.com/yaojin156/tmp.git
#${user.dir}srcmainesourcesconfigs
#定义为强制向git去拉取配置
force-pull: true
6:开始测试本地配置是否生效
http:localhost:9090/order/server-prod
搭建一个客户端configclient
首先了解bootstarp配置
bootstarp配置文件会被先加载,一旦在我们的application中存在同名配置,会直接生效application中的配置,所以,我们可以认为这个是一个覆盖的过程。
了解一下springboot的Actuator监控
Actuator是springboot提供的一个监控方式。
Actuator是Spring Boot提供的对应用系统的自省和监控的集成功能,可以查看应用配置的详细信息,例如自动化配置信息、创建的Spring beans以及一些环境属性等。
Actuator的监控分两类:原生端点和用户自定义端点;自定义端点主要是指扩展性,用户可以根据自己的实际应用,定义一些比较关心的指标,在运行期进行监控。
原声端点分为三类
- 应用配置类:可以查看应用在运行期的静态信息:例如自动配置信息、加载的springbean信息、yml文件配置信息、环境信息、请求映射信息;
- 度量指标类:主要是运行期的动态信息,例如堆栈、请求连、一些健康指标、metrics信息等;
- 操作控制类:主要是指shutdown,用户可以发送一个请求将应用的监控功能关闭。
Actuator 提供了 13 个接口
我们只需要去了解我们今天要用的 env/{name} 根据名称获得特定的属性值
1:配置bootstrap.yml
spring: cloud:
config:
#定义为文件的名字
name: order-server
#去获取到配置中心的地址
uri: http://127.0.0.1:9090/
#获取到我们的profile名字
profile: test
2:配置application.yml
##定义端口号和实例名称server:
port: 8091
spring:
application:
name: spring-cloud-config-client
###定义开启env
management:
endpoints:
web:
exposure:
include: env
3:启动config-client 访问
http://localhost:8091/actuator/env
可以看到我们的配置中心内部的配置信息
4:开始从配置中心获取配置信息
@Value("${name}") private String name;
@Value("${id}")
private String id;
@RequestMapping("/hi")
public String hi(){
System.out.println("输出的东西是:id:"+id+",name:"+name);
return "id:"+id+",name:"+name;
}
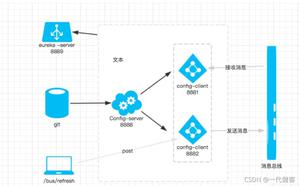
5: 如果服务端配置发生变化,客户端如何发生变化?
我们的配置并不是一成不变的,如果我去移动了服务器,或者我需要新加入一个节点,那么我就需要在配置项中把配置进行修改,那么在这个时候,我们难道要去重启我们的所有服务节点吗?
在配置文件orderserver-test.properties中新加入配置
dn.name = nickdn.age = 17
’
刷新服务,配置已经在配置中心可以显示了。
但是,在我们的客户端
并没有相应的配置项存在,那么问题就来了。
这时候我们该怎么办?
spring给我们提供了一个刷新的方式,可以通过刷新配置端点来解决当前的问题。
具体操作如下:修改客户端配置application.yml
management: endpoints:
web:
exposure:
#让客户端支持env和refresh方式
include: env,refresh
通过postman向我们的配置服务器发送请求
http://localhost:8091/actuator/refresh 记得是POST方式
这样我们就可以获取到修改后最新的配置了。
正常情况下,我们修改了配置需要cloud的Bus也就是事件总线来对我们客户端通知进行拉取,现在暂时不讲。留在后面一起完成。这里只需要知道这种方式可以去完成我们的目标即可。
理解refresh的作用
官方文档地址:
https://cloud.spring.io/spring-cloud-static/spring-cloud-config/2.1.0.RC3/single/spring-cloud-config.html
在这段话中,官方文档提到了一个叫做spring-cloud-config-monitor的东西,这一段话中主要的意思其实就是我们的配置中心的变更可以用spring cloud Bus来对我们进行通知。如果在配置服务器中添加Spring - Cloud配置监视器库的依赖项并激活Spring云总线,则启用/monitor端点。
注意文档中这一段:
When the webhook is activated, the Config Server sends a RefreshRemoteApplicationEvent targeted at the applications it thinks might have changed.
当webhook被激活时,配置服务器发送一个RefreshRemoteApplicationEvent,目标是它认为可能已经更改的应用程序。
好,这一块东西我们暂时不讲,先寄存着,我们先了解一下refresh的原理
public synchronized Set<String> refresh() { //调用下面的刷新方法。
Set<String> keys = this.refreshEnvironment();
//清空RefreshScope缓存
// RefreshScope用新的环境参数重新生成Bean
this.scope.refreshAll();
return keys;
}
public synchronized Set<String> refreshEnvironment() {
//提取标准参数(SYSTEM,JNDI,SERVLET)之外所有参数变量
Map<String,Object>before= this.extract(this.context.getEnvironment().getPropertySources());
//把原来的Environment里的参数放到一个新建的Spring Context容器下重新加载,完事之后关闭新容器
this.addConfigFilesToEnvironment();
//比较出变更项
Set<String> keys = this.changes(before,
this.extract(this.context.getEnvironment().getPropertySources())).keySet();//提取更新过的参数(排除标准参数)
//发送EnvironmentChangeEvent
//发布环境变更事件,接收:EnvironmentChangeListener/LoggingRebinder
this.context.publishEvent(new EnvironmentChangeEvent(this.context, keys));
return keys;
}
以上是 微服务(springcloud配置中心) 的全部内容, 来源链接: utcz.com/z/512990.html