【原创】(十六)Linux内存管理之CMA

背景
Read the fucking source code!--By 鲁迅A picture is worth a thousand words.--By 高尔基
说明:
- Kernel版本:4.14
- ARM64处理器,Contex-A53,双核
- 使用工具:Source Insight 3.5, Visio
1. 概述
Contiguous Memory Allocator, CMA,连续内存分配器,用于分配连续的大块内存。
CMA分配器,会Reserve一片物理内存区域:
- 设备驱动不用时,内存管理系统将该区域用于分配和管理可移动类型页面;
- 设备驱动使用时,用于连续内存分配,此时已经分配的页面需要进行迁移;
此外,CMA分配器还可以与DMA子系统集成在一起,使用DMA的设备驱动程序无需使用单独的CMA API。
2. 数据结构
内核定义了struct cma结构,用于管理一个CMA区域,此外还定义了全局的cma数组,如下:
struct cma { unsigned long base_pfn;
unsigned long count;
unsigned long *bitmap;
unsigned int order_per_bit; /* Order of pages represented by one bit */
struct mutex lock;
#ifdef CONFIG_CMA_DEBUGFS
struct hlist_head mem_head;
spinlock_t mem_head_lock;
#endif
const char *name;
};
extern struct cma cma_areas[MAX_CMA_AREAS];
extern unsigned cma_area_count;
base_pfn:CMA区域物理地址的起始页帧号;count:CMA区域总体的页数;*bitmap:位图,用于描述页的分配情况;order_per_bit:位图中每个bit描述的物理页面的order值,其中页面数为2^order值;
来一张图就会清晰明了:
3. 流程分析
3.1 CMA区域创建
3.1.1 方式一 根据dts来配置
之前的文章也都分析过,物理内存的描述放置在dts中,最终会在系统启动过程中,对dtb文件进行解析,从而完成内存信息注册。
CMA的内存在dts中的描述示例如下图:
在dtb解析过程中,会调用到rmem_cma_setup函数:
RESERVEDMEM_OF_DECLARE(cma, "shared-dma-pool", rmem_cma_setup);3.1.2 方式二 根据参数或宏配置
可以通过内核参数或配置宏,来进行CMA区域的创建,最终会调用到cma_declare_contiguous函数,如下图:
3.2 CMA添加到Buddy System
在创建完CMA区域后,该内存区域成了保留区域,如果单纯给驱动使用,显然会造成内存的浪费,因此内存管理模块会将CMA区域添加到Buddy System中,用于可移动页面的分配和管理。CMA区域是通过cma_init_reserved_areas接口来添加到Buddy System中的。
core_initcall(cma_init_reserved_areas);core_initcall宏将cma_init_reserved_areas函数放置到特定的段中,在系统启动的时候会调用到该函数。
3.3 CMA分配/释放
- CMA分配,入口函数为
cma_alloc:
- CMA释放,入口函数为
cma_release:函数比较简单,直接贴上代码
/** * cma_release() - release allocated pages
* @cma: Contiguous memory region for which the allocation is performed.
* @pages: Allocated pages.
* @count: Number of allocated pages.
*
* This function releases memory allocated by alloc_cma().
* It returns false when provided pages do not belong to contiguous area and
* true otherwise.
*/
bool cma_release(struct cma *cma, const struct page *pages, unsigned int count)
{
unsigned long pfn;
if (!cma || !pages)
return false;
pr_debug("%s(page %p)
", __func__, (void *)pages);
pfn = page_to_pfn(pages);
if (pfn < cma->base_pfn || pfn >= cma->base_pfn + cma->count)
return false;
VM_BUG_ON(pfn + count > cma->base_pfn + cma->count);
free_contig_range(pfn, count);
cma_clear_bitmap(cma, pfn, count);
trace_cma_release(pfn, pages, count);
return true;
}
3.4 DMA使用
代码参考driver/base/dma-contiguous.c,主要包括的接口有:
/** * dma_alloc_from_contiguous() - allocate pages from contiguous area
* @dev: Pointer to device for which the allocation is performed.
* @count: Requested number of pages.
* @align: Requested alignment of pages (in PAGE_SIZE order).
* @gfp_mask: GFP flags to use for this allocation.
*
* This function allocates memory buffer for specified device. It uses
* device specific contiguous memory area if available or the default
* global one. Requires architecture specific dev_get_cma_area() helper
* function.
*/
struct page *dma_alloc_from_contiguous(struct device *dev, size_t count,
unsigned int align, gfp_t gfp_mask);
/**
* dma_release_from_contiguous() - release allocated pages
* @dev: Pointer to device for which the pages were allocated.
* @pages: Allocated pages.
* @count: Number of allocated pages.
*
* This function releases memory allocated by dma_alloc_from_contiguous().
* It returns false when provided pages do not belong to contiguous area and
* true otherwise.
*/
bool dma_release_from_contiguous(struct device *dev, struct page *pages,
int count);
在上述的接口中,实际调用的就是cma_alloc/cma_release接口来实现的。
整体来看,CMA分配器还是比较简单易懂,也不再深入分析。
4.后记
内存管理的分析先告一段落,后续可能还会针对某些模块进一步的研究与完善。
内存管理子系统,极其复杂,盘根错节,很容易就懵圈了,尽管费了不少心力,也只能说略知皮毛。
学习就像是爬山,面对一座高山,可能会有心理障碍,但是当你跨越之后,再看到同样高的山,心理上你将不再畏惧。
接下来将研究进程管理子系统,将任督二脉打通。
未来会持续分析内核中的各类框架,并发机制等,敬请关注,一起探讨。
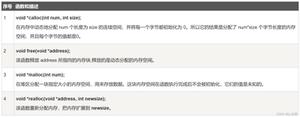
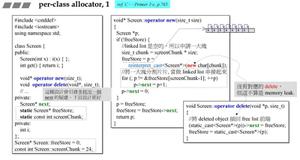
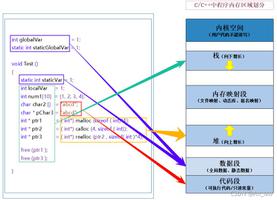
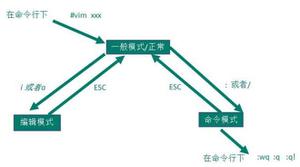
以上是 【原创】(十六)Linux内存管理之CMA 的全部内容, 来源链接: utcz.com/z/512633.html