Linux:搭建samba服务器

samba服务器" title="samba服务器">samba服务器的搭建">samba服务器的搭建
修改防火墙设置
firewall-cmd --permanent --add-service=samba //设置防火墙firewall-cmd --reload //重新加载防火墙
安装samba服务并启动samba服务
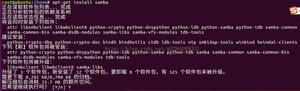
yum install -y samba samba-client //安装服务 systemctl start smb.service nmb.service //启动服务
建立共享目录
mkdir /home/company 创建访问账号
useradd -s /sbin/nologin xzusr smbpasswd -a xzusr
选项说明:
-a 添加 smb 帐号;
-x 删除 smb 帐号;
-d 禁用 smb 帐号;
-e 启用 smb 帐号
修改配置文件
修改配置文件:/etc/samba/smb.conf
[company] //共享名称为 company comment = company share//共享注释
path = /home/company //指定共享路径
browseable = yes //所有人可见
guest ok = no //拒绝匿名访问
writeable = yes //支持写入数据
valid users=xzusr,gcusr,xsusr //允许访问的用户列表
write list=xzusr //允许写入的用户列表
修改配置文件以后,必须重启服务(systemctl restart smb nmb)使更改生效
测试配置文件
testparm 当配置文件的语法出错时会给出提示,修改再次运行 testparm 测试测试samba服务器
在 linux 客户端访问测试:smbclient -U smbuser //xxx.xxx.xxx.xxx/company 查看服务器的共享文件有哪些:smbclient -L xxx.xxx.xxx.xxx
查看 smbuser 用户可以访问的共享文件:smbclient -L xxx.xxx.xxx.xxx -U smbuser
匿名共享
1)创建共享目录: [root@localhost home]# mkdir share
[root@localhost home]# echo 'hello,world!'>/home/share/hello.txt
2)修改配置文件
[root@localhost home]# vim /etc/samba/smb.conf
security=share
[share] 共享名
comment=Linux share 共享目录的注释、说明信息
path=/home/share 共享目录
public=yes 允许所有samba用户访问该共享目录
writable = yes
printable = no
write list = +staff
3)修改后重启samba服务
[root@localhost home]#service smb restart
4)在windows客户端测试访问:
开始--运行--\xxx.xxx.xxx.xxx
此时发现可以看到共享文件,但无法查看其内容,这是由于samba服务器上的
selinux导致的,需要将selinux改为许可模式:
[root@localhost home]# setenforce 0
带身份验证的文件共享
(1)创建samb用户: [root@localhost home]# useradd smbuser
[root@localhost home]# smbpasswd -a smbuser
New SMB password:
Retype new SMB password:
使用smbpasswd命令可以对samba用户进行管理,主要选项有:
-h 显示smbpasswd命令的帮助信息
-a 添加指定的samba用户
-d 禁用指定的samba用户
-e 启用指定的samba用户
-x 删除指定的samba用户
(2)修改配置文件
将global中的 security=share 改为:security=user
改完后需要重启smb服务
[root@localhost home]#service smb restart
(3)访问测试
在windows客户端:开始--运行--\192.168.10.1
此时你会发现需要输入用户和密码进行验证。
如果利用smbuser用户连接共享文件后,你想用smbadmin用户连接共享文件时你会发现是直接连接的。这是因为windows访问时会缓存,用如下办法可解决此办法:
开始--运行--cmd--net use * /del--y
设置共享权限
所有用户都可以写入
(1)修改配置文件[root@localhost home]# vim /etc/samba/smb.conf
[share]
comment=Linux share
path=/home/share
public=yes
writable=yes
(2)修改共享目录的权限:
[root@localhost home]#chmod 777 /home/share
setfacl -m u:nobody:rwx /home/share 访问控制列表ACL
setfacl -x
只有指定用户可以写入
[root@localhost home]# vim /etc/samba/smb.conf [share]
comment=Linux share
path=/home/share
public=yes
write list=smbadmin
writable=yes表示所有用户都有写入权限
write list=smbadmin表示指定smbadmin用户有写入权限
如果要指定多个用户有写入权限,用户之间用,号隔开:write list=smbadmin,smbuser
只有指定用户可以访问
[root@localhost home]# vim /etc/samba/smb.conf [share]
comment=Linux share
path=/home/share
valid users=smbuser,smbadmin
write list=smbadmin
允许/拒绝指定用户的访问
只允许在IP地址为x.x.x.x的客户端上访问teach共享目录[tech]
comment=technet
path=/home/technet
writable=yes
hosts allow=x.x.x.x
允许地址段x.x.x.x/xx内的用户访问tech共享目录,IP地址为x.x.x.x的计算机除外
[tech]
Comment=technet
path=/home/technet
writable=yes
hosts allow=x.x.x.x EXCEPT x.x.x.x
teach(/home/tech),只有tech组的成员可以访问和写入权限
[tech]
Comment=technet
path=/home/technet
valid users=@tech
write list=@tech
以上是 Linux:搭建samba服务器 的全部内容, 来源链接: utcz.com/z/511057.html