SpringCloud——配置中心Config

SpringCloud——配置中心Config
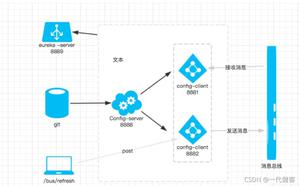
SpringCloudConfig作为远程配置中心,即可以从本地读取配置文件,也可以从远程git仓库读取配置文件,甚至可以用SpringCloudBus刷新配置。
一、搭建SpringCloudConfig
(1)使用本地文件
config-server
- pom.xml
<parent> <artifactId>config-test</artifactId>
<groupId>com.calvin.config</groupId>
<version>1.0-SNAPSHOT</version>
</parent>
<modelVersion>4.0.0</modelVersion>
<artifactId>config-client</artifactId>
<dependencies>
<dependency>
<groupId>org.springframework.boot</groupId>
<artifactId>spring-boot-starter-web</artifactId>
</dependency>
<dependency>
<groupId>org.springframework.cloud</groupId>
<artifactId>spring-cloud-starter-config</artifactId>
</dependency>
</dependencies>
<build>
<plugins>
<plugin>
<groupId>org.springframework.boot</groupId>
<artifactId>spring-boot-maven-plugin</artifactId>
</plugin>
</plugins>
</build>
- ConfigServerApplication.java
/** * <p>
* 添加@EnableConfigServer注解,开启远程配置服务
* </p>
*
* @author Calvin
* @date 2019/11/13
* @since
*/
@SpringBootApplication
@EnableConfigServer
public class ConfigServerApplication {
public static void main(String[] args) {
SpringApplication.run(ConfigServerApplication.class, args);
}
}
- application.yml
spring: application:
name: config-server
cloud:
config:
server:
native:
search-locations: classpath:/shared #本地文件路径
profiles:
active: native
server:
port: 8050
- config-client-dev.yml
#为config-client提供的dev文件,创建在/resources/shared下server:
port: 9030
config-client
- pom.xml
<parent> <artifactId>config-test</artifactId>
<groupId>com.calvin.config</groupId>
<version>1.0-SNAPSHOT</version>
</parent>
<modelVersion>4.0.0</modelVersion>
<artifactId>config-client</artifactId>
<dependencies>
<dependency>
<groupId>org.springframework.boot</groupId>
<artifactId>spring-boot-starter-web</artifactId>
</dependency>
<dependency>
<groupId>org.springframework.cloud</groupId>
<artifactId>spring-cloud-starter-config</artifactId>
</dependency>
</dependencies>
<build>
<plugins>
<plugin>
<groupId>org.springframework.boot</groupId>
<artifactId>spring-boot-maven-plugin</artifactId>
</plugin>
</plugins>
</build>
- bootstrap.yml
#此处使用application.yml因为spring:
application:
name: config-client
cloud:
config:
uri: http://localhost:8050 #指定远程配置地址
fail-fast: true
profiles:
active: dev #dev环境,获取配置的时候文件名为${spring.application.name}-${spring.cloud.profiles.active}
- ConfigClientApplication.java
/** * <p>
* 简单的web项目,只拉远程配置
* </p>
*
* @author Calvin
* @date 2019/11/15
* @since
*/
@SpringBootApplication
public class ConfigClientApplication {
public static void main(String[] args) {
SpringApplication.run(ClientApplication.class, args);
}
}
- HelloController.java
/** * <p>
* 测试接口
* </p>
*
* @author Calvin
* @date 2019/11/15
* @since
*/
@RestController
public class HelloController {
@Value("${server.port}")
private String port;
@Value("${spring.application.name}")
private String applicationName;
@GetMapping("hello")
public String hello(){
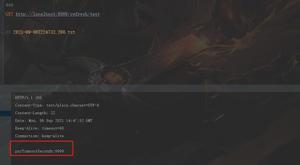
return String.format("hello , this is %s, port: %s", applicationName, port);
}
}
- 测试结果
- 先启动ConfigServerApplication,再启动ConfigClientApplication
- 浏览器调用 http://localhost:9030/hello
(2)使用git远程仓库文件
- 改造config-server/application.yml
spring: application:
name: config-server
cloud:
config:
server:
git:
uri: https://gitee.com/devilscode/cloud-practice.git
search-paths: files
default-label: config-files
server:
port: 8050
- 把config-client-dev.yml文件上传到 https://gitee.com/devilscode/cloud-practice.git 地址的config-files分支,下面创建一个目录files,将文件上传到files下。
- 然后config-server, config-client,会得到上文一样的结果
- 踩坑:关于分支配置: {spring.cloud.config.label}是不能再我使用的这个版本中起作用的,所以采用了{spring.cloud.config.server.git.default-label}
二、高可用SpringCloudConfig
1. config-server向eureka注册
- pom.xml
<!-- 增加配置 --><dependency>
<groupId>org.springframework.cloud</groupId>
<artifactId>spring-cloud-starter-eureka</artifactId>
</dependency>
- bootstrap.yml
spring: application:
name: config-server
cloud:
config:
server:
git:
uri: https://gitee.com/devilscode/cloud-practice.git
search-paths: files
default-label: config-files
server:
port: 8050
#增加向eureka注册
eureka:
client:
service-url:
defaultZone: http://localhost:8010/eureka/
instance:
hostname: localhost
- ConfigServerApplication.java
/** * <p>
* 添加@EnableConfigServer注解,开启远程配置服务
* v2增加了@EnableEurekaClient表示向eureka注册中心进行注册
* </p>
*
* @author Calvin
* @date 2019/11/13
* @since
*/
@SpringBootApplication
@EnableConfigServer
@EnableEurekaClient
public class ConfigServerApplication {
public static void main(String[] args) {
SpringApplication.run(ConfigServerApplication.class, args);
}
}
2. config-client从eureka获取配置
- pom.xml
<!-- 增加配置 --><dependency>
<groupId>org.springframework.cloud</groupId>
<artifactId>spring-cloud-starter-eureka</artifactId>
</dependency>
- bootstrap.yml
spring: application:
name: config-client
cloud:
config:
fail-fast: true
#修改为向注册中心获取服务地址
discovery:
service-id: config-server
enabled: true
profiles:
active: dev
#向注册中心注册为一个服务
eureka:
client:
service-url:
defaultZone: http://localhost:8010/eureka/
instance:
hostname: localhost
- ConfigServerApplication.java
/** * <p>
* v2增加@EnableEurekaClient注解
* </p>
*
* @author Calvin
* @date 2019/11/15
* @since
*/
@EnableEurekaClient
@SpringBootApplication
public class ClientApplication {
public static void main(String[] args) {
SpringApplication.run(ClientApplication.class, args);
}
}
3. 启动项目
- 启动eureka-server注册中心
- 启动config-server并且向注册中心注册成功
- 启动config-client注册并且获取配置
一定要等待config-server向eureka注册成功以后再启动config-client,否则正确获取serviceId对应的实例
4. 其他高可用配置
- 私服仓库指定密码
spring: cloud:
config:
server:
git:
uri: https://github.com/spring-cloud-samples/config-repo
#指定username和password
username: trolley
password: spanpassword
- 占位符
#支持{application}和{profile}(以及{label})的占位符spring:
cloud:
config:
server:
git:
uri: https://github.com/myorg/{application}
- 模式匹配和多个存储库
#使用pattern进行模式匹配,是一个数组spring:
cloud:
config:
server:
git:
uri: https://github.com/spring-cloud-samples/config-repo
repos:
simple: https://github.com/simple/config-repo
special:
pattern: special*/dev*,*special*/dev*
uri: https://github.com/special/config-repo
local:
pattern: local*
uri: file:/home/configsvc/config-repo
详细学习SpringCloudConfig,可以查阅官方SpringCloudConfig文档
三、总结
- 本文使用代码简单构建了SpringCloudConfig配置中心
- 介绍了本地配置和git仓库远程配置两种方式
- 介绍了周边的相关配置,并且踩坑一个
- 缺一个利用SpringCloudBus刷新配置的,这个在SpringCloudBus中一起实现
本文代码
系列地址
- 初识微服务之功能篇 微服务功能之通读
- Spring Cloud Eureka 高可用服务注册中心
- Spring Cloud Ribbon 微服务消费之负载均衡
- Spring Cloud Feign 声明式调用Java Http客户端
- Spring Cloud Hystrix 熔断器,故障解决方案
- Spring Cloud Zuul 网关监控
以上是 SpringCloud——配置中心Config 的全部内容, 来源链接: utcz.com/z/510949.html