崛起于Springboot2.X+100秒掌握异步任务(55)

《SpringBoot2.X心法总纲》
1、应用场景
如果觉得消息队列太繁琐了,对于异步发送短信、邮件、app消息推送,等等都可以使用简单的异步来解决。
2、异步配置
Springboot启动类添加注解如下,表示开启,会自动进行扫描。
@EnableAsync
异步任务类添加注解
@Async@Component
3、编写异步Task
@Async@Component
public class AsyncTask {
public Future<String> task1() throws InterruptedException{
long begin = System.currentTimeMillis();
Thread.sleep(1000L);
long end = System.currentTimeMillis();
System.out.println("异步任务async1:耗时="+(end-begin));
return new AsyncResult<String>("任务1");
}
public Future<String> task2() throws InterruptedException{
long begin = System.currentTimeMillis();
Thread.sleep(2000L);
long end = System.currentTimeMillis();
System.out.println("异步任务async2:耗时="+(end-begin));
return new AsyncResult<String>("任务2");
}
public Future<String> task3() throws InterruptedException{
long begin = System.currentTimeMillis();
Thread.sleep(3000L);
long end = System.currentTimeMillis();
System.out.println("异步任务async3:耗时="+(end-begin));
return new AsyncResult<String>("任务3");
}
}
4、编写同步Task
@Componentpublic class SyncTask {
public Boolean task1() throws InterruptedException{
long begin = System.currentTimeMillis();
Thread.sleep(1000L);
long end = System.currentTimeMillis();
System.out.println("同步任务sync1:耗时="+(end-begin));
return true;
}
public Boolean task2() throws InterruptedException{
long begin = System.currentTimeMillis();
Thread.sleep(2000L);
long end = System.currentTimeMillis();
System.out.println("同步任务sync2:耗时="+(end-begin));
return true;
}
public boolean task3() throws InterruptedException {
long begin = System.currentTimeMillis();
Thread.sleep(3000L);
long end = System.currentTimeMillis();
System.out.println("同步任务sync3:耗时="+(end-begin));
return true;
}
}
5、controller
@RestControllerpublic class TestController {
@Autowired
AsyncTask asyncTask;
@Autowired
SyncTask syncTask;
@GetMapping(value = "/testTask")
public String testTask(int type) throws InterruptedException {
// type:1、异步任务测试 2、同步任务测试
long begin = System.currentTimeMillis();
if (type == 1) {
Future<String> async1 = asyncTask.task1();
Future<String> async2 = asyncTask.task2();
Future<String> async3 = asyncTask.task3();
//如果都执行往就可以跳出循环,isDone方法如果此任务完成,true
while (true){
if (async1.isDone() && async2.isDone() && async3.isDone()) {
break;
}
}
} else {
boolean sync1 = syncTask.task1();
boolean sync2 = syncTask.task2();
boolean sync3 = syncTask.task3();
//如果都执行往就可以跳出循环,isDone方法如果此任务完成,true
while (true){
if (sync1 && sync2 && sync3) {
break;
}
}
}
long end = System.currentTimeMillis();
long total = end-begin;
return "执行总耗时="+total;
}
}
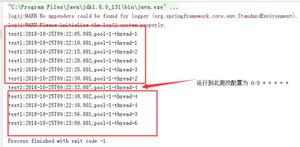
6、测试接口
异步任务测试:http://localhost:8080/testTask?type=1
结果:
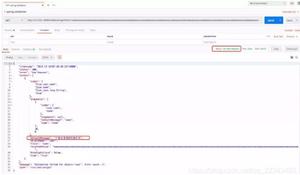
同步任务测试:http://localhost:8080/testTask?type=2
结果:
7、总结
综上所看,异步为3秒左右,同步为6秒,故此异步任务成功。异步任务需要用Future<String>返回结果AsyncResult<String>("")。
以上是 崛起于Springboot2.X+100秒掌握异步任务(55) 的全部内容, 来源链接: utcz.com/z/510517.html