webpack4快速搭建

安装
npm install --save-dev webpack@4.30.0 webpack-cli@3.3.2更新 package.json 脚本
"scripts": { "build": "webpack --config webpack.config.js"
}
更新目录结构
webpack-demo |- package.json
+ |- webpack.config.js
+ |- index.html
+ |- /src
+ |- index.js
更新 webpack.config.js
const path = require('path');module.exports = {
entry: './src/index.js',
output: {
filename: 'bundle.js',
path: path.resolve(__dirname, 'dist')
}
};
设定 HtmlWebpackPlugin
npm install --save-dev html-webpack-plugin@3.2.0# webpack.config.js
const HtmlWebpackPlugin = require('html-webpack-plugin');
// ...
plugins: [
new HtmlWebpackPlugin({
filename: path.resolve(__dirname, 'dist/index.html'),
template: path.resolve(__dirname, 'index.html'),
inject: true,
chunksSortMode: 'dependency'
})
]
清理 /dist 文件夹
npm install clean-webpack-plugin@1.0.1 --save-dev# webpack.config.js
const CleanWebpackPlugin = require('clean-webpack-plugin');
// ...
plugins: [
new CleanWebpackPlugin(['dist'])
],
使用观察模式
"watch": "webpack --watch"运行 npm run watch 可以实时编译文件。
配置 babel
npm install -D babel-loader@7.1.4npm install -D babel-core@6.26.0
npm install -D babel-preset-env@1.6.1
#
npm install -D babel-loader@7.1.4 babel-core@6.26.0 babel-preset-env@1.6.1
新建 .babelrc 文件
{ "presets": ["env"]
}
修改 webpack.config.js
module.exports={ module: {
rules: [
{
test: /\.js$/,
exclude: /node_modules/,
loader: "babel-loader"
}
]
}
}
配置 sass
npm install -D node-sass@4.11.0 sass-loader@7.1.0 css-loader@2.1.0 style-loader@0.23.1# webpack.config.js
module: {
rules: [
{
test: /\.scss$/,
use: ['style-loader', 'css-loader', 'sass-loader']
}
]
}
运行
npm run build调试模式
安装依赖
npm install --save-dev webpack-dev-server修改 webpack.config.js
const path = require('path');const HtmlWebpackPlugin = require('html-webpack-plugin');
const CleanWebpackPlugin = require('clean-webpack-plugin');
module.exports = {
entry: {
test: './src/test.js'
},
output: {
filename: '[name].js',
path: path.resolve(__dirname, 'dist')
},
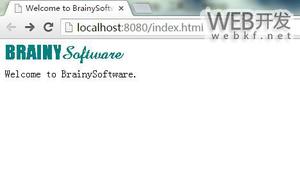
// 告知 webpack-dev-server,在 localhost:8080 下建立服务,将 dist 目录下的文件,作为可访问文件。
devServer: {
contentBase: './dist'
},
plugins: [
new HtmlWebpackPlugin({
filename: path.resolve(__dirname, 'dist/index.html'),
template: path.resolve(__dirname, 'src/test.html'),
inject: true,
chunksSortMode: 'dependency'
}),
new CleanWebpackPlugin(['dist'])
]
};
在 package.json 中添加脚本
"dev": "webpack-dev-server --open"附录
阅读原文:https://blog.mazey.net/1514.html
以上是 webpack4快速搭建 的全部内容, 来源链接: utcz.com/z/508990.html