如何在CentOS 7上安装iptables
从CentOS 7开始, FirewallD 取代iptables作为默认的防火墙管理工具。
FirewallD是一个完整的防火墙解决方案,可以使用名为firewall-cmd的命令行实用程序进行控制。如果您对Iptables命令行语法比较满意,则可以禁用FirewallD并返回经典的iptables设置。
本教程将向您展示如何禁用FirewallD服务和安装iptables。
先决条件
开始学习本教程之前,请确保您以具有sudo权限的用户身份登录。
停用FirewallD
要在CentOS 7系统上禁用FirewallD ,请按照以下步骤操作:
键入以下命令以停止FirewallD服务:
sudo systemctl stop firewalld禁用FirewallD服务在系统引导时自动启动:
sudo systemctl disable firewalld屏蔽FirewallD服务以防止其被其他服务启动:
sudo systemctl mask --now firewalld安装并启用Iptables
执行以下步骤在CentOS 7系统上安装iptables:
运行以下命令从CentOS信息库安装iptables-service软件包:
sudo yum install iptables-services安装软件包后,启动Iptables服务:
sudo systemctl start iptablessudo systemctl start iptables6
启用Iptables服务,使其在系统启动时自动启动:
sudo systemctl enable iptablessudo systemctl enable iptables6
通过以下方法检查iptables服务状态:
sudo systemctl status iptablessudo systemctl status iptables6
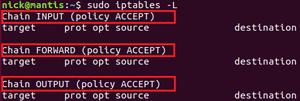
要检查当前的iptables规则,请使用以下命令:
sudo iptables -nvLsudo iptables6 -nvL
默认情况下,仅SSH端口22开了。输出应如下所示:
Chain INPUT (policy ACCEPT 0 packets, 0 bytes) pkts bytes target prot opt in out source destination
5400 6736K ACCEPT all -- * * 0.0.0.0/0 0.0.0.0/0 state RELATED,ESTABLISHED
0 0 ACCEPT icmp -- * * 0.0.0.0/0 0.0.0.0/0
2 148 ACCEPT all -- lo * 0.0.0.0/0 0.0.0.0/0
3 180 ACCEPT tcp -- * * 0.0.0.0/0 0.0.0.0/0 state NEW tcp dpt:22
0 0 REJECT all -- * * 0.0.0.0/0 0.0.0.0/0 reject-with icmp-host-prohibited
Chain FORWARD (policy ACCEPT 0 packets, 0 bytes)
pkts bytes target prot opt in out source destination
0 0 REJECT all -- * * 0.0.0.0/0 0.0.0.0/0 reject-with icmp-host-prohibited
Chain OUTPUT (policy ACCEPT 4298 packets, 295K bytes)
pkts bytes target prot opt in out source destination
至此,您已经成功启用了iptables服务,并且可以开始构建防火墙了。重新启动后,更改将继续存在。
结论
在本教程中,您学习了如何禁用FirewallD服务和安装iptables。
如果您有任何疑问或意见,请在下面发表评论。
以上是 如何在CentOS 7上安装iptables 的全部内容, 来源链接: utcz.com/z/507206.html