CentOS安装卸载memcache及JAVA示例
原文地址:http://www.cnblogs.com/zhongshengzhen/
先安装libevent,memcached依赖libevent的lib
[root@VM_64_81_centos download]# wget http://www.monkey.org/~provos/libevent-1.2.tar.gz
[root@VM_64_81_centos download]# tar zxvf libevent-1.2.tar.gz
[root@VM_64_81_centos download]# cd libevent-1.2
设置安装目录
[root@VM_64_81_centos libevent-1.2]# ./configure --prefix=/usr/
安装
[root@VM_64_81_centos libevent-1.2]# make && make install
测试是否安装成功
[root@VM_64_81_centos memcached-1.2.0]# ls -al /usr/lib | grep libevent
lrwxrwxrwx 1 root root 21 Jan 14 17:47 libevent-1.2.so.1 -> libevent-1.2.so.1.0.3
-rwxr-xr-x 1 root root 264056 Jan 14 17:47 libevent-1.2.so.1.0.3
-rw-r--r-- 1 root root 430396 Jan 14 17:47 libevent.a
-rwxr-xr-x 1 root root 814 Jan 14 17:47 libevent.la
lrwxrwxrwx 1 root root 21 Jan 14 17:47 libevent.so -> libevent-1.2.so.1.0.3
安装memcache
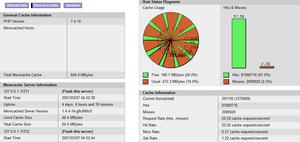
Memcache是一个hash表形式的缓存服务。用户缓存数据达到提供响应效率和处理高并发的情况。
[root@VM_64_81_centos download]# wget http://www.danga.com/memcached/dist/memcached-1.2.0.tar.gz
[root@VM_64_81_centos download]# tar zxvf memcached-1.2.0.tar.gz
[root@VM_64_81_centos download]#cd memcached-1.2.0
[root@VM_64_81_centos memcached-1.2.0]# ./configure -with-libevent=/usr
[root@VM_64_81_centos memcached-1.2.0]# make
[root@VM_64_81_centos memcached-1.2.0]# make install
测试是否安装成功
[root@VM_64_81_centos memcached-1.2.0]# ls -al /usr/local/bin/mem*
-rwxr-xr-x 1 root root 113188 Jan 14 17:51 /usr/local/bin/memcached
-rwxr-xr-x 1 root root 117535 Jan 14 17:51 /usr/local/bin/memcached-debug
启动memcached
[root@a ~]# /usr/local/bin/memcached -d -m 512 -u root -l 127.0.0.1 -p 11211 -c 256 -P /tmp/memcached.pid
root 用户名
512缓存大小512M
192.168.137.33 本机ip
11211分配的端口
256是连接数
SPRINGMVC配置memcached
#######################设置Memcached服务器参数#######################
#设置服务器地址
memcached.server=目标服务器ip:11211 #该端口号默认为11211
#容错
memcached.failOver=true
#设置初始连接数
memcached.initConn=20
#设置最小连接数
memcached.minConn=10
#设置最大连接数
memcached.maxConn=250
#设置连接池维护线程的睡眠时间
memcached.maintSleep=3000
#设置是否使用Nagle算法(Socket的参数),如果是true在写数据时不缓冲,立即发送出去
memcached.nagle=false
#设置socket的读取等待超时时间
memcached.socketTO=3000
#设置连接心跳监测开关
memcached.aliveCheck=true
卸载memcached
1.结束memcached进程
# killall memcached
2.删除memcached目录及文件
# rm -rf /usr/local/memcached
# rm -f /etc/rc.d/init.d/memcached
3.关闭memcached开机启动
# chkconfig memcached off
4.把memcached移出开机启动
# chkconfig --del memcached
错误说明:
1、[root@VM_64_81_centos memcached-1.2.0]# /usr/local/bin/memcached -d -m 512 -u root -l 127.0.0.1 -p 11211 -c 256 -P /tmp/memcached.pid
/usr/local/bin/memcached: error while loading shared libraries: libevent-1.2.so.1: cannot open shared object file: No such file or directory
解决:
原因是memcached在/usr/lib/找不到文件,因而设置一个软连接如下:
[root@VM_64_81_centos lib]# ln -s /usr/lib/libevent-1.2.so.1 /usr/lib64/
spring+java测试Memcache
spring配置:
<bean ><value>3000</value></property>
</bean>
JAVA代码:
@Component
public class SysCacheHelper {
@Autowired
@Qualifier("testCached")
private MemCachedClient cache;
public boolean setSysCache(int categoryId, TSysConfig sysConfig){
return cache.set(Constants.SYS_PREFIX + categoryId, sysConfig, LoginedCacheHelper.get3DayCalendarTime(Constants.SYS_CACHE_EXPIRED_DAY));
}
public TSysConfig getSysCache(int categoryId){
return (TSysConfig)cache.get(Constants.SYS_PREFIX + categoryId);
}
public boolean removeSysCache(int categoryId){
return cache.delete(Constants.SYS_PREFIX + categoryId);
}
}
可以调用方法查看memcached中的内容。
示例代码只是摘录重要片段。
以上是 CentOS安装卸载memcache及JAVA示例 的全部内容, 来源链接: utcz.com/z/391598.html