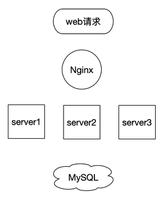
Python-搭建Nginx+Django环境

1.安装 flup 模块
下载:http://projects.unbit.it/downloads/uwsgi-latest.tar.gz
安装:python setup.py install
2.安装 django
去官网下载:https://www.djangoproject.com/download/
安装:python setup.py install
3.建立服务器与 FastCGI server 的链接
web 服务器可通过两种办法和 FastCGI server 连接:
1). Unix domain socket(或 win32 的“命名管道")
2). TCP socket
通常 TCP socket 更简单, 因为权限问题比较好配置
如何启动 FactCGI 服务器:
到项目目录中, 执行:
python manage.py runfcgi [options]
如果要看帮助:
python manage.py runfcgi help
在选项中, 需要指定一个 socket 或 (host 和 port 的组合), 这样的话, 当你启动 web server 时, 就可以通过这些信息来连接到 FactCGI 服务器
以下为两种启动方法的示例, 可以选择其中一种: 1).在 TCP 端口中运行一个线程内服务器:
python manage.py runfcgi method=threaded host=127.0.0.1 port=8051 daemonize=true minspare=10 maxspare=30
2).在 Unix domain socket 上运行一个 preforked 服务器(Windows不支持):
python manage.py runfcgi method=prefork socket=/tmp/django.sock daemonize=true maxrequests=1 minspare=10 maxspare=30 pidfile=/var/run/django.pid
# maxspare为初始化的进程/线程数, 也是最少个数
# minspare为最少空闲进程/线程数, 注意空闲二字
# maxchildren 进程/线程上限, 以每个py进程20~30M算, 自己算下服务器内存能创建最大进程数吧
# maxrequests 处理多少个请求后, 销毁进/线程, 防内存泄漏, 默认不销毁
# method = prefork|threaded 进程或线程跑你的程序, 默认进程。
PS: 如果不调试则 daemonize=false
PS: 第二种方法如果想停止后台的 FastCGI 进程, 执行 kill -9 `cat /var/run/django.pid`
4.修改nginx的配置文件:
server {
listen 8000;
server_name localhost;
access_log /usr/local/nginx/log.log main;
error_log /usr/local/nginx/error.log debug;
location / {
#如果上面是采用TCP的形式则
#fastcgi_pass 127.0.0.1:8051;
#如果上面是采用的unix sock的形式则
fastcgi_pass unix:/tmp/django.sock;
fastcgi_param PATH_INFO $fastcgi_script_name;
fastcgi_param REQUEST_METHOD $request_method;
fastcgi_param QUERY_STRING $query_string;
fastcgi_param CONTENT_TYPE $content_type;
fastcgi_param CONTENT_LENGTH $content_length;
fastcgi_param REMOTE_ADDR $remote_addr;
fastcgi_param SERVER_PROTOCOL $server_protocol;
fastcgi_param SERVER_PORT $server_port;
fastcgi_param SERVER_NAME $server_name;
fastcgi_pass_header Authorization;
fastcgi_intercept_errors off;
}
}
5.启动nginx服务器
1.检测nginx服务器配置
/usr/local/nginx/sbin/nginx -t
2.平滑重启
/usr/local/nginx/sbin/nginx -s reload
6.访问localhost:8000即可
7.如果出现502错误, 检查错误日志, 及/tmp/django.sock的访问权限
参考:
Django on Nginx https://wiki.freebsdchina.org/doc/n/nginx_django
django-admin.py和manage.py http://www.tuicool.com/articles/226ZZv
Python+Django+Nginx服务器环境的配置 https://wiki.freebsdchina.org/doc/n/nginx_django
如何用 FastCGI 运行 Django http://www.cnblogs.com/RChen/archive/2007/03/23/django_fcgi.html
linux下nginxpythonfastcgi部署总结django版 http://www.vimer.cn/2011/07/linux%E4%B8%8Bnginxpythonfastcgi%E9%83%A8%E7%BD%B2%E6%80%BB%E7%BB%93django%E7%89%88.html
Django 站点部署和管理常用命令 http://www.oschina.net/question/234345_54799
以上是 Python-搭建Nginx+Django环境 的全部内容, 来源链接: utcz.com/z/389259.html


